background image

RBR#0008818revB

27


.


.

RBR

quartz

3


Q with the external pressure adaptor installed

7  Repairs

RBR supports all our products. Contact us immediately at


support@rbr-global.com

 or

 via the


RBR website

 if there are 

any issues with your instrument. Please have the model and the serial number of the unit ready. Our support team will 

work to resolve the issue remotely. In some cases, you may have to return your instrument to RBR for further servicing.  

To return a product to RBR for an upgrade, repair, or calibration, please contact our 

support team

 to obtain a return 

merchandise authorisation code (RMA) and review the detailed shipping information on the


RBR website

There are no user-repairable parts of the instrument. Any attempt to repair without prior authorisation from 

RBR will void the warranty. Refer to the 

RBR warranty statement

.

8  Revision history

Revision No.

Release date

Notes

A

04-May-2020

Original

B

31-August-2021

Updated Specifications, Hardware, General maintenance, Pressure sensor 
maintenance, and Repair sections. Added information on external pressure 
adaptor kit. Removed the Warranty section (available on the RBR website) 

and Appendices. Minor updates throughout the document.

Summary of Contents for quartz3 Q

Page 1: ...rbr global com INSTRUMENT GUIDE Q...

Page 2: ...pport kit 14 4 2 Replacing the O ring 15 4 3 Replacing batteries 16 4 4 Replacing desiccant capsules 17 4 5 Cables and connectors 18 4 6 Cleaning the instrument 19 4 7 Calibrating the instrument 19 5...

Page 3: ...l changes over long deployments Flexible measurement schedules and burst sampling permit applications for tide wave and sea level measurements The RBRquartz3 Q has a large memory capacity sufficient p...

Page 4: ...end cap 572mm with connectorised end cap 504mm with right angle connectorised end cap Weight with batteries 2 3kg in air 0 25kg in water Temperature sensor Specification Description Range 5 to 35 C In...

Page 5: ...SB C power The USB C cable provides power sufficient for configuration or data download However the instrument requires an internal or external power supply to perform sampling Deployment estimates wi...

Page 6: ...end cap Twist the battery end cap counterclockwise Once fully unscrewed pull the end cap away from the housing For instruments with connectorised end caps unplug the umbilical cable Closing the instru...

Page 7: ...teps below to access the USB C port located inside the instrument body Remove the batteries Connect the computer to the instrument through the USB C port Start the Ruskin application Mini display port...

Page 8: ...rd end cap Connectorised end cap Right angle connectorised end cap MCBH connectors Only connectorised battery end caps have the external MCBH 6 MP connector Depending on your needs they may be wired t...

Page 9: ...rds as shown in the first image It is recommended to deploy the instrument vertically to match the way it was calibrated It is acceptable to deploy horizontally if necessary Recommended orientation se...

Page 10: ...ist activation in Ruskin the instrument starts to sample based on the twist on off position rather than a schedule To start sampling first click Enable in Ruskin to enable logging The status will then...

Page 11: ...0011088 USB MCIL 6FS to USB C For instruments with USB output Includes a power terminal block No extension cable available for USB 0009379 RS 232 MCIL 6FS to USB C For instruments with RS 232 output e...

Page 12: ...puter Name Notes RS 232 MCIL 6FS to MCIL 6MP Extension cable with RS 232 and power wiring Part No Length m 0005075 3 0004651 5 0004652 10 0005146 15 0004653 20 0005228 25 0004654 30 0005229 35 0004655...

Page 13: ...Rfermata Name Notes Cable MCIL 6FS to MCIL 6MP Interconnect cable with female locking sleeves Suitable for RS 232 power or other applications Part No Length m 0000295 0 6 0002611 2 0002209 3 0002265 5...

Page 14: ...port kit RBR support kit RBR provides one support kit per every three instruments ordered If you need more units contact RBR The RBR support kit contains an assortment of basic accessories and spare p...

Page 15: ...of the case between the threads and the open end The groove in the end cap where the O ring sits Refer to Opening and closing the instrument for details on accessing the O ring The O ring removal too...

Page 16: ...placing the batteries Remove the battery end cap Using both thumbs press down on the symbols on the battery cover and slide in the direction of the arrow Remove the eight old batteries from the batter...

Page 17: ...new ones available from RBR or refreshed Refreshing the desiccant To refresh the desiccant saturated silica beads must be removed from their capsule and heated to 120 C for about two hours Once cool r...

Page 18: ...e silicon compound provided with your instrument Apply the silicon compound to all female connectors before every mating Ensure each connector hole is filled with approximately 30 lubricant Lubricatin...

Page 19: ...aking in vinegar for more than 24 hours may damage the O ring and increase the chances of a leak 4 7 Calibrating the instrument Factory calibration coefficients are calculated for each sensor and the...

Page 20: ...retaining ring using the removal tool Hook the split in the ring at the opening and pull it out of the recess in the sensor end cap The upper mesh insulator disk nickel copper mesh and the lower mesh...

Page 21: ...ng up and pull any remaining oil out of the needle into the syringe 2 Remove the needle 3 Gently push the plunger to purge the air from the syringe 4 Install the stopper 5 Reverse the syringe so that...

Page 22: ...assembly by purging the assembly with buffer oil This method will consume more oil but it may be more effective in some situations Step Description 1 Prepare the instrument and the syringe Remove the...

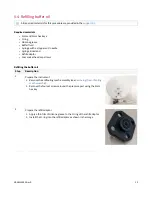
Page 23: ...r oil Step Description 1 Prepare the instrument Remove the antifouling mesh assembly see Removing the antifouling mesh assembly Remove the four set screws around the pressure port using the 3mm hex ke...

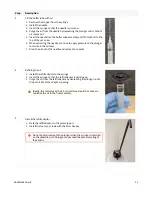
Page 24: ...il level Draw the oil out of the needle and remove the needle 4 Refilling the oil Install the refill adaptor to the syringe Invert the syringe so that the refill adaptor is pointing up Purge the air f...

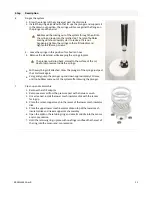
Page 25: ...move excess oil from the pressure port with a tissue or swab Once cleaned install the lower mesh insulator disk with the recess facing up Place the nickel copper mesh in the recess of the lower mesh i...

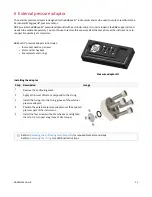
Page 26: ...e RBRquartz pressure adaptor kit includes four socket head cap screws 3mm and 5m hex keys five replacement O rings Pressure adaptor kit Installing the adaptor Step Description Image 1 Remove the antif...

Page 27: ...calibration please contact our support team to obtain a return merchandise authorisation code RMA and review the detailed shipping information on the RBR website There are no user repairable parts of...

Reviews: