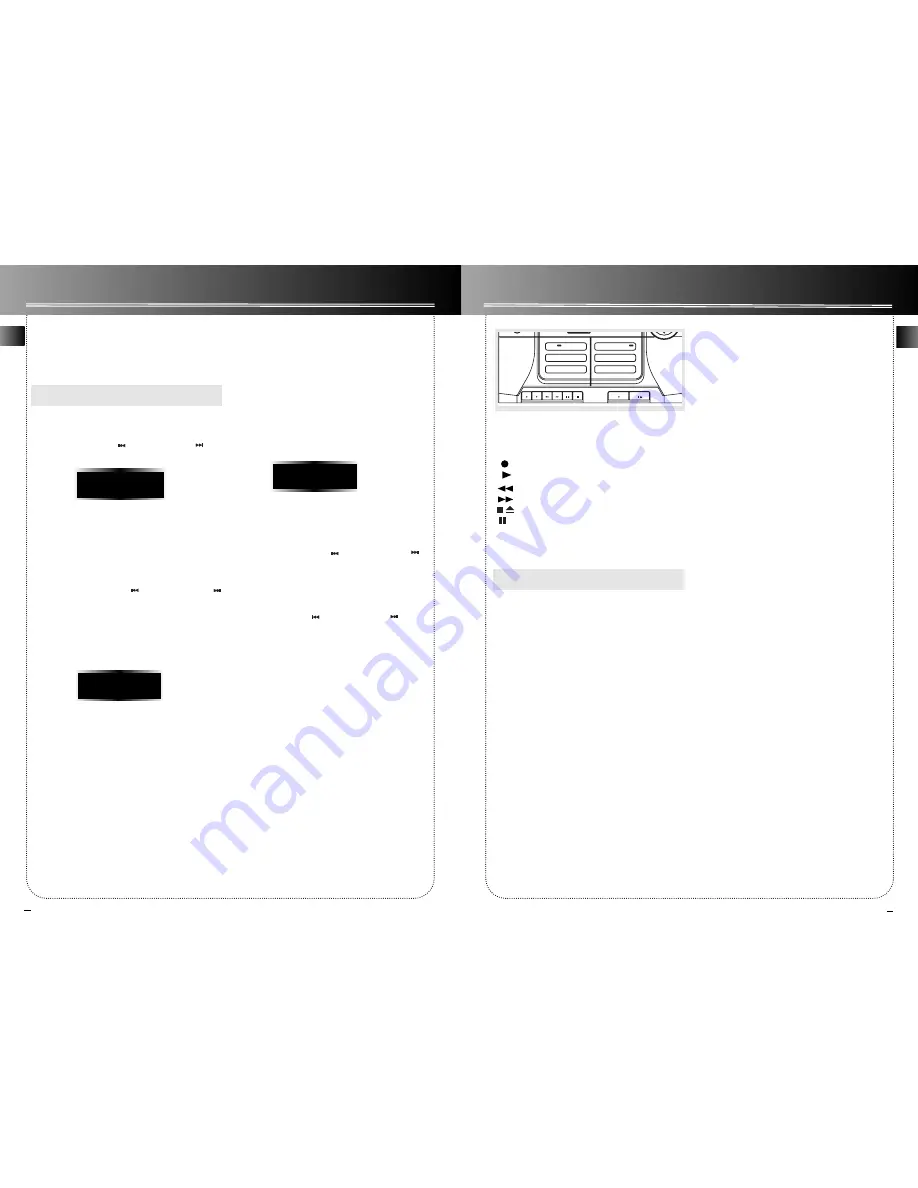
background image

9

EN

Tape Player

Tape Player

RECORD
PLAY
REWIND
FAST FORWARD
STOP/EJECT
PAUSE

Playing a Tape

Tip:

You can play a tape from either deck.

1. Press 

SOURCE

repeatedly to select 

TAPE

.

2. Press 

STOP/EJECT

to open the cassette door.

3.  Insert a tape into the door and push the  door 

closed.

4. Press 

REWIND/FAST FORWARD 

to position the 

tape to the desired starting position. (Deck 1 
Only)

5. Press 

PLAY 

to begin playback.

Continuous Play

1.  Insert a tape into deck 2 and start playback. 
2.  Insert a tape into deck 1 and press 

PLAY

and 

PAUSE

together.

3.  When the tape in deck 2 finishes playback, PAUSE 

at deck 1 will be released automatically and start 
playback.

Recording

From Tuner

1.  Insert a tape into deck 1.
2. Press 

SOURCE

repeatedly to select 

TUNER

and 

press 

BAND

to access the desired radio band.

3.  Tune to the station to be recorded.
4. Press 

RECORD

to begin recording.

5. Press 

STOP

to end recording.

From CD

1.  Insert a tape into deck 1.
2. Press 

SOURCE

repeatedly to select 

CD

.

3.  Insert the disc(s) to be recorded.
4.  Select the track, CD, or program to be recorded.
5. Press 

RECORD

to begin recording when CD 

begins to play.

6. Press 

STOP

to end recording.

Tape to Tape

1.  Insert the destination tape in deck 1.
2. Insert the source tape into deck 2.
3. Press 

PAUSE

and then 

RECORD

on deck 1.

4. Press 

PLAY

on deck 2. The playback and 

recording start simultaneously.

VOLU

ME CONT

RO

L

DECK

PLAYBACK/ RECORD

PLAYBACK

AUTOMATIC RECORD LEVEL • AUTO STOP MECHANISM

ONE TOUCH RECORDING

CONTINUOUS PLAY 2 > 1

TAPE DUBBING 2 > 1

AUTO PROG

DECK

1

2

BASS BOOST

CD DISPLAY

8

EN

Radio

Selecting Tuner Band

1. Press 

SOURCE 

to select 

TUNER

.

2. Press 

BAND 

to select between AM or FM radio 

band. 

Tip

: Your audio system has 32 preset stations.

Tuning to a Station

Press SKIP BACKWARD          / SKIP FORWARD           to
select frequencies.

Using Presets

The tuner can be in either TUNE or PRESET mode.
When in PRESET mode, the PROG light is on.
• Press 

TUNE•PRESET

to toggle TUNE and PRESET 

mode.  

•  Press  SKIP BACKWARD          or SKIP FORWARD

on the main system or 

PRESET UP

or

DOWN 

on 

the remote control to access the previous or next 
preset station. The display first shows the preset 
program number and after a few seconds, the  
frequency  will be displayed.  (FMPR:01 is FM 
preset 1)

Auto Preset Programming 

(FM only)

Press and hold 

BAND 

button for 2 seconds to scan

stations in FM band. The stations will then be stored
as preset channels. A maximum of 32 stations can be
stored. Beware of your preset channels being erased
accidentally because the scanning and storing process
is automatic upon pressing the button. You can stop
the automatic scan by pressing any button, but the
erased stations cannot be recovered.

Manually Setting Presets

1. Press 

TUNE•PRESET

button to enter TUNE mode.

2.   Press SKIP BACKWARD          / SKIP FORWARD              

to access the desired  frequency.

3. Press 

the 

PROG•SET

button once.

4.  The most recently accessed program location will    

be displayed.

5.  If a different program location is preferred, press 

SKIP BACKWARD         / SKIP FORWARD    
to move to the desired preset number (1-32).

6. Press 

PROG•SET

to store the selected frequency 

at that preset.

Suppressing Stereo Signal

Press 

FM ST. 

to toggle between FM mono and stereo

for stereo FM stations. (Remote Only)

AUTO

87.50 MH

z

PR:01

Summary of Contents for 004-000-00345-4

Page 1: ... read this instruction book prior to using your new product for the first time Es importante leer este manual antes de usar por vez primera su euipo u s e r m a n u a l VOLUME CONTROL DECK DIGITAL TUNING PRESET EQ PLAYBACK RECORD PLAYBACK AUTOMATIC RECORD LEVEL AUTO STOP MECHANISM ONE TOUCH RECORDING CONTINUOUS PLAY 2 1 TAPE DUBBING 2 1 REPEAT PROG SET SOURCE CLOCK TUNE PRESET TIMER BAND DIMMER DE...

Page 2: ...t branch circuits If these measures do not eliminate the interference please consult your dealer or an experienced radio tele vision technician for additional suggestions Also the Federal Communications Commission has prepared a helpful booklet How To Identify and Resolve Radio TV Interference Problems This booklet is available from the U S Government Printing Office Washington DC 20402 Please spe...

Page 3: ...if possible The higher the better You ll also need to connect the AM antenna loop to the back of the unit if you listen to AM stations Rotate the AM loop antenna for better reception Connecting the Speakers Match the red wire on the left speaker to red terminal for the left speaker L on the back of the unit and the black wire on the left speaker to the black terminal for left speaker L Follow the ...

Page 4: ...he batteries Lightly push it closed with a snap EN EN SOURCE DN PRESET UP CD TUNER TAPE AUX E Q B BOOST VOL VOL REV PREV FW D N EXT REPEAT ON DEMO DIMMER DISC SKIP FM ST SLEEP INTRO OPEN CLOSE STOP Battery Size AAA or UM 4 or R03 Display Showing Demonstration Not operational in CD mode Press DIMMER DEMO CD DISPLAY to turn on off demonstration mode The demonstration scrolls through all display oper...

Page 5: ...en the tray while a CD is playing 2 Load change discs for available trays by pressing DISC SKIP 3 Press OPEN CLOSE to close the tray Skipping a Disc Press DISC SKIP Searching Through a CD Press and hold SKIP BACKWARD SKIP FORWARD to search through a CD while it is playing Shuffling the Play Order Press SHUFFLE to turn on off the playing of tracks in random order Remote Only Sampling Tracks Press I...

Page 6: ...PROG DECK 1 2 BASS BOOST CD DISPLAY 8 EN Radio Selecting Tuner Band 1 Press SOURCE to select TUNER 2 Press BAND to select between AM or FM radio band Tip Your audio system has 32 preset stations Tuning to a Station Press SKIP BACKWARD SKIP FORWARD to select frequencies Using Presets The tuner can be in either TUNE or PRESET mode When in PRESET mode the PROG light is on Press TUNE PRESET to toggle ...

Page 7: ...g a soft dust cloth CD Player CAUTION This system operates with a laser It must be opened by only a qualified technician Tape Player To prevent deterioration of sound quality periodical ly open the door of each deck and clean the magnetic heads pinch roller and capstan with a cotton bud dipped in alcohol Also demagnetize the head by playing a demagnetizing cassette available through an audio equip...

Page 8: ...for which it is not intended is unlawful and there fore not condoned by Thomson multimedia Technical Specification Power supply 120V 60Hz Dimensions H x W x D inches Unit size 12 2 x 12 x 15 4 Main Speaker 12 2 x 8 5 x 7 Tape deck Response curve 125Hz 8kHz 5dB CD player Response curve 2dB 60Hz to 15 kHz Rating Plate Look for it at the back of the set The descriptions and characteristics given in t...

Page 9: ...Warranty Canada What your warranty covers Defects in materials or workmanship For how long after your purchase One year from date of purchase for labor and parts The warranty period for rental units begins with the first rental or 45 days from date of shipment to the rental firm whichever comes first What we will do Pay any Authorized RCA Audio Service Center the labor charges to repair your unit ...

Page 10: ...F THIS PRODUCT EXCEPT TO THE EXTENT PROHIBITED BY APPLICABLE PROVINCIAL LAW ANY IMPLIED WARRANTY OF MERCHANTABILITY OR FITNESS FOR A PARTICULAR PURPOSE ON THIS PRODUCT IS LIMITED TO THE APPLICABLE WARRANTY PERIOD SET FORTH ABOVE How Provincial Laws relates to warranty This warranty gives you specific legal rights which are in addition to statutory warranties that may vary from Province to Province...

Reviews: