background image

2

CAUTION:

THIS DIGITAL VIDEO PLAYER EMPLOYS A LASER SYSTEM.

TO ENSURE PROPER USE OF THIS PRODUCT, PLEASE READ THIS USER'S GUIDE CAREFULLY AND RETAIN FOR
FUTURE REFERENCE.  SHOULD THE UNIT REQUIRE MAINTENANCE, CONTACT AN AUTHORIZED SERVICE LOCA-
TION-SEE SERVICE PROCEDURE.

USE OF CONTROLS, ADJUSTMENTS OR THE PERFORMANCE OF PROCEDURES OTHER THAN THOSE SPECIFIED
HEREIN MAY RESULT IN HAZARDOUS RADIATION EXPOSURE.

TO  PREVENT DIRECT EXPOSURE TO LASER BEAM, DO NOT TRY TO OPEN THE ENCLOSURE.  VISIBLE LASER
RADIATION MAY BE PRESENT WHEN THE ENCLOSURE IS OPENED.  DO NOT STARE INTO BEAM.

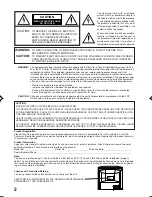
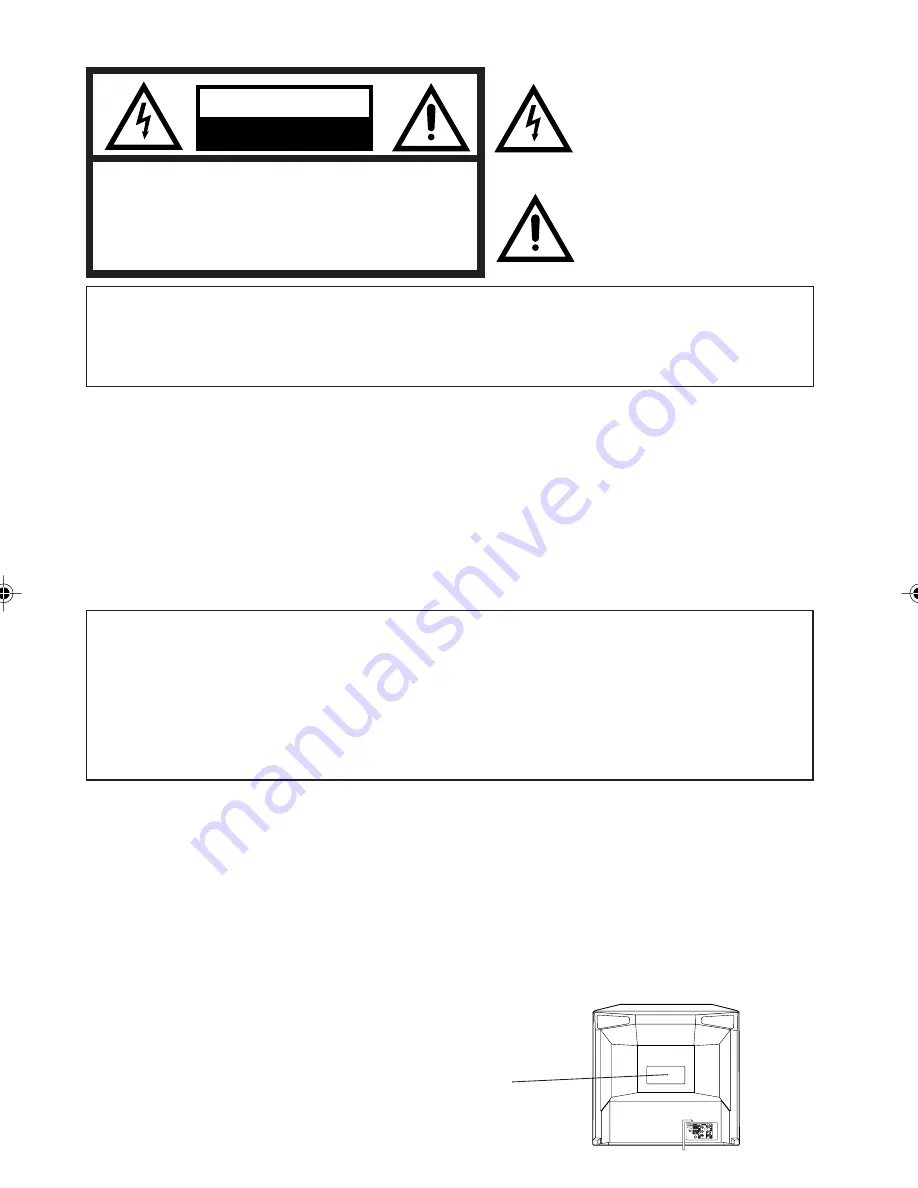
RISK OF ELECTRIC SHOCK

DO NOT OPEN

CAUTION

The lightning flash with arrowhead
symbol, within an equilateral triangle is
intended to alert the user to the presence
of uninsulated dangerous voltage within
the product's enclosure that may be of
sufficient magnitude to constitute a risk
of electric shock to persons.

The exclamation point within an equilateral
triangle is intended to alert the user to
the presence of important operating and
maintenance (servicing) instructions in
the literature accompanying the appliance.

CAUTION:

TO REDUCE THE RISK OF ELECTRIC
SHOCK, DO NOT REMOVE COVER (OR
BACK). NO USER-SERVICEABLE
PARTS INSIDE. REFER SERVICING TO
QUALIFIED SERVICE PERSONNEL.

WARNING:

This equipment has been tested and found to comply with the limits for a Class B digital device, pursuant to Part
15 of the FCC Rules. These limits are designed to provide reasonable protection against harmful interference in a
residential installation. This equipment generates, uses and can radiate radio frequency energy and, if not
installed and used in accordance with the instructions, may cause harmful interference to radio communications.
However, there is no guarantee that interference will not occur in a particular installation. If this equipment does
cause harmful interference to radio or television reception, which can be determined by turning the equipment
off and on, the user is encouraged to try to correct the interference by one or more of the following measures:

- Reorient or relocate the receiving antenna.
- Increase the separation between the equipment and receiver.
- Connect the equipment into an outlet on a circuit different from that to which the receiver is connected.
- Consult the dealer or an experienced radio/TV technician for help.

CAUTION:

Changes or modifications not expressly approved by the partly responsible for compliance with the FCC
Rules could void the user's authority to operate this equipment.

WARNING:

TO REDUCE THE RISK OF FIRE OR ELECTRIC SHOCK, DO NOT EXPOSE THIS
APPLIANCE TO RAIN OR MOISTURE.

CAUTION:

TO PREVENT ELECTRIC SHOCK DO NOT USE THIS POLARIZED PLUG WITH AN EXTENSION
CORD, RECEPTACLE OR OTHER OUTLET UNLESS THE BLADES CAN BE FULLY INSERTED
TO PREVENT BLADE EXPOSURE.

Product Registration

Please fill out the product registration card (packed separately) and return it immediately. For U.S. customers: Your RCA
Consumer Electronics product may also be registered at www.rca.com/productregistration. Registering this product allows us
to contact you if needed.

Product Information

Keep your sales receipt to obtain warranty parts and service and for proof of purchase. Attach it here and record the serial
and model numbers. These numbers are located on the product.
Model No. _________________________ Serial No. ___________________ Purchase Date: ______________________
Dealer/Address/Phone: ______________________________________________________________________________

Note:

This device is protected by U.S. patent numbers 4,631,603 and 4,577,216 and 4,819,098 and other intellectual property
rights. The use of Macrovision's copy protection technology in the device must be authorized by Macrovision and is intended
for home and other limited pay-per-view uses only, unless otherwise authorized in writing by Macrovision. Reverse engineer-
ing or disassembly is prohibited.

Location of the required Marking

The rating sheet and the safety caution are on the rear of the unit.

CERTIFICATION: COMPLIES WITH FDA RADIATION PERFORMANCE
STANDARDS, 21 CFR SUBCHAPTER J.

 5P70101B [E] (02-05)

10/19/04, 9:30 AM

2

Summary of Contents for 20F501TDV

Page 1: ...TV VCR DVD User s Guide Changing Entertainment Again ...

Page 2: ... off and on the user is encouraged to try to correct the interference by one or more of the following measures Reorient or relocate the receiving antenna Increase the separation between the equipment and receiver Connect the equipment into an outlet on a circuit different from that to which the receiver is connected Consult the dealer or an experienced radio TV technician for help CAUTION Changes ...

Page 3: ...ar or over a radiator or heat source This unit should not be placed in a built in installation such as a bookcase or rack unless proper ventilation is provided and or the manufacturer s instructions have been adhered to 10 POWER SOURCES This unit should be operated only from the type of power source indicated on the rating plate If you are not sure of the type of power supply to your home consult ...

Page 4: ... servicing to qualified service personnel 19 DAMAGE REQUIRING SERVICE Unplug this unit from the wall outlet and refer servicing to qualified service personnel under the following conditions a When the power supply cord or plug is damaged b If liquid has been spilled or objects have fallen into the unit c If the unit has been exposed to rain or water d If the unit does not operate normally by follo...

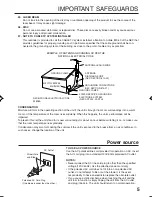
Page 5: ...0 of the NEC that provides guidelines for proper grounding and in particular specifies that the cable ground shall be con nected to the grounding system of the building as close to the point of cable entry as practical TO USE AC POWER SOURCE Use the AC polarized line cord provided for operation on AC Insert the AC cord plug into a standard 120V 60Hz polarized AC outlet NOTES Never connect the AC l...

Page 6: ...tart DVD Section Compatible with a wide range of DVD audio outputs Digital Audio Jack When a component with a built in Dolby Digital decoder is connected Dolby Digital sound can produce the effect of being in a movie theater or a concert hall Surround standard different from Dolby Digital This format is already in use in many theaters By connecting this unit to a DTS decoder or an AV amplifier wit...

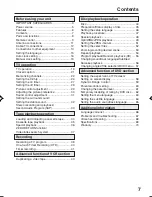
Page 7: ...ound Setting the stable sound 32 Stereo recording and playback Second Audio Program SAP 33 TV operation Disc 44 Preparation Status display of disc 45 Setting the setup language 46 Playback procedure 47 Special playback 48 mp3 WMA JPEG playback 49 Setting the JPEG interval 51 Setting the select files 52 Zooming Locating desired scene 53 Repeat playback 54 Program playback Random playback CD 55 Chan...

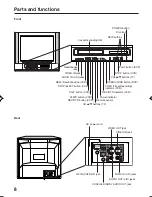
Page 8: ...CR STOP EJECT button VCR STOP button DVD PLAY button DVD OPEN CLOSE button DVD Disc tray SKIP buttons POWER button CH buttons TV Power indicator Remote sensor REC OTR indicator VCR T REC Timer Recording indicator VCR Cassette Loading Slot AUDIO IN L R jacks COAXIAL DIGITAL AUDIO OUT jack VIDEO IN jack AUDIO OUT L R jacks RF IN VHF UHF jack VIDEO OUT jack AC power cord ...

Page 9: ... REC Set the unit to start recording at a preset time 41 42 TV MONITOR Temporarily view a TV channel select on the VCR while in the playback mode 36 SLOW Slow motion playback 36 48 SLEEP Sleep timer 20 CLOSED CAPTION Switch between closed captioning options 21 AUDIO SELECT Switches sound between mono and stereo 33 Change sound track language of DVD 56 30 Sec ADV Skip the unwanted short material of...

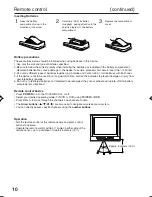
Page 10: ...stalling the batteries as indicated in the battery compartment Reversed batteries may cause damage to the device To avoid a potential short circuit insert the end first 3 Do not mix different types of batteries together e g Alkaline and Carbon zinc or old batteries with fresh ones 4 If the device is not to be used for a long period of time remove the batteries to prevent damage or injury from poss...

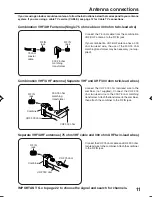
Page 11: ...nd 300 ohm UHF twin lead wires RF IN jack RF IN jack RF IN jack Combiner RF IN jack Combiner Connect the 75 ohm cable from the combination VHF UHF antenna to the RF IN jack If your combination VHF UHF antenna has a 300 ohm twin lead wire the use of the 300 75 ohm matching transformer may be necessary not sup plied Connect the UHF 300 ohm twin lead wire to the combiner not supplied Connect the VHF ...

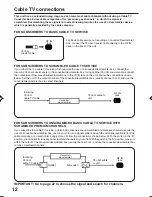
Page 12: ... SERVICE WITH SCRAMBLED PREMIUM CHANNELS Splitter B A Incoming 75 ohm cable TV cable A B switch 75 ohm cable to unit Incoming 75 ohm cable TV cable 75 ohm cable to unit Converter descrambler RF IN jack RF IN jack RF IN jack Converter descrambler This unit has an extended tuning range and can tune most cable channels without using a Cable TV Converter box Some cable companies offer premium pay chan...

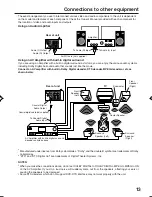
Page 13: ...put AUDIO cord not supplied Amplifier Rear of unit Audio R Output Audio L Output NOTES When you make the connections above do not set DOLBY DIGITAL to DOLBY DIGITAL MPEG to MPEG to ON on the AV Amplifier If you do a loud noise will suddenly come out from the speakers affecting your ears or causing the speakers to be damaged Some DTS decoders which do not support DVD DTS interface may not work prop...

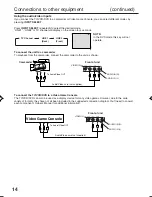
Page 14: ...VCR DVD to a Video Game Console The TV VCR DVD can also be used as a display device for many video games However due to the wide variety of formats they have not all been included in the suggested connection diagram You ll need to consult each component s Owner s Manual for additional information Front of unit Audio Video cord not supplied To Audio Video OUT VIDEO IN AUDIO IN L AUDIO IN R LINE 1 N...

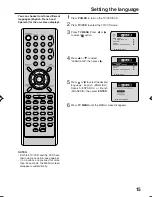
Page 15: ...e pressed for more than 60 seconds the MENU screen disappears automatically 1 Press POWER to turn on the TV VCR DVD 2 Press TV VCR to select the TV VCR mode 5 Press TV MENU Press or to select option Press or toselectthedesired language English ENGLISH Spanish ESPAÑOL or French FRANCAIS then press ENTER 3 4 Press or to select LANGUAGE then press 6 Press TV MENU until the MENU screen disappears CH E...

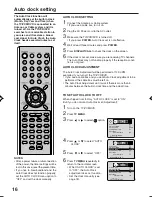
Page 16: ...ree minutes and press POWER 5 Press DISPLAY CALL to check the clock on the screen 6 If the clock is not set make sure you are receiving TV channels The Auto Clock may not function properly if the reception condi tion is not good The Auto Clock Adjustment will be performed at 12 00 PM everyday if you turn off the TV VCR DVD If you use a cable box and you want Auto Clock adjustment to be performed t...

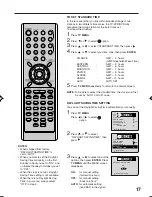
Page 17: ...me the clock must first be set by AUTO CLOCK once 1 Press TV MENU Press or to select option 2 Press or to select DAYLIGHT SAVING TIME then press 3 Press or to select one of the options then press ENTER Press TV MENU until the MENU screen disappears ON for manual setting forward one hour OFF for manual setting back one hour AUTO for automatic setting read XDS in the signal You can set the Daylight ...

Page 18: ...ction of the power the timer settings will be lost In this case reset the present time NOTE 1 Press TV MENU The TV VCR menu screen will appear 5 Set the day year and time as in step 4 then press ENTER 6 After setting the clock date and time starts functioning automatically To make corrections any time during the process Press repeatedly until the item you want to change blinks then press or EXAMPL...

Page 19: ...by pressing VOL or The volume level appears 1 2 3 4 Press the number buttons to select the channel Channels can be instantly selected by using two buttons for example to select channel 2 press 0 then 2 If you press only 2 channel selection will be delayed for a few sec onds For channels 10 and above press the 2 digits in order For example to select channel 36 press 36 You can also press 0 then the...

Page 20: ... SLEEP 120 110 10 0 After the sleep time is programmed the display will appear briefly every ten minutes to remind you that the sleep timer is operating To confirm the sleep timer setting press SLEEP and the remaining time will be displayed for a few seconds To cancel the sleep timer press SLEEP repeatedly until the display turns to 0 SLEEP 120 Channel number or VIDEO mode Stereo or SAP second aud...

Page 21: ...oadcasting with closed captions look in your TV guide for the closed captions symbol CC When selecting closed captions the captioning will be delayed approximately 10 seconds If no caption signal is received no captions will appear but the television will remain in the caption mode Misspellings or unusual characters may occasionally appear during closed captioning This is normal with closed captio...

Page 22: ...electing channels they must be programmed into the unit s memory In addition to normal VHF and UHF channels this TV VCR DVD can receive up to 113 Cable TV channels To use this TV VCR DVD with an antenna set the TV CABLE menu option to the TV mode When shipped from the factory this menu option is in the CABLE mode TV CABLE SELECTION Press or to select TV or CABLE Press TV MENU until the MENU screen...

Page 23: ...screen disappears 1 2 3 5 TO ADD DELETE CHANNELS Press or to select ADD or DELETE whichever function you want to perform 5 Select the desired channel to be memorized or deleted using the number buttons 0 9 or or 1 Press or to select ADD DELETE then press 3 Press TV MENU The TV VCR menu screen will appear 2 6 4 Press The TV will begin memorizing all the channels available in your area 4 Press or to...

Page 24: ... and hear violent scenes or pictures for adults etc The TV VCR DVD corresponds to TV RATING and MOVIE RATING To use the V Chip function you must register a password NOTES To avoid forgetting the password write it down and keep it in a safe place If you forget the password 1 Disconnect the AC cord plug from the AC outlet and leave the TV VCR DVD unplugged for more than two minutes 2 Insert the AC c...

Page 25: ...ears old and above 2 3 Press or to select desired rating then press ENTER OFF MOVIE RATING is not set G All ages PG Parental guidance PG 13 Parental guidance less than 13 years old R Under 17 years old Parental guidance suggested NC 17 17 years old and above X Adult only 4 Press TV MENU until the MENU screen disappears Press or to select V CHIP Press or to display ON Now your settings were set int...

Page 26: ... the PASSWORD Press or to select CHANGE PASSWORD then press Enter the new password using the number buttons 0 9 then press ENTER Enter the same password again to confirm then press ENTER Press TV MENU repeatedly to return to normal screen 1 2 3 5 6 7 8 CH Enter the Password using the number buttons 0 9 then press ENTER If you put a wrong number press CANCEL 4 Setting the V Chip continued ...

Page 27: ...nd daily or weekly timer date as in step 4 Press or to set the desired hour then press Press or to select ON TIMER then press Press or to select ON OFF TIMER then press NOTES The TV VCR DVD will automatically turn off approximately 1 hour later after the ON TIMER turns on if no OFF TIMER has been set To continue watching the TV press any button to cancel the one hour automatic shut off To cancel O...

Page 28: ...E Turning off the TV at 11 30 PM This feature allows you to have the TV VCR DVD turn off automatically at a predetermined time If you program the OFF TIMER once the TV VCR DVD will automatically turn off at the same time everyday Press TV MENU Press or to select option Press or to select OFF TIMER then press Press or to select ON OFF TIMER then press 1 2 3 4 5 Press or to set the desired minute th...

Page 29: ...reset levels NOTE The CONTRAST default setting is set to maximum at the factory Press or to select PICTURE then press 1 2 3 4 Press or to select the item you want to adjust Press or to adjust the setting 5 After your desired setting press TV MENU until the MENU screen disappears CH CH CH BRIGHTNESS CONTRAST COLOR TINT SHARPNESS increase brightness increase contrast brilliant color greenish color d...

Page 30: ...ct PICTURE PREFERENCE then press 1 2 3 4 Press or to select the item you want to adjust Press ENTER to adjust the setting 5 After your desired setting press TV MENU until the MENU screen disappears CH Mode Picture Quality STANDARD Standard picture quality factory set SPORTS Bright and dynamic picture factory set MOVIE Movie like picture setting factory set Your personal preferences set by you see ...

Page 31: ... sound level from both speakers Press or to select option Press TV VCR Press TV MENU the TV VCR menu screen will appear Press or to select AUDIO then press 1 2 3 4 Press or to select the item you want to adjust Press or to adjust the setting 5 After your desired setting press TV MENU until the MENU screen disappears CANCEL Pressing CANCEL while making sound adjustments will return all adjustments ...

Page 32: ... the surround sound mode Follow the above step 2 then press or to select OFF position Press TV MENU until the MENU screen disappears The stable sound feature limits the highest volume level to prevent extreme changes in volume when the signal source is changed Setting the stable sound Press TV MENU Press or to select option Press or to select AUDIO then press 1 2 Press or to select STABLE SOUND Th...

Page 33: ...position this button can be set to the MONO position if the stereo broadcast or videotape audio is of poor quality The R and L positions allow the audio from the Right or Left Hi Fi channel to be heard over both TV speakers This button has no effect when viewing a MONO video tape or TV program Each time when you press the button output selection display appears on the screen for several seconds Re...

Page 34: ...CT on the TV VCR DVD or the Re mote Remove the cassette tape Loading Push the center of the tape until it is automatically inserted Insert the cassette tape with its labeled side facing up and the erase prevention tab positioned at your left An inverted cassette tape cannot be inserted Erase prevention tab Automatic playback When loading a cassette tape without an erase prevention tab playback wil...

Page 35: ...o stop the tape winding press STOP To switch to playback directly without STOP press PLAY Forward Reverse picture search mode When the tape is being winded you can switch to picture search mode see next page To do this press REW or F FWD and hold it down The TV VCR DVD will resume the tape winding as soon as the button is released This TV VCR DVD selects the playback tape speed SP or SLP automatic...

Page 36: ...oises well during playback press TRACKING to eliminate the noises MANUAL TR will appear Press it briefly for a fine adjustment or press and hold for a coarse adjustment Manual tracking adjustment Repeat playback The entire video tape will be played until its end The tape will then automatically rewind to the beginning and the playback will be repeated 1 Press TV MENU Press or to select option 3 Pr...

Page 37: ... of any recording made on the VCR Recording an INDEX MARK The Index Search function automatically records an INDEX mark on the tape whenever a recording is initiated Index Search Press INDEX or during stop or play mode For Succeeding programs Press INDEX For Preceding programs Press INDEX Additional press increases the INDEX NO up to 9 When the INDEX or is pressed the TV VCR DVD starts searching t...

Page 38: ... during recording the TV and the DVD sections go off and the VCR continues to record Press STOP to halt the recording and turn off the VCR The TV VCR DVD channel cannot be changed during recording If you record the TV program after the DVD playback you must set the TV VCR DVD to TV VCR mode using TV VCR You can not record disc material in DVD Audio CD etc onto a video tape with this TV VCR DVD Pre...

Page 39: ...R DVD The TV VCR DVD will change to the STOP mode You can select a recording channel in the recording pause mode Auto Rewind feature This VCR will automatically rewind the tape when the tape has ended except during OTR and TIMER REC It will also eject the tape To display VCR operation status Press DISPLAY CALL The clock day of the week and more information will be indicated To cancel the display P...

Page 40: ... 5 NOTES If you wish to watch the DVD playback during the recording or the OTR press DVD to change to DVD mode and perform the DVD playback The channel cannot be changed during recording Example One touch Timer Recording for 30 minutes Press REC OTR Press the button again to stop recording after 30 minutes Each additional press of REC OTR will increase recording time as shown in the chart below up...

Page 41: ...to the normal screen press TV MENU 3 times 7 Press TIMER REC The T REC indicator will light and the VCR stands by for recording The timer recording will start at 5 seconds before the time you predetermined NOTES If the T REC indicator does not light in spite of the pressing of TIMER REC the cassette may not have been loaded yet see page 34 If the cassette is ejected in spite of the pressing of TIM...

Page 42: ... Wednesday One month later minus one day 8 00 11 00 9 00 10 00 Program 1 Prog 1 Deleted Parts Non Recorded Portion Parts Prog 2 Prog 3 Program 2 Program 3 Recording Control Settings NOTES If there are other timer record programs remaining TIMER REC must be pressed to reactivate the timer otherwise the remaining timer record programs will be ignored You can correct or cancel a programmed setting in...

Page 43: ... REC OTR on the recording unit then press PAUSE STILL 4 Press the PLAY button on the playback VCR or CAMCORDER then press the pause button 5 Release the recording pause and the playback still simultaneously to begin the duplicating process 6 For duplicating a previously recorded tape from a camcorder follow the camcorder manufacturer s instructions A typical camcorder dubbing hookup is shown above...

Page 44: ...ny sections Each section is called a CHAPTER Track An Audio CD can contain several items Each item is called a TRACK Removing Disc from Case Be sure to hold the edge of disc Do not touch the surface of the disc Pick up the disc gently from the case Do not scratch the disc Do not get dirt on the surface of the disc Do not stick a label or adhesive tape on the disc Do not drop or bend the disc Stori...

Page 45: ...polarized AC outlet If the AC cord plug is plugged in for the first time wait for about 5 seconds before pressing POWER NOTE When connecting to other equipment unplug the TV VCR DVD from the AC outlet Press POWER on the TV VCR DVD or on the remote con trol to turn on the TV VCR DVD The POWER indicator will light Every time you press POWER the TV DVD starts from TV mode When using an amplifier swit...

Page 46: ...NTER to select OSD Language 4 Press or ENTER and then press or to select desired language e g English then press ENTER 5 Press SETUP or RETURN to remove the MENU screen OSDLanguage English English Francais Espanol Enter Setup Return Language Picture Parental Other Sound OSD Language English Enter Setup Return Language Picture Parental Other Sound Enter Setup Return Language Picture Parental Other ...

Page 47: ...The disc tray closes automatically and TV VCR DVD turns off NOTES If a non compatible disc is loaded Incor rect Disc Region Code Error or Paren tal Error will appear on the TV screen ac cording to the type of loaded disc If these appear check your disc again see pages 44 and 60 Some discs may take a minute or so to start playback A Prohibition symbol may appear at the upper left of the screen This...

Page 48: ...To resume the still playback press PAUSE STILL Press SLOW during normal playback or still playback Each press of SLOW will change the speed of the slow x1 2 x1 4 x1 6 x1 7 Slow motion Playback To resume normal playback press PLAY Locating a chapter or track WARNING The TV VCR DVD is capable of holding a still video image or on screen display im age on your television screen indefinitely If you lea...

Page 49: ...ed back by selecting them from the file menu mp3 WMA JPEG CD Information This player can play back mp3 WMA JPEG files recorded on a CD R or CD RW mp3 is an audio file format which compresses recorded music It was developed by Fraunhofer Gesellschaft in collaboration with Thomson Inc The main advantage of the mp3 format is that it means CD quality music tracks can be stored on a personal computer W...

Page 50: ...file A file menu screen will appear on the TV screen Press to select folder Press or or the number buttons 0 9 to select the desired file When 1 1 1 1 1 PLAY has been pressed after displaying the file menu or when the disc tray has been closed after press ing 1 1 1 1 1 PLAY in step 2 playback begins automatically starting from the first file In this case if the first file is a JPEG file the first ...

Page 51: ...l You can continuously play back all JPEG files automatically Press SETUP in the stop mode Press to select Picture then press or ENTER Press or to select JPEG Interval Press ENTER or to select your desired time Off Plays back one file at a time 5 Seconds Displays images in the form of a slide show Every 5 seconds the image changes 10 Seconds Displays images in the form of a slide show Every 10 sec...

Page 52: ...Sound JPEG Interval Select Files Off Pictures Only 4 3 When playing back a CD containing a mixture of mp3 WMA and JPEG files only mp3 WMA or JPEG files can be displayed on the file menu PressSETUPinthestopmode Press to select Picture then press or ENTER Press or to select Select Files Press ENTER or to se lect your desired file type All Displays all files Music Only Displays only mp3 WMA files Pic...

Page 53: ...x 1 5 3 x 2 0 2 3 Zooming Use the title chapter and time recorded on the disc to locate the desired point to play back Press the number buttons 0 9 to input the number If you input a wrong number press CANCEL Refer to the package supplied with the disc to check the numbers 1 Press JUMP during play back 3 Locating Desired Scene Press ENTER 4 Playback starts When you change the title playback starts...

Page 54: ... back The start point is selected 2 Press REPEAT A B again The end point is selected Play back starts at the point that you selected Playback stops at the end point returns to Point A au tomatically then starts again A B Repeat Playback CD 2 Press or or ENTER once or twice to select Chapter or Title In case of CD at first press to select Repeat and then press or or ENTER once or twice to select Tr...

Page 55: ... the disc Program playback Play Mode Off Repeat Off Enter Play Mode Program Playback 02 31 08 29 Track 7 11 1 Press PLAY MODE during playback or stop mode Random playback Play Mode Off Repeat Off Enter Play Mode 2 Press or to select Play Mode then press or ENTER to select Random 3 Press PLAY Random Play will appear on the screen and Random Playback will start NOTES To cancel program play select Cl...

Page 56: ... the power off Some functions may not work on some DVDs You may not be able to turn sub titles on or off or change subtitles While playing the DVD the subtitle may change when you open or close the disc tray you change the title In some cases the subtitle language is not changed to the selected one imme diately The vocal output feature is used during playback of Dolby Digital multi chan nel record...

Page 57: ...en 2 Press or to select the desired title 3 Title selection Some DVDs allow you to select the disc contents using the menu When you play back these DVDs you can select the sub title language and sound track language etc using the DVD menu DVD menu NOTES Depending on the DVD you may not be able to change the angles even if multi angles are recorded on the DVD Depending on the DVD you may not be abl...

Page 58: ...ting the aspect ratio of TV screen You can select the aspect ratio of the picture 1 Press SETUP in the stop mode or No Disc Press or to select Picture 2 Press or ENTER then press or to select Display 3 Press or ENTER to select On or Off On On screen displays appear when you press the but tons factory setting Off On screen displays do not appear when you press any buttons except SETUP SEARCH MODE P...

Page 59: ...l DRC Dynamic Range Control ena bles you to control the dynamic range so as to achieve a suitable sound for your equipment NOTES This function works only during play back of Dolby Digital recorded discs The level of Dynamic Range Reduction may differ depending on DVD video disc Enter Setup Return Language Picture Parental Sound Other DRC On Enter Setup Return Language Picture Parental Sound Other ...

Page 60: ...rental control setting does not function Level 8 Virtually all DVD software can be played back Level 1 DVD software for adults cannot be played back Select from level 1 to level 8 The limitation will be more severe as the level number decreases Press to select Password Press the number buttons 0 9 to input a 4 digit password Be sure to remember this number If you input a wrong number press CANCEL ...

Page 61: ... Enter Setup Return Language Picture Parental Sound Other 0 9 Cancel Password Parental 3 Enter Setup Return 0 9 Cancel Language Picture Parental Sound Other Password Parental 3 Enter Setup Return 0 9 Cancel 1234 Language Picture Parental Sound Other Password Parental Enter Setup Return Language Picture Parental Sound Other 5 Password Parental 5 Enter Setup Return 0 9 Cancel Language Picture Parent...

Page 62: ...ows the Reading screen will change depending on which disc is played If you select YES withENTERkey Yourdiscexceedstheparentalcontrollevel1 e g screen will then appear 3 Enter the password with Direct Channel Selection 0 9 Then press ENTER 4 Playback will commence if the entered password was correct 5 NOTE This temporary cancellation of rating level will be kept until the disc is ejected When the ...

Page 63: ... the stop mode Press or to select Language Menu Subtitle Audio English Automatic English English Francais Espanol Other Enter Setup Return Language Picture Parental Sound Other Enter Setup Return Language Picture Parental Sound Other Menu Subtitle Audio Enter Setup Return Language Picture Parental Sound Other English Automatic English English Francais Espanol The selected language will be heard or...

Page 64: ...age then press ENTER 1 Press SETUP in the stop mode Press or to select Language 2 3 Press SETUP or RETURN to remove the MENU screen 4 NOTE If the selected language is not recorded on the disc the first priority language is selected The same subtitle language can always be selected even if you replace the disc or turn the power off Press or ENTER Then press or to select Subtitle The TV VCR DVD will...

Page 65: ...meaudiosoundtracklanguage can always be selected by your TV VCR DVDevenifyoureplacethedisc or turn the power off English Francais Espanol The language you have selected will play if it is recorded on the disc Other If you want to select another language enter the language code See the Language code list on page 66 Original The TV VCR DVD will select the first priority language of each disc Press o...

Page 66: ...Hindi 1819 Norwegian 2425 Thai 3018 Bihari 1218 Hungarian 1831 Oriya 2528 Tibetan 1225 Breton 1228 Icelandic 1929 Panjabi 2611 Tigrinya 3019 Bulgarian 1217 Indonesian 1924 Pashto Pushto 2629 Tonga 3025 Burmese 2335 Interlingua 1911 Persian 1611 Turkish 3028 Byelorussian 1215 Irish 1711 Polish 2622 Turkmen 3021 Cambodian 2123 Italian 1930 Portuguese 2630 Twi 3033 Catalan 1311 Japanese 2011 Quechua ...

Page 67: ...ected or possible local interference TV station experiencing problems Antenna CABLE connector is not connected or possible local interference Cable TV channel is scrambled CABLE connector is not connected TV CABLE Mode menu option is set to the TV mode Cable TV service interrupted TV CABLE Mode menu option is not set to the appropriate mode UHF antenna is not connected TV station experiencing prob...

Page 68: ...disc is dirty The parental lock function is set It is in the mode of repeat playback memory playback etc The function is prohibited with the TV VCR DVD or the disc Eject the disc and clean it Some times a small amount of picture distortion may appear This is not a malfunction Insert a disc Insert a playable disc Check the disc type and Region Number This is a Region 1 player Place the disc with th...

Page 69: ... ZZZ 86 94 86 94 95 99 A 5 A 1 100 125 100 125 01 5A VHF UHF In 75 ohm coaxial 1 13 16 46 mm x 3 7 8 99 mm 8 ohm x 2 1 5W 1 5W 4 Rotary Heads Hi Fi Sound 2 Tracks MONO Sound 1 Track 181 Channel Freq Synthesized VHF 2 13 UHF 14 69 CABLE 14 36 A W 37 59 AA WW 60 85 AAA ZZZ 86 94 86 94 95 99 A 5 A 1 100 125 100 125 01 5A Approx 1 minute and 48 seconds with T 120 Cassette Tape NTSC DVD 12 cm 8 cm CD 1...

Page 70: ...red by an Authorized RCA Television Service Center If not you must take your unit to the Service Center location at your own expense or pay for the cost the Service Center may charge to transport your unit to and from your home To identify your nearest Authorized RCA Service Center ask your dealer look in the Yellow Pages visit www rca com or call 1 800 336 1900 Proof of purchase in the form of a ...

Page 71: ...NG FROM THE USE OF THIS PRODUCT OR ARISING OUT OF ANY BREACH OF ANY EXPRESS OR IMPLIED WARRANTY ON THIS PRODUCT THIS DISCLAIMER OF WARRANTIES AND LIMITED WARRANTY ARE GOVERNED BY THE LAWS OF THE STATE OF INDIANA EX CEPT TO THE EXTENT PROHIBITED BY APPLICABLE LAW ANY IMPLIED WARRANTY OF MERCHANTABILITY OR FITNESS FOR A PARTICULAR PURPOSE ON THIS PRODUCT IS LIMITED TO THE APPLICABLE WARRANTY PERIOD ...

Page 72: ...any products to the Indianapolis address listed in this manual or on the carton This will only add delays in service for your product RCA and associated marks are trademarks of THOMSON S A used under license to TCL Thomson Electronics TTE 2004 TTE Technology Inc Printed in Thailand TOCOM 1637133B ...

Reviews: