background image

Summary of Contents for 27V550

Page 1: ...Television User s Guide Changing Entertainment TOCOM 161623 ...

Page 2: ... s authority to operate it Caution Using video games or any external accessory with fixed images for extended periods of time can cause them to be permanently imprinted on the picture tube or projection IV picture tubes ALSO some network program Iogos phone numbers etc may cause similar damage This damage is not covered by your warranty Cable IV Installer This reminder is provided to call your att...

Page 3: ...e the Initial Setup 8 Turn on the TV 8 Complete the Initial Setup 8 Complete Auto Channel Search 8 Chapter 2 Using the Remote Control Button Descriptions for TV Mode 9 Button Descriptions for DVD and VCR Modes 9 Using the INPUT Button 10 Programming the Remote to Operate Other Components 10 Find Out If You Need to Program the Remote 10 Programming the Remote 10 How to Use the Remote After You ve P...

Page 4: ...Ratings 20 V Chip Movie Rating Limit 20 V Chip Exempt Program Block 20 KidPass 21 V Chip Active 21 Front Panel Lock 21 Change Password 21 Chapter 4 Using the TV s Menu System Sound Menu 22 Picture Menu 22 Setup Menu 23 Parental Control Menu 24 Time Menu 24 Chapter 5 Other Information Troubleshooting 25 Care and Cleaning 27 Limited Warranty 27 2 ...

Page 5: ...e lV route all cables down the side of the back of the W instead of straight down the middle of the W If your antenna uses 3OO ohm twin lead cables do not coil the cables Also keep the twin lead cables away from audio video cables Important Stand and Base Safety Information Choose the location for your _ carefully Place the V on a stand or base that is of adequate size and strength to prevent the ...

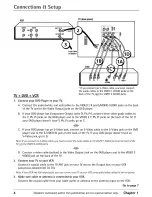
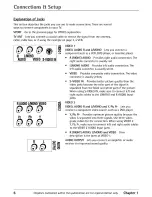
Page 6: ...n the DVD player and to the S VIDEO IN jack on the back of the TV If your DVD player doesn t have an S Video jack go to D Note If you connectan S Video cable you mustconnect the audiocablesto the VIDEO1AUDIOjacks on the beckof the P_ not the VIDEO 2 AUDIOjacks lOR D Connect a video eable yellow to the Video Output Jack on the DVD player and to the VIDEO 2 VIDEO jack on the back of the IV 2 Connect...

Page 7: ... to a DVD player Use a Component video to VPORT cable not provided to connect your IV to another component such as a DVD player that has Y Pb Pr jacks Connect the Component video to VPORT cable to the VPORT jack on the back of the IV Connect the other ends of the Component video to VPORTcable to the Y Pb Pr and the Audio Output Jacks on the back of the DVD OR 2 Connect your IV to an Xbox video gam...

Page 8: ...te video connection The video connector is usually yellow S VIDEO IN Providesbetter picture quality than the video jacks becausethe color part of the signal is separated from the black and white part of the picture When using S VIDEOIN make sure to connect left and right audio cablesto the L MONOand RAUDIO Input jacks VIDEO2 VIDEO AUDIO R and L MONO and Y Pb Pr Lets you connect a component video s...

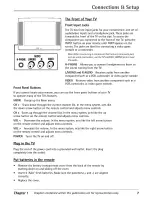
Page 9: ...can use the front panel buttons of your IV to operate many of the lV s features MENU Brings up the Main menu CH v Scans down through the current channel list In the menu system acts like the down arrow button on the remote control and adjusts menu controls CH Scans up through the channel list In the menu system acts like the up arrow button on the remote control and adjusts menu controls VOL Decre...

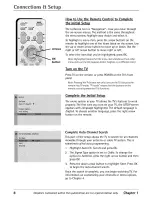
Page 10: ...de TVmode meansthat the buttons on the remote control operate the 1V sfunction Complete the Initial Setup The menu system in your 1V allows the IV s features to work properly The first time you turn on your IV the 5ETUPsereen appearswith Language highlighted The default language is English Tochoose another language pressthe right arrow button on the remote Complete Auto Channel Search This part of...

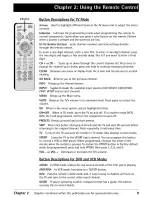
Page 11: ...s again to restore the volume OK When in the menu system selects highlighted items ONeOFF When in IV mode turns the IV on and off If in another mode VCR DVD etc and programmed will turn the component on and off PRESETS Brings upsound and picture presets SKIP Press once before changing channels and the W will wait 30 seconds before returning to the original channel Press repeatedly to add more time...

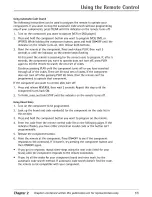
Page 12: ...T button REVERSE and PLAY buttons _ii i _ i _i_ii_ i _ i_ il i iiiil _ON OFF button STOP button You ll usethese buttons when programming the remote Programming the Remote to Operate Other The universal remote can be programmed to operate most brands of remote controllable components The remote is already programmed to operate most RCA GE and Prosean components Note The Vhutton con t beprogrommed o...

Page 13: ...emote can t be programmed to operate that component If the component you want to control does turn off 1 Press and release REVERSE then wait 2 seconds Repeat this step until the component turns back ON 2 To finish press and hold STOP until the indicator on the remote turns off Using Direct Entry 1 Turn on the component to be programmed 2 Look up the brand and code number s for the component on the...

Page 14: ...040 2041 2042 2044 2045 2046 Aiwa 2026 2047 2065 2113 2118 2117 2130 Akai 2003 2004 2O0S 2007 2008 2111 21t2 2113 Fisher 2011 2023 204a 2049 2050 20Sl 2052 2118 American High 2021 Fuji 2021 2119 Asha 2013 Funai 2026 Audio Dynamics 2009 2010 Oarrard 2026 Audi0vox 2014 0E 2000 2001 2013 Bell _ Howell 2011 2021 2022 2OS3 21IS 2120 2t31 Beaumark 2013 0oldstar 2009 2014 2018 20S4 B oksonic 2012 2025 0 ...

Page 15: ...2123 Portland 2016 2017 2019 2110 Ploscan 2000 2001 2131 Plotec 2061 Pulsar 2104 Quartel 2011 Quartz 2011 Quasar 2021 2022 2125 RCA 2000 2001 2003 2013 2021 2055 2056 2082 2083 2084 2085 2086 2087 2088 2089 2090 2091 2102 2116 2120 2126 2131 2133 Radioshack Reatistic 2011 2013 2014 2021 2022 2023 2026 2029 2049 2050 2R96 2132 Radix 2014 Randex 2014 Ricoh 2128 Runco 2104 Samsung 2005 2013 2015 2033...

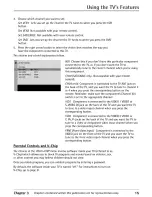
Page 16: ...channel Displays the current time Displays the current channel and label assigned to the channel Displayed when you mute the sound Why You Should Use the Auto Tunin9 Feature The auto tuning feature tunes the IV to the correct channel for different components you have connected to your IV like a VCR DVD player etc When you set up auto tuning in the menu system you don t have to remember to change y...

Page 17: ...ponent s Channel 3 4 switch is set to the appropriate channel VID1 Component is connected to the VIDEO 1 VIDEO or S VIDEO IN jack on the back of the IV and you want the IV to tune to a video input channel when you press the corresponding button VID2 Component is connected to the VIDEO 2 VIDEO or Y Pb Pr jacks on the back of the IV and you want the IV to tune to a video or component video input cha...

Page 18: ...sexual situations S or intense violence V TV PG Parental Guidance Suggested Contains material that parents may find unsuitable for younger children Many parents may want to watch it with their younger children The program contains one or more of the following content themes some suggestive dialogue D infrequent coarse language L some sexual situations S or moderate violence V TV G General Audience...

Page 19: ...ncourage children to imitate dangerous acts which they may see on television Any realistic depictions of violence will be infrequent discreet of low intensity and will show the consequences of the acts Other Content Guidelines There will be no profanity nudity or sexual content C Children Programming intended for children under age 8 Violence Guidelines Careful attention is paid to themes which co...

Page 20: ...its Note If you forget your password you canresetit M_kesurethe W isoff Simultaneously pressand hold VOL on the V sfront panel and CLEAR on the remote for approximately 5 seconds Enter e new passwordnext time youaccessthe PARENTAL CONTROL menu TheV Chip Rating Screen The following is an exampte of where items are located within the 1VRATING LIMIT screen Rating Status Field Lets you select whether ...

Page 21: ...e of the ratings back to View 1 Press the up or down arrow button to select the rating with a status of Block 2 Press OKto select View Blocking Specific Content Themes You can block programs based on their content Content is represented by the D L S V and FV on your screen When you block a content theme for a particular rating you automatically block that content theme for higher rated programs as...

Page 22: ... menu 2 Highlight English Ratings or FrenchRatings and press OK 3 Determine the rating you want to block 4 Press the down arrow button to scroll to the rating you want to change 5 Press the OK button to change its status to block the lock icon appears and all ratings above the one you selected change to leek V Chip Movie Rating Limit Set movie rating limits by blocking movies rated above a specifi...

Page 23: ... it shut off the passwordscreenappearsCenter the passwordusedfor V Chip V Chip Active Selecting this option lets you activate and deactivate parental control settings 1 Fromthe PARENTAL CONTROL menu pressthe up or down arrow to highlight V Chip active 2 Pressthe right or left arrow to turn on box hascheck mark or off box doesn t have check mark V Chip active If you do not activate V Chip none of t...

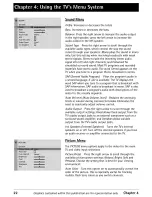
Page 24: ...m s audio with descriptions of the video for the visually impaired Auto Vol level Auto Volume Level Reducesthe annoying blasts in volume during commercial breaks Eliminates the need to constantly adjust volume control Audio Output Pressthe right arrow to scroll through the available output settings Fixedallows fixed output from the 1V saudio output jacks to an external component such as a surround...

Page 25: ...stores them in the V s channel list Go to page 8 for more information List _ Labels Edit the channels in the list or choose labels for each channel To delete a channel from the channel list highlight Channel and use the left or right arrow to select the channel Then highlight In listand press the OK button The box should no longer display a check mark To add a label to a channel select the channel...

Page 26: ...guage for the menus Parental Control Menu The Parental Control menu wasexplained in Chapter 3 Go to page 15for more information Time Menu Sleep Timer Lets you set the W to turn off after a given time Press the right arrow to add 15 minutes to the clock up to four hours Time ret Ch Choose a channel so the W sets the time for you Note that local channels usually broadcast the time Time Time is set i...

Page 27: ... in the PARENTALCONTROLmenu and press OK box won t have check mark Unplug the IV for two minutes and then plug it back in Turn the IV on and try again TV turns off unexpectedly Sleep timer may have been activated Go to page 24 for instructions KidPass may have been activated Go to page 21 for instructions Wake Up timer turned on the IV and no remote or front panel buttons were pressed for two hour...

Page 28: ...ode Pressthe IV button so the remote win operate the IV Maybe batteries in remote are weak dead or installed incorrectly Put new batteries in the remote Note if you remove the batteries you may have to reprogram the remote to operate other components You might need to drain the remote s microprocessor remove batteries and pressthe number 1 button for at least 60 seconds Release the 1 button replac...

Page 29: ... time can cause them to be permanently imprinted on the picture tube or projection IV picture tubes ALSO some network program logos phone numbers etc may cause similar damage This damage is not covered by your warranty Limited Warranty What your warranty covers Defects in material or workmanship For how long after your purchase _ 90 days from date of purchase for labor charges _ One year from date...

Page 30: ...ANTIES EXPRESSOR IMPLIED INCLUDING ALL IMPLIED WARRANTIES OF MERCHANTABILITY OR FITNESS FOR A PARTICULAR PURPOSE ARE HEREBY DISCLAIMED NO VERBAL OR WRITTEN INFORMATION GIVEN BY THOMSON INC ITS AGENTS OR EMPLOYEES SHALL CREATE A GUARANTY OR IN ANY WAY INCREASE THE SCOPE OF THIS WARRANTY REPAIR OR REPLACEMENT AS PROVIDED UNDER THIS WARRANTY IS THE EXCLUSIVE REMEDY OF THE CONSUMER THOMSON INC SHALL N...

Page 31: ...ge Protector Component Video Cables 6 ft Component Video Cables 12 ft Xbox to VPORTCable not shown Component Video to VPORTCable not shown Part No VH81 VH82 VH89 VH83 VH84 VH976 VH913 VH47 ANT200 260606 228449 SCW4OOOC DT6DC DT12DC GP641XB GP68OXB Pricesare subject to change without notice VH83 SCW40OOC HOW TO ORDER Price 3 95 4 95 5 95 5 95 9 95 7 95 14 95 3 95 49 95 24 99 4 45 49 95 24 95 34 95 ...

Page 32: ...an be determined by turning the equipment off and on the user is encouraged to try to correct the interference by one or more of the following measures Reorient or relocate the receiving antenna Increase the separation between the equipment and receiver Connect the equipment into an outlet on a circuit different from that to which the receiver is connected Consult the dealer or an experienced radi...

Reviews: