background image

Copyright © 2012 Discount Two-Way Radio Corporation - North American Distributor

43

BR850

TM

 Professional Two-Way Radio Instruction Manual

For Sales, Warranty and Customer Support please contact:

Discount Two-Way Radio Corporation – North American Distributor

1430 240th Street 

Harbor City, CA 90710

Phone: 310-224-5100 / Fax: 310-224-5101

www.discounttwo-wayradio.com

RCA COMMUNICATIONS SYSTEMS strives to achieve accuracy and completeness of this manual, 
but no warranty of accuracy or reliability is given. All the above specifications and design are subject 
to change without notice due to continuous development.
No  part  of  this  manual  may  be  copied,  reproduced,  translated,  stored  in  a  retrieval  system, 
distributed, or transmitted in any form or by any means, electronic or mechanical, for any purpose 
without the express written permission of RCA.

Summary of Contents for BR850U

Page 1: ......

Page 2: ...ons Cutting edge design professional grade materials and components simple operation and superior assembly quality RCA Communications Systems has it all including our exclusive no nonsense three year Warranty Protection Program one of the most comprehensive warranties in the communications industry To ensure you achieve maximum performance from your BR850TM radio please be sure to carefully read t...

Page 3: ...ry Charger 18 Antenna Information 19 Assembly and Disassembly 19 Attaching Removing the Battery 19 20 Attaching Removing the Antenna 20 Attaching Removing the Belt Clip 21 Attaching the Earpiece Speaker Mic 21 BasicOperations 22 Programmable Auxiliary Functions 22 Advanced Operations 23 Call 1 Call 2 23 Emergency 23 Lone Worker optional 23 Lone Worker Backup optional 24 Man Down optional 24 Man Do...

Page 4: ...ptional 29 Auto Contact Temporary Delete 30 Channel Lock optional 30 Time Out Timer TOT optional 30 Busy Channel Lockout optional 30 Battery Save optional 31 Low Battery Alert 31 Safety Check optional 31 CTCSS CDCSS 31 DTMF optional 32 2 Tone MDC1200 RDC2400TM optional 32 Signalling Logic 32 BOT ID and EOT ID PTT ID optional 33 Care and Cleaning 33 CONTENTS continued Troubleshooting 34 Optional Ac...

Page 5: ...or spare batteries must not be carried into a hazardous area Use only the intrinsically safe battery B850LI IS specified by RCA The use of other batteries is strictly prohibited and will result in failure of the Intrinsically Safe protection The battery must be charged in a non hazardous area with the designated charger CH850R1 IS or CH850R6 IS Use only RCA approved accessories Ensure that the rad...

Page 6: ...o to direct sunlight over a long time nor place it close to heating source When transmitting with a portable radio hold the radio in a vertical position with the microphone 3 to 4 centimeters away from your lips Keep antenna at least 2 5 centimeters away from your body when transmitting Please use the Intrinsically Safe BR850TM radio unit only with RCA dedicated Intrinsically Safe batteries and ac...

Page 7: ...fication standards When the equipment is given this rating it is considered safe to use in certain flammable or combustible atmospheres Flammable atmospheres have been categorized by Class Division and Group as described below I S Classes I II III Division 1 Groups CDEFG T3 Class Material I Gas Vapor Liquid II Dust III Fiber Flying Area Classification Division Description 1 An area where there is ...

Page 8: ...cetone benzol natural gas E Metal dust including aluminum mag nesium and their alloys F Carbon black coal or coke dust G Flour starch or grain dust Classification of Atmospheres Class Maximum Surface Temperature T1 842 F 450 C T2 572 F 300 C T2A 536 F 280 C T2B 500 F 260 C T2C 446 F 230 C T2D 419 F 215 C T3 392 F 200 C T3A 356 F 180 C T3B 329 F 165 C T3C 320 F 160 C T4 275 F 135 C T4A 248 F 120 C ...

Page 9: ...TM portable radio comes with the following items Item Qty PCS BR850 IS Handheld Radio 1 B850LI IS Li Ion Battery 1700 mAh 1 AN850U Antenna for UHF Models AN950V Antenna for VHF Models 1 BC850 Belt Clip 1 STR850 Handy Carry Strap prevents dropping the BR850TM 1 Instruction Manual 1 CH850R1 IS Desktop Rapid Charger 1 PS 50R Power Supply 1 B850LI IS Li Ion Battery 1700 mAh CH850R1 IS Desktop Rapid Ch...

Page 10: ...stributor 9 BR850TM Professional Two Way Radio Instruction Manual Note The frequency band of the BR850TM is marked on the radio label If it is not visible identify the frequency band according to the color circle on the antenna red indicates UHF and green indicates VHF ...

Page 11: ... Push to Talk key 2 SK1 Side Key 1 programmable 3 SK2 Side Key 2 programmable 4 Antenna 5 Microphone 6 Speaker 7 TK Top Key 8 Channel Selector Knob 9 Radio On Off Volume Control Knob 10 LED Indicator 11 Accessory Jack 12 Battery Latch 13 Belt Clip 14 Accessory Cover 15 Battery 16 Screw 17 Electrode Charging Piece BR850 1 2 3 4 5 6 7 8 9 10 11 12 13 14 15 16 17 ...

Page 12: ...y for definitions of long and short press Channel Selector Knob Turn the knob to select a desired channel TK TopKey Programmable function key Radio On Off Volume Control Knob Turn the knob clockwise to turn the radio on and turn the knob fully counter clockwise until it clicks to turn the radio off Turn the knob clockwise to increase the volume or counter clockwise to decrease the volume WARNING M...

Page 13: ...n the target radio on The LED flashes orange twice Source radio power on the target radio and connect the cloning cable and then press the PTT key of the source radio to initiate cloning 1 The LED solidly glows red during cloning 2 The LED goes out when cloning is finished Note The LED flashes red when cloning fails Target radio 1 The LED solidly glows green during cloning 2 The LED goes out when ...

Page 14: ...loning The LED flashes orange once Source radio turn on both the source radio and target radio while holding down the PTT and SK1 keys and then press the PTT key of the source radio while both radios are on the same channel to initiate cloning The LED solidly glows red during cloning Target radio 1 The LED solidly glows green during cloning 2 The LED flashes green and the radio sounds the beep ton...

Page 15: ...resents Scanning The LED flashes green once every 1 second Programming Reading the LED glows red Writing the LED glows green Encoding DTMF PTT ID 2 Tone MDC1200 RDC2400TM 1 The LED glows red while transmitting 2 The LED glows orange when transmission is over Decoding 2 Tone MDC1200 RDC2400TM The LED flashes orange after the signalling is successfully decoded Select Power Level 1W One beep is heard...

Page 16: ... three full charge discharge cycles If battery power runs low recharge the battery Batteries that are brand new or that have been stored for an extended period of time several weeks may require more time to fully charge Applicable Battery Packs To reduce the risk of injury use only batteries specified by RCA Communications Systems Caution 1 To avoid risk of personal injury do not dispose of batter...

Page 17: ...To Prolong Battery Life 1 Battery performance greatly decreases at temperatures below 4 F 20 C Having a spare battery is always necessary in extremely cold environments A cold battery may work again when it returns to room temperature so keep it for later use 2 Dust on the battery contact may cause the battery not to work or charge properly Use a clean dry cloth to wipe it before attaching the bat...

Page 18: ...ause your battery to malfunction and no longer accept a charge 2 Use only chargers specified by RCA Communications Systems When the charger s LED illuminates red it is an indication that the battery is being correctly charged When the LED illuminates green the battery charge is complete Status Charger LED Standby no load Red LED slowly flashes 0 2s on 3s off Battery is charging Red LED solidly glo...

Page 19: ...he AC outlet socket 3 Plug the DC connector of the adapter into the DC socket on the back of the charger 4 Place the radio with the battery attached or the battery alone in the charger 5 Make sure the battery is in well contact with the charging terminals The charging process initiates when the red LED lights 6 The greed LED lights about 3 hours later indicating the battery is fully charged Then r...

Page 20: ...tep 3 Hold the battery bottom and push the battery upward Align the two screws on the battery with the screw holes on the radio body and then tighten the screws see Fig 1 Fig 1 ASSEMBLY AND DISASSEMBLY Attaching the Battery Step 1 Insert the battery top into the aluminum chassis and make sure the battery top is positioned correctly see figure 1 Step 2 Press the battery to make it cling to the guid...

Page 21: ...from the battery and slide down the battery for 1 to 2 centimeters Then remove the battery from the radio unit see Fig 2 Fig 2 ATTACHING REMOVINGTHEANTENNA Attaching the Antenna 1 With the radio off insert the antenna into the big screw thread hole on top of the main unit 2 Turn the antenna clockwise until it is screwed down as shown see Fig 3 Removing the Antenna With the radio off remove the ant...

Page 22: ...downwards to attach it see Fig 4 Removing the Belt Clip Lift up the dome and slide the belt clip upwards to remove it see Fig 4 Fig 4 ATTACHING EARPIECE SPEAKER MIC Open don t remove the accessory cover and plug the audio accessory firmly into the accessory jack Then secure the screw using your hand or a coin Please loosen the screw prior to removing the audio accessory See Fig 5 Note Use of the a...

Page 23: ...ect a desired channel If the Channel Annunciation feature is enabled by your dealer your radio will automatically announce the channel the knob is set at 4 To transmit press and hold down the PTT key and speak into the microphone at your normal voice level Hold the radio about 2 5 to 5 centimeters away from your mouth 5 Release the PTT key to receive PROGRAMMABLE AUXILIARY FUNCTIONS Your dealer ma...

Page 24: ...ansmit Affirm ADVANCED OPERATIONS The following functions are not active by default but can be programmed by your dealer upon request Call1 Call2 optional Press the programmed Call1 Call2 key to transmit the stored DTMF code 2 Tone MDC1200 or RDC2400TM signalling Emergency optional Press the programmed Emergency key to transmit emergency alarm or send ENI Emergency Number Identity background tone ...

Page 25: ...fined emergency procedure will be activated The Lone Worker status will be memorized after the radio is powered off and on again Man Down optional Press the programmed function key to activate the Man Down mode in which horizontally or inversely positioning the radio will activate an alert tone A defined emergency procedure is activated if the radio is horizontally or inversely positioned for a ce...

Page 26: ...When audio signal is received on the channel audio will be heard Otherwise background noise will be heard Press the Squelch Off key to open noise squelch Press the key again to close it Squelch Off Momentary When audio signal is received on the channel audio will be heard Otherwise background noise will be heard Hold down the programmed key continuously to enter this mode and release the key to ex...

Page 27: ... can be deleted temporarily only 3 If the current Scan list contains only one or two channels Nuisance Channel Temporary Delete is not possible 4 Once the radio exits the Scan mode or is powered off and on again the temporarily deleted channel will appear in the Scan list again Nuisance Channel Delete When scanning pauses on an unwanted channel such as a nuisance channel press the programmed Nuisa...

Page 28: ...the Scrambler feature When the feature is activated any other party who is on your channel is prevented from listening to your conversation The Scrambler status will not be memorized once the radio is powered off and on again Scrambler Backup Press the programmed function key to activate the Scrambler Backup feature When the feature is activated any other party listening on your channel is prevent...

Page 29: ...every press of the function key low med high cycle and then save your change Whisper optional Press the programmed function key to activate the Whisper feature When the feature is activated you can speak quietly into the radio and still be heard clearly Press the key again to exit the feature The Whisper status will not be memorized once the radio is powered off and on again Whisper Backup optiona...

Page 30: ...p is heard the Channel Annunciation will be temporarily activated The current channel number will be heard when the radio is turned on again b If the current channel number is not heard Press the function key If two beeps are heard the Channel Annunciation will be temporarily canceled The current channel number will not be heard when the radio is turned on again If one beep is heard the Channel An...

Page 31: ...nels by limiting the maximum time of each transmission Once a continuous transmission exceeds the preset time programmable by your dealer the transmission will be automatically terminated and an alert tone will be heard Release the PTT key to cancel the alert tone Your dealer may program the alert tone sounds before the TOT timer nearly expires Busy Channel Lockout BCL optional When the BCL featur...

Page 32: ...o detects no activity on the channel and no operation is performed during standby time it will automatically enter Battery Save mode in 12 seconds Pressing any key or receiving a signal will cause the radio to restore to normal operation and exit from Battery Save Low Battery Alert optional For extra convenience the red LED flashes and the radio sounds three beeps every 30 seconds to alert the use...

Page 33: ... 2 Tone MDC1200 RDC2400TM signalling can be enabled disabled by your dealer If 2 Tone MDC1200 RDC2400TM signalling is set on the current channel press the programmed Call 1 Call 2 key to transmit 2 Tone MDC1200 RDC2400TM signalling The preset function will be performed when the radio receives an incoming signal with match 2 Tone MDC1200 RDC2400TM Radios set with match 2 Tone MDC1200 RDC2400TM can ...

Page 34: ...ct to a repeater or telephone system BOT ID sent upon each press of the PTT key EOT ID sent upon each release of the PTT key Both sent upon each press and release of the PTT key CARE AND CLEANING Do not directly handle the radio by its antenna or external microphone Do not place the radio in a dusty or dirty environment Clean the radio with a lint free cloth moistened with clean water and or a mil...

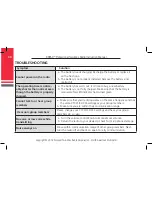
Page 35: ... fully charged Make sure that the battery is removed after LED indicator has turned green Cannot talk to or hear group members a Make sure that your radio operates on the same frequency and has the same CTCSS CDCSS settings as your group members b Make sure you are within their communication range Hear non group members Please change your CTCSS CDCSS settings and have your group members do so also...

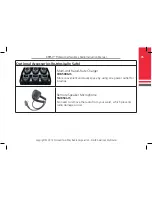
Page 36: ... Two Way Radio Instruction Manual Optional Accessories Intrinsically Safe Multi Unit Rapid Rate Charger CH850R6 IS More convenient and saves space by using one power outlet for 6 radios Remote Speaker Microphone SM850L IS No need to remove the radio from your waist which prevents radio damage or loss ...

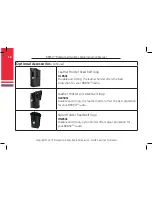
Page 37: ...er Holster fixed belt loop HL850L Durable and strong the leather holster offers the best protection for your BR850TM radio Leather Holster w swivel belt loop HL850SL Durable and strong the leather holster offers the best protection for your BR850TM radio Nylon Holster fixed belt loop HN850L Durable and strong nylon holster offers great protection for your BR850TM radio ...

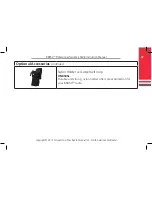
Page 38: ...oration North American Distributor 37 BR850TM Professional Two Way Radio Instruction Manual Optional Accessories continued Nylon Holster w swivel belt loop HN850SL Durable and strong nylon holster offers great protection for your BR850TM radio ...

Page 39: ......

Page 40: ...unmute its output audio Battery Save The function is to save battery power and prolong the operation time Once no activity or operations are occurring on the channel the radio will be on and off alternately Time out Timer TOT The time out timer feature stops someone from talking too long and tying up the channel Squelch The purpose of squelch is to mute audio output from the speaker when no signal...

Page 41: ...ts in material and workmanship under normal use and service for the time period listed below provided that the user has complied with the requirements stated herein The warranty period begins on the date of purchase from an Authorized RCA Communications Systems Sales and Service Outlet This warranty is offered to the original end user and is not assignable or transferable RCA Communications System...

Page 42: ...via standard ground shipping service RCA Communications Systems shall have no obligation to repair or replace the product if there is damage as a result of normal wear and tear or if the damage is caused in whole or in part by catastrophe fault or negligence of the user improper or unauthorized alterations or repairs to the product incorrect wiring use of the product in a manner for which it was n...

Page 43: ...is manual without authorization is prohibited In this manual we strive to achieve accuracy and completeness but provide no warranty of accuracy or reliability All the above specifications and design are subject to change without notice due to continuous development No part of this manual may be copied reproduced translated stored in a retrieval system distributed or transmitted in any form or by a...

Page 44: ...10 224 5101 www discounttwo wayradio com RCA COMMUNICATIONS SYSTEMS strives to achieve accuracy and completeness of this manual but no warranty of accuracy or reliability is given All the above specifications and design are subject to change without notice due to continuous development No part of this manual may be copied reproduced translated stored in a retrieval system distributed or transmitte...

Page 45: ...Copyright 2012 Discount Two Way Radio Corporation North American Distributor BR850TM Professional Two Way Radio Instruction Manual 44 NOTES ...

Page 46: ...sure compliance with established RF exposure limits http www fcc gov oet rfsafety rf faqs html http www osha gov SLTC radiofrequencyradiation index html Federal Communication Commission FCC Regulations The FCC rules require manufacturers to comply with the FCC RF energy exposure limits for portable two way radios before they can be marketed in the U S When two way radios are used as a consequence ...

Page 47: ...tion in front of the face with the microphone and other parts of the radio including the antenna at least one inch 2 5 centimeters away from the nose or lips Antenna should be kept away from the eye Keeping the radio at a proper distance is important since RF exposures decrease with increasing distance from the antenna Body Worn Operation When worn on the body always place the radio in a RCA Commu...

Reviews: