7
Copyright © 2020 RCA Communications Systems
www.RCACommunicationsSystems.com
Communications Systems
BRM350D Digital Mobile
Two-Way Radio
INSTRUCTION MANUAL
• Lone Worker On/Off
- Toggles Lone Worker feature On or Off, on per
channel basis.
• Manual Dial For Private
- Enables user to manually enter a radio ID for
a private call.
• Monitor On/Off
- Monitors a selected channel for activity.
• Nuisance Delete
- Temporarily removes an unwanted channel, except
the Selected Channel, from the scan list. The Selected Channel refers
to the user’s selected zone/channel combination from which scan is
initiated.
• One Touch Access
- Directly initiates a predefined Private or Group Call,
a Call Alert or a Quick Text message.
• Privacy On/Off
- Toggles emergency alarm or call on or off.
• Public Address
- Turns public address system on or off.
• Repeater/Talkaround
- Circumvents a repeater to talk directly to another
radio.
• RF Power Switch
- Toggles between low and hi power.
• Scan On/Off
- Toggles scan on or off.
• Squelch Level
- Toggles between tight, normal and open.
• Squelch Switch
- Toggles squelch on or off.
• Surveillance/Covert Mode
- Disables screen, buttons, and LED so the
radio remains dark when operational.
• Tight/Normal Squelch
- Toggles between tight and normal squelch
levels.
• Volume Up/Down
- Raises and lowers the volume.
• VOX On/Off
- Toggles Voice Activated Function (VOX) on or off.
• Zone Up/Down
- Switches between zones.
Accessing the Programmed Functions and Radio Menu
There are 2 ways to access various radio functions: Use a short/long press
on a programmable button OR use the menu options.
To access the menu -
• Press the Volume Knob [
VK
] - Accesses the menu and confirms menu
selection
• Up/Down [▲]/[▼] Buttons - Toggles through the menu options
• P4 Button [
P4
] - To go back one menu level, or return to the previous
screen
Note:
Your radio will exit the menu after a period of inactivity and returns
to Main Menu.
Keypad/Mic (Optional MM301HDK)
The optional keypad microphone also enables you to access radio features. You
can also use the keypad to enter subscriber numbers or IDs, and text messages.
Note:
Some characters require that you press a button multiple times. The
table shows the number of times a button needs to be pressed to generate
the required character.
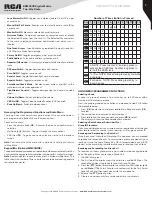
Key 1 2 3 4 5 6 7 8 9 10 11 12 13
1
,.?
1 .
, ? ! @ & ‘ % -
:
* #
2
abc
A B C 2
3
def
D E F 3
4
ghi
G H I 4
5
jkl
J K L 5
6
mno
M N O 6
7
pqrs
P Q R S 7
8
tuv
T U V 8
9
wxyz
W X Y Z 9
0
CAPS
0 NOTE: Press to enter “0” and long press to
activate the CAPS lock. Another long press to
turn off the CAPS lock.
*
DEL
* or Del
NOTE:
Press during text entry to delete
a character.
#
˽
# or Space
NOTE:
Press during text entry to
insert a space.
Number of Times Button is Pressed
USING MENU/PROGRAMMED FUNCTIONS
Selecting a Zone
A zone is a group of channels. Your radio has up to 250 zones with a
maximum of 16 channels per zone.
Press the pre-programmed zone button and proceed to step 2 OR follow
the procedure below.
1. Press [
VK
] to enter menu, and press ▲/▼ to find a Zone and press [
VK
]
to select.
2. The current zone Is displayed an indicated by a
√
3. Press ▲/▼ to find the zone you want and press [
VK
]
to select.
4. The display will show the Zone selected for a moment.
Selecting a Radio Channel, Subscriber ID, or
Group ID Procedure:
If you have multiple zones in your radio, once the required zone Is displayed,
press ▲/▼ to select the channel, subscriber alias or ID, or group alias or ID.
Receiving and Responding to a Radio Call
Once the channel, subscriber ID or group ID is displayed, you can proceed
to receive and respond to calls. To unscramble a privacy-enabled call, your
radio must have the same Privacy Key, OR ID (programmed by your RCA
dealer), as the transmitting radio (the radio you are receiving the call from).
Receiving and Responding to a Group Call
To receive a call from a group of users, your radio must be configured to be
part of the group. When you receive a Group Call:
1. The LED blinks green.
2. The first line of the display shows the caller alias, and the RSSI icon. The
second line displays the group alias and the Group Call icon.
3. Press the [
PTT
] button to respond to the call and the LED indicator lights
up red.
Note:
If Talk Permit Function is enabled, wait for the Talk Permit
Tone to finish and then speak clearly into the microphone.
4. Release the [
PTT
] button to listen.
5. If there is no voice activity for a set period of time, the call ends.


