Graphics contained within this publication are for representation only.
30
Chapter 3: Recording, Playback & Features
Watching TV
Turn on the DVD recorder to watch TV
1.
Turn on the TV, and tune the TV to the correct Video Input Channel (this channel corresponds to the input jacks on your TV that you used to connect the DVD recorder
to the TV).
2.
Turn on the DVD recorder (the DVD recorder’s main menu appears).
3.
Since the
Watch TV
menu is already highlighted, just press the OK button on the remote (the DVD recorder tunes to the last station you watched and a channel banner
appears). To see the channel banner after it disappears from the screen, press INFO on the remote control.
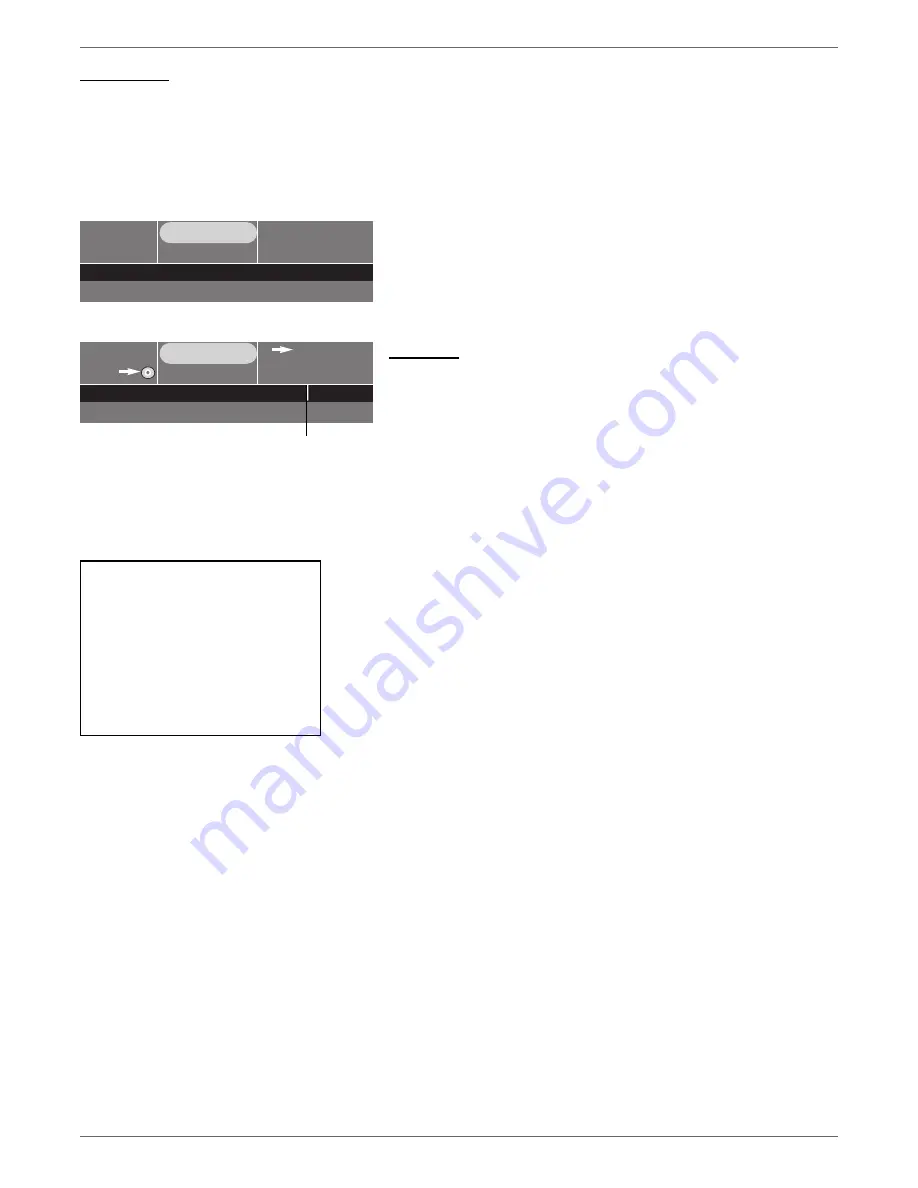
The Channel Banner
While watching TV, press INFO on the remote control to see the channel banner. The information that
appears in the channel banner depends upon the information sent from the broadcaster. For example,
the rating, the program name, and the time the program ends are not always sent by the broadcaster.
02:15 pm
Ch 9
Favorite Show
3:00
Audio: Stereo. (>)
TV-PG
00:01:08
•
REC
Ch 9
• 0h 30min
00h:54min available
Audio: Stereo. (>)
TV-PG
*1
Channel Banner
Space available on disc
Recording Banner
Note: When you stop recording, the DVD recorder takes several
seconds to save information to the disc. A still frame of the recording
may appear on the screen before you are returned to TV viewing.
Recording
After you load a DVD+R or DVD+RW disc into the DVD recorder’s disc tray, there are several ways
to record programming. When you insert a blank DVD+R or DVD+RW disc, the DVD recorder will
need to format the disc so you may need to wait several seconds. The quickest way to start recording
is to press the RECORD button while you’re watching a show (the recording banner appears). You
don’t even need to remember to press the stop button if you use the Express Recording feature in the
recording banner (see next section).
DISCS THAT YOU CAN USE FOR RECORDING
DVD+R 2.4x, 4x, 8x, and 16x ONLY; These are write-once discs and can’t be erased.
DVD+RW 2.4x and 4x ONLY.
These are rewritable discs which can be erased and
reused for recording.
Notes:
This recorder is not compatible with DVD-R or DVD-RW discs for recording. Please make sure to
purchase discs with the plus “+” symbol on the package. Also, it is NOT possible to record on
CD-R or CD-RW discs.
IMPORTANT: It is NOT possible to record content that is copy-protected. This is usually true for
most pre-recorded DVD discs and many pre-recorded VHS tapes.
Notes:
The fi rst time you load a DVD+R or DVD+RW disc, the DVD recorder will format it. This should
only take a few seconds.
Remember, if you’re using a DVD+R disc you must fi nalize it if you want to play the disc in
another DVD player (page 35). The DVD recorder automatically asks you if you want to fi nalize a
disc when it is fi nished recording.
Express Recording
When you press the RECORD button on the remote or on the front of the DVD recorder, the
Express Recording screen appears. Here you can choose the duration of the recording, and the
quality. For the duration, each time you press RECORD or the right arrow button, the recording time
increases by 30 minutes, up to the maximum limit. The DVD recorder will record for the amount
of time you specifi ed and then stop automatically. At anytime during the recording, you can bring up
the Express Recording screen by pressing RECORD again and then extending the recording time . To
cancel the recording, highlight and select
Cancel
in the Express Recording screen.
IMPORTANT:
When you record to a DVD+R disc, you must
fi nalize it before you can play it in another DVD
player. The DVD recorder automatically asks you
if you want to fi nalize a disc when it is fi nished
recording.
If you need to fi nalize a disc
later
,
select the
Disc
menu from main menu, then
Disc Actions
, and fi nally
select
Finalize Disc
and press OK. Once the disc is
fi nalized you won’t be able to change the name of
the disc or the name of the titles on the disc.
Summary of Contents for DRC8060N
Page 64: ...This page intentionally left blank ...
Page 65: ...This page intentionally left blank ...
Page 66: ...This page intentionally left blank ...
Page 67: ......


