5
EN
Connections
A. Connecting a TV
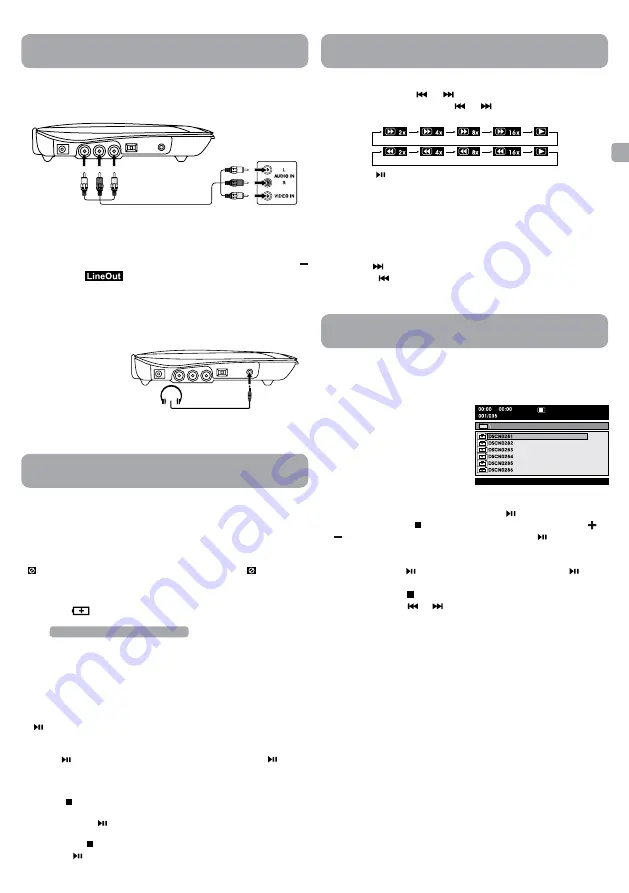
If your TV has audio/video inputs, you can connect the unit to your TV
using standard Audio/Video cables.
To AUDIO /
VIDEO OUT
jacks
Audio / Video cable
(not included)
TV
White Red Yellow
W
hit
e
Red Y
ello
w
This owner’s manual explains the basic instructions for operating
this unit. Some DVDs are produced in a manner that allows specific
or limited operation during playback. Therefore, this unit may not
respond to all operating commands. THIS IS NOT A DEFECT. Please
refer to the instructions accompanying the specific DVD in question
for more information about the options available on that DVD.
“ ” may appear on the screen during operation. A “ ” means the
desired operation is not permitted by the unit or disc.
Playing a Disc
1. Slide the
/ STANDBY / ON
switch on the left side of the unit to
the ON position.
See Customizing the function settings before proceeding to step 2.
2. use your fingers to hold the disc door on the front of the unit and
lift it up to open.
3. Hold the disc by its sides and carefully place it onto the spindle with
the label side facing up, pushing gently until you hear a “click”.
4. Close the disc door. It takes a short while for your unit to load the
disc. After loading, the unit will automatically bring you to the main
menu of the DVD or start playing the DVD.
5. If the unit does not automatically start playing the DVD, press the
button on the unit.
Pausing Playback (Still Mode)
Press the button. To resume normal playback, press the button
again.
Stopping Playback
Press the button at the location where you want to interrupt
playback. To resume playback at the position where the disc was
stopped, press the button.
If you press the button twice, the unit’s memory will be cleared and
pressing the button will reset the DVD to the beginning.
Playing a Disc (Basic Playback)
Playing a Disc (Basic Playback)
Caution:
Avoid listening to sound
at levels which may be
harmful to your ears.
Headphones/Earphones
(3.5mm diameter plug)
(not included)
Watching a DVD on your TV
1. Turn on the unit.
2. Turn on the TV and follow the instructions included with it to watch
video from external sources.
3. To mute the unit and listen the sound from TV only, please press
button until
appear on the screen.
B. using Headphones/Earphones
•
Turn down the volume before connecting, and then adjust the level.
•
When headphones/earphones are connected, no sound will be
emitted from the unit’s speaker.
Fast Forward / Fast Reverse
1. Press and hold the
or
button when a disc is playing. Each
time you press and hold the
or
button, the playback speed
changes in the following sequence:
2. Press the button twice when you reach the desired point to
resume normal playback.
Notes:
• The DVD player mutes sound and subtitles during reverse and
forward scan of DVDs.
• The fast playback speed may differ depending on the disc.
Skip (Forward / Reverse)
• Press the
button to advance titles, chapters/tracks.
• Press the
button to go back to current or previous titles,
chapters/tracks.
This unit can play JPEG files recorded on a CD-R or CD-ROM disc (CD-RW
is not recommended).
Viewing JPEG Files
1. use your fingers to hold the disc
door on the front of the unit and
lift it up to open.
2. Hold a JPEG file disc by its edges
and gently push it onto the
spindle with the label side facing
up until you hear a “click”.
3. Close the disc door. The JPEG
files on the disc will be displayed one by one automatically. If the
disc does not play automatically, press the button.
4. Press the
MENU
or button to display a folder list. Press the or
button to highlight a JPEG file to play. Press the button to start
playback.
Notes:
• You can press the
button to freeze the picture. Press the button
again to resume picture slide show.
• You can press the
button to quit playback.
• You can press the
or
button to change the picture.
• Some discs may not permit this operation.
Viewing JPEG Files


