14
15
Expansion Installation (IP125 only)
1. Press MENU or OK button
[
Function Settings
[
Expansion Installation,
2. The phone will direct you to press one of the lit blue LCD buttons on the EM32
between 1 and 6. Pressing a key will cause it to flash red. Then press the OK but-
ton on the IP125.
Expansion Settings (IP125 only)
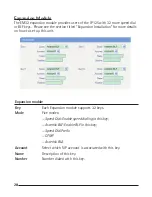
Mode – This determines the function of the programmable key. You can choose
Asterisk BLF, Speed Dial Prefix, BLA or DTMF.
Speed Dial – This sets the programmable key as a one touch dial key for the phone
number entered.
Asterisk BLF – If you are using an Asterisk based service provider or PBX this func-
tion will set the programmable key as a quick dial key and a status indicator. You
will be able to see if users on the same system as you are Online, Busy or have an
incoming call.
Speed Dial Prefix – This will pre-dial any numbers you might need before dialing
the phone number you wish. This is helpful if your system requires a code to ac-
cess an outside line, for example.
BLA – Bridged Line Appearance will allow two separate phones on the same
system access to the same VoIP line. Please see your service provider or systems
administrator for instructions on how to set up this feature.
DTMF – This function will input the desired numbers as DTMF tones. This is help-
ful if you wish to have a voicemail password or other automated code set as a
one touch dial.
NOTE: Functions like BLF and BLA only work properly when using two accounts on
the same VoIP service provider or PBX. Please see your service provider or systems
administrator for more information.
Account – Choose which SIP account you wish associate with this programmable key.
Number – Using the dial pad, enter phone number or code with which to associ-
ate this programmable key.
Name – Using the alphanumeric dial pad, select a name for this programmable key.
Summary of Contents for IP115
Page 1: ...IP115 125 IP Phone ...
Page 64: ...01 13 10 send will ...


