background image

8

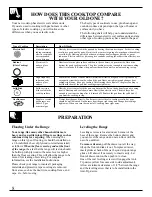
HOW DOES THIS COOKTOP COMPARE 

WITH YOUR OLD ONE?

Your new cooktop has electric coil surface units. 
If you are used to cooking with gas burners or other
types of electric cooktops, you will notice some
differences when you use electric coils.

The best types of cookware to use, plus heat-up and
cool-down times, depend upon the type of burner or
surface unit you have.

The following chart will help you to understand the
differences between electric coil surface units and any
other type of cooktop you may have used in the past.

Type of Cooktop

Description

How It Works

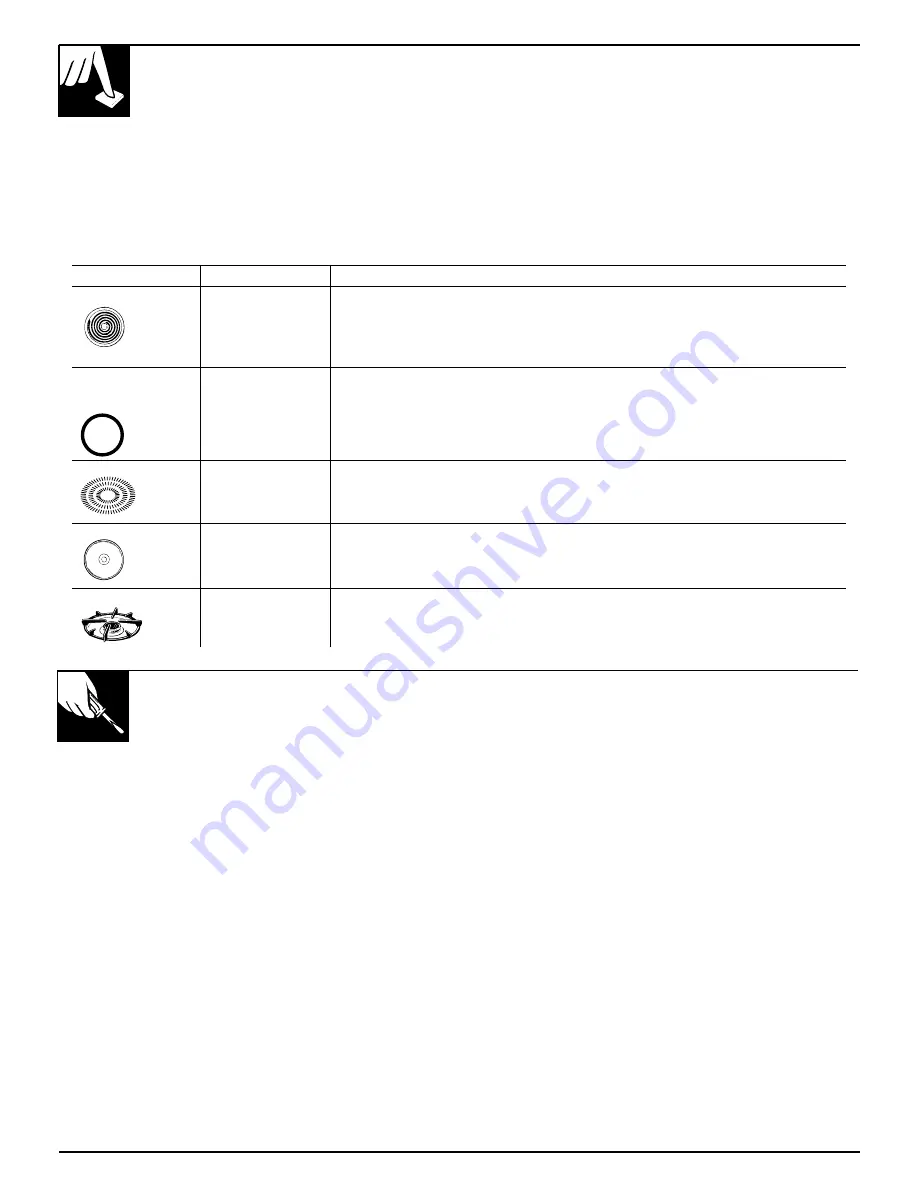
Electric Coil 

Flattened metal

Heats by direct contact with the pan and by heating the air under the pan. For best cooking 

tubing containing 

results, use good quality pans. Electric coils are more forgiving of warped pans than radiant 

electric resistance 

or solid disks. Heats up quickly but does not change heat settings as quickly as gas or 

wire suspended

induction. Electric coils stay hot enough to continue cooking for a short time after they are 

over a drip pan.

turned off.

Radiant 

Electric coils 

Heat travels to the glass surface and then to the cookware, so pans must be flat on the 

(Glass Cooktop) 

under a glass

bottom for good cooking results. The glass cooktop stays hot enough to continue cooking 

cooktop.

after it is turned off. Remove the pan from the surface unit if you want cooking to stop.

Induction

High frequency 

Pans must be made of ferrous metals (metal that attracts a magnet). Heat is produced by 

induction coils 

a magnetic circuit between the coil and the pan. Heats up right away and changes heat 

under a glass 

settings right away, like a gas cooktop. After turning the control off, the glass cooktop is

surface.

hot from the heat of the pan, but cooking stops right away. 

Solid Disk 

Solid cast iron 

Heats by direct contact with the pan, so pans must be flat on the bottom for good cooking 

disk sealed to the

results. Heats up and cools down more slowly than electric coils. The disk stays hot  

cooktop surface.

enough to continue cooking after it is turned off. Remove the pan from the solid disk if 
you want the cooking to stop.

Gas Burners

Regular or sealed 

Flames heat the pans directly. Pan flatness is not critical to cooking results, but pans 

gas burners use

should be well balanced. Gas burners heat the pan right away and change heat settings 

either LP gas

right away. When you turn the control off, cooking stops right away.

or natural gas.

PREPARATION

Flooring Under the Range

Leveling the Range

Your range, like many other household items, is
heavy and can settle into soft floor coverings such as
cushioned vinyl or carpeting. 
When moving the
range on this type of flooring, it should be installed on
a 1/4-inch-thick sheet of plywood (or similar material)
as follows: When the floor covering ends at the front
of the range, 
the area that the range will rest on should
be built up with plywood to the same level or higher
than the floor covering. This will allow the range to be
moved for cleaning or servicing. For complete
information, see the Installation Instructions.

Please check your range to insure all packaging
materials and protective tape covering are removed
from areas, such as the door trim, cooktop frame, end
caps, etc., before using.

Leveling screws are located on each corner of the 
base of the range. Remove the bottom drawer and 
you can level the range on an uneven floor with the 
use of a nutdriver.

To remove drawer, pull the drawer out all the way, 
tilt up the front and take it out. To replace drawer,
insert glides at back of drawer beyond stop on range
glides. Lift drawer if necessary to insert easily. Let
front of drawer down, then push in to close.

One of the rear leveling screws will engage the Anti-
Tip device (allow for some side to side adjustment).
Allow a minimum clearance of 1/8

between the range

and the leveling screw that is to be installed into the
Anti-Tip device.

Summary of Contents for LEB131

Page 1: ...val 25 Light 13 Light Bulb Replacement 26 OvenControl Settings 13 14 16 19 Preheating 14 18 20 Roasting Roasting Guide 17 18 Shelves 4 13 14 17 19 20 24 Thermostat Adjustment 16 Preparation 8 Problem Solver 28 Safety Instructions 3 5 Surface Cooking 8 11 Cooking Tips 10 Cooktop Comparison 8 Home Canning Tips 11 Surface Control Settings 9 Warranty Back Cover Model LEB131 Contents Use and Care of Yo...

Page 2: ...umer Product Ownership Registration Card that came with your range Before sending in this card please write these numbers here Model Number Serial Number Use these numbers in any correspondence or service calls concerning your range If you received a damaged range Immediately contact the dealer or builder that sold you the range Save time and money Before you request service Check the Problem Solv...

Page 3: ...t of the appliance Don t allow anyone to climb stand or hang on the door storage drawer or cooktop They could damage the range and even tip it over causing severe personal injury CAUTION ITEMS OF INTEREST TO CHILDREN SHOULD NOT BE STORED IN CABINETS ABOVE A RANGE OR ON THE BACKSPLASH OF A RANGE CHILDREN CLIMBING ON THE RANGE TO REACH ITEMS COULD BE SERIOUSLY INJURED Do not store flammable material...

Page 4: ...safe distance from your range Oven Stand away from range when opening oven door Hot air or steam which escapes can cause burns to hands face and or eyes Do not heat unopened food containers Pressure could build up and the container could burst causing an injury Keep oven vent duct unobstructed Keep oven free from grease buildup Place oven shelf in desired position while oven is cool If shelves mus...

Page 5: ...over nearby surface units Always turn surface unit controls off before removing cookware Carefully watch for spillovers or overheating of foods when frying at high or medium high temperatures To avoid the possibility of a burn or electric shock always be certain that the controls for all surface units are at off position and all coils are cool before attempting to remove the unit Do not immerse or...

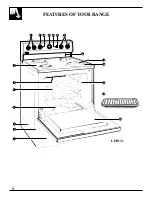
Page 6: ...EATURES OF YOUR RANGE OFF L O H I MED OFF L O H I MED OFF L O H I MED OFF L O H I MED FRONT REAR REAR FRONT OFF 4 3 2 1 30 25 20 15 10 5 0 12 3 9 6 LEB131 8 13 11 12 9 8 10 7 6 5 4 3 2 1 14 15 16 17 19 18 ...

Page 7: ...n goes off and on during cooking with the oven element as temperature is maintained 10 Oven Control 13 14 16 19 11 Timer Clock on some models 12 12 ON Indicator Lights for Surface Units 9 13 Oven Light Switch 13 14 Oven Vent Duct 24 Located under the right rear surface unit 15 Plug In Surface Units 8 21 Two 6 and two 8 May be removed when cleaning under unit 16 Chrome Plated Drip Pans 21 17 Oven S...

Page 8: ...lat on the bottom for good cooking disk sealed to the results Heats up and cools down more slowly than electric coils The disk stays hot cooktop surface enough to continue cooking after it is turned off Remove the pan from the solid disk if you want the cooking to stop Gas Burners Regular or sealed Flames heat the pans directly Pan flatness is not critical to cooking results but pans gas burners u...

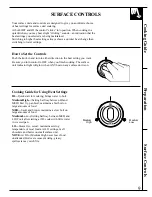
Page 9: ...face unit indicator light will glow when ANY heat on any surface unit is on H I O F F LO M E D Cooking Guide for Using Heat Settings HI Quick start for cooking brings water to boil Medium High Setting halfway between HI and MED Fast fry pan broil maintains a fast boil on large amounts of food MED Sauté and brown maintains a slow boil on large amounts of food Medium Low Setting halfway between MED ...

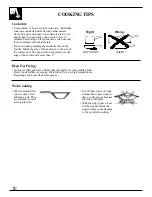
Page 10: ... unit The pan should not extend over the edge of the surface unit more than 1 Right Wrong NOT OVER 1 OVER 1 Deep Fat Frying Do not overfill cookware with fat that may spill over when adding food Frosty foods bubble vigorously Watch food frying at high temperatures Keep range and hood clean from grease Wok Cooking We recommend that you use only a flat bottomed wok They are available at your local r...

Page 11: ...r its location does not allow the canner to be centered on the surface unit use smaller diameter pots for good canning results 2 For best results use canners with flat bottoms Canners with flanged or rippled bottoms often found in enamelware don t make good contact with the surface unit and take a long time to boil water Flat bottomed canners are recommended 3 When canning use recipes and procedur...

Page 12: ...imer has been combined with the range clock Use it to time all your precise cooking operations You ll recognize the Timer as the pointer that is different in color than the clock hands Minutes are marked up to 30 and hours are marked up to 4 on the center of the clock To set the Timer turn the knob to the left without pushing in until the pointer reaches the number of minutes or hours you want to ...

Page 13: ...n Shelves Shelf Positions The shelves are designed with stop locks so when placed correctly on the shelf supports they will stop before coming completely out of the oven and will not tilt when you are removing food from them or placing food on them When placing cookware on a shelf pull the shelf out to the bump on the shelf support Place the cookware on the shelf then slide the shelf back into the...

Page 14: ...ts or muffins B or C Cookies or cupcakes B or C Brownies B or C Layer cakes B or C Bundt or pound cakes A or B Pies or pie shells B or C Frozen pies A on cookie sheet Casseroles B or C Roasting A or B Preheating Baking Pans Preheating is necessary for good results when baking cakes cookies pastry and breads For most casseroles and roasts preheating is not necessary For ovens without a preheat indi...

Page 15: ... to produce a browner crisper crust Frozen pies in foil pans should be placed on an aluminum cookie sheet for baking since the shiny foil pan reflects heat away from the pie crust the cookie sheet helps retain it When baking cakes warped or bent pans will cause uneven baking results and poorly shaped products A cake baked in a pan larger than the recipe recommends will usually be crisper thinner a...

Page 16: ...w pointing to the center of the upper screw indicates the original factory setting 3 To make adjustment loosen approximately one turn but do not completely remove the two screws on the back of the knob With the back of the knob facing you hold the outer edge of the knob with one hand and turn the front of the knob with the other hand To raise the oven temperature move the top screw toward the righ...

Page 17: ... temperature in the Roasting Guide Remember that food will continue to cook in the hot oven and therefore should be removed when the desired internal temperature has been reached Use of Aluminum Foil You can use aluminum foil to line the broiler pan This makes clean up easier when using the pan for marinating cooking with fruits cooking heavily cured meats or basting food during cooking Press the ...

Page 18: ...10 minutes per pound for roasts under 5 pounds more time for larger roasts Make sure poultry is thawed before roasting Unthawed poultry often does not cook evenly Some commercial frozen poultry can be cooked successfully without thawing Follow the directions given on the package label Oven Approximate Roasting Time Internal Type Temperature Doneness in Minutes per Pound Temperature F Meat 3 to 5 l...

Page 19: ...not turning out as brown as they should A In some areas the power voltage to the range may be low In these cases preheat the broil element for 10 minutes before placing the broiler pan with food in the oven Check to see if you are using the recommended shelf position Broil for the longest period of time indicated in the Broiling Guide Turn the food only once during broiling You may need to move th...

Page 20: ...ch thick C 10 7 Up to 8 patties take about same time Beef Steaks Rare 1 inch thick C 6 5 Steaks less than 1 inch thick cook through Medium 1 to 11 2 lbs C 8 6 before browning Pan frying is recommended Well Done C 12 11 Slash fat Rare 11 2 inch thick C 10 7 8 Medium 2 to 21 2 lbs C 15 14 16 Well Done C 25 20 25 Chicken 1 whole A 35 10 15 Reduce time about 5 to 10 minutes per 2 to 21 2 lbs side for ...

Page 21: ...e surface unit more than 1 inch If you do it may not lie flat on the drip pan when you plug it back in Repeated lifting of the surface unit more than 1 inch above the drip pan can permanently damage the receptacle To replace a surface unit Replace the drip pan into the recess in the cooktop Make sure opening in the pan lines up with the receptacle Insert the terminals of the surface unit through t...

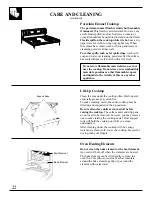
Page 22: ...e vicinity of this or any other appliance Lift Up Cooktop Clean the area under the cooktop often Built up soil especially grease may catch fire To make cleaning easier the entire cooktop may be lifted up and supported in the up position Be sure all surface units are turned off before raising the cooktop The surface units and drip pans do not need to be removed however you may remove one to make ra...

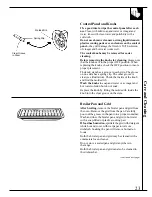
Page 23: ...ee illustration Check the inside of the knob and find the molded rib Wash the knobs in soap and water or a vinegar and hot water solution but do not soak Replace the knob by fitting the molded rib inside the knob into the clear groove on the stem Clear Groove in Stem Spring Clip Molded Rib Broiler Pan and Grid After broiling remove the broiler pan and grid from the oven Remove the grid from the pa...

Page 24: ...oven is vented through an opening under the right rear surface unit Never cover the opening with aluminum foil or any other material This would prevent the oven vent from working properly Oven Vent Removable Storage Drawer The storage drawer is a good place to store cookware and bakeware Do not store plastics and flammable material in the drawer Do not over load the storage drawer If the drawer is...

Page 25: ... of door Soap and water will normally do the job Heavy spattering or spillovers may require cleaning with a mild abrasive cleaner Soapy wet metal pads may also be used Do not allow food spills with a high sugar or acid content such as milk tomatoes sauerkraut fruit juices or pie filling to remain on the surface They may cause a dull spot even after cleaning If necessary you may use an oven cleaner...

Page 26: ...with a high sugar or acid content such as milk tomatoes sauerkraut fruit juices or pie filling to remain on the surface They may cause a dull spot even after cleaning Household ammonia may make the cleaning job easier Place 1 2 cup in a shallow glass or pottery container in a cold oven overnight The ammonia fumes will help loosen the burned on grease and food If necessary you may use an oven clean...

Page 27: ...to a cabinet place the bracket against back wall and cabinet as shown in Figure 1 If there is no adjacent cabinet determine where the location of the range side painted outside panel will be Place the bracket with its outside edge at this location and against the back wall See Figure 1 3 Determine whether you will anchor the bracket to the floor or wall Fasten the bracket securely with the screws ...

Page 28: ...okware of improper size is being used The oven thermostat needs adjustment See the Adjust the Oven Thermostat Do It Yourself section SURFACE UNITS NOT Surface units are not plugged in solidly FUNCTIONING PROPERLY Surface unit controls are not properly set AUTOMATIC OVEN Check to be certain step by step directions were followed correctly TIMER DOES NOT See the Automatic Oven Timer section WORK PROP...

Page 29: ...29 The Problem Solver NOTES ...

Page 30: ...30 NOTES ...

Page 31: ...dled in just one visit Service Contracts 800 626 2224 You can have the secure feeling that GE Consumer Service will still be there after your RCA product warranty expires Purchase a GE contract while your warranty is still in effect and you ll receive a substantial discount With a multiple year contract you re assured of future service at today s prices Parts and Accessories 800 626 2002 Individua...

Page 32: ...o use the product Read your Use and Care material If you then have any questions about operating the product please contact your dealer or Manager Consumer Affairs RCA Appliances Appliance Park Louisville KY 40225 Improper installation If you have an installation problem contact your dealer or installer You are responsible for providing adequate electrical gas exhausting and other connecting facil...

Reviews: