background image

3

Copyright © 2020 RCA Communications Systems   

www.RCACommunicationsSystems.com

Communications Systems

RDR6350 Digital Mobile

Two-Way Radio

INSTRUCTION MANUAL

Installation:

Read the following precautions before installing the mobile terminal:

• The radio operates with cathode-grounded power supply of 13.6V ± 

15% only. Please check polarity and voltage of the power supply on 

the vehicle before you install the radio. 

• Please check how long the screws will extend from the bottom 

surface of the radio, before you install the radio. Drill the mounting 

hole cautiously to avoid damage to the vehicle wiring and other parts. 

• Please connect RCA supplied antenna and power cord to the radio, 

before you install it in the bracket. And make sure the antenna and 

power cord is dedicated for RCA digital radios to prevent injuries to 

passengers. 

• Set the mobile terminal in a location convenient on the front panel for 

easy operation. 

• Please make sure there’s sufficient space at the back of the radio for 

wiring.

• When the fuse for DC power cord needs replacement, it must be 

replaced by a fuse with the same specification.

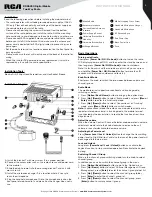
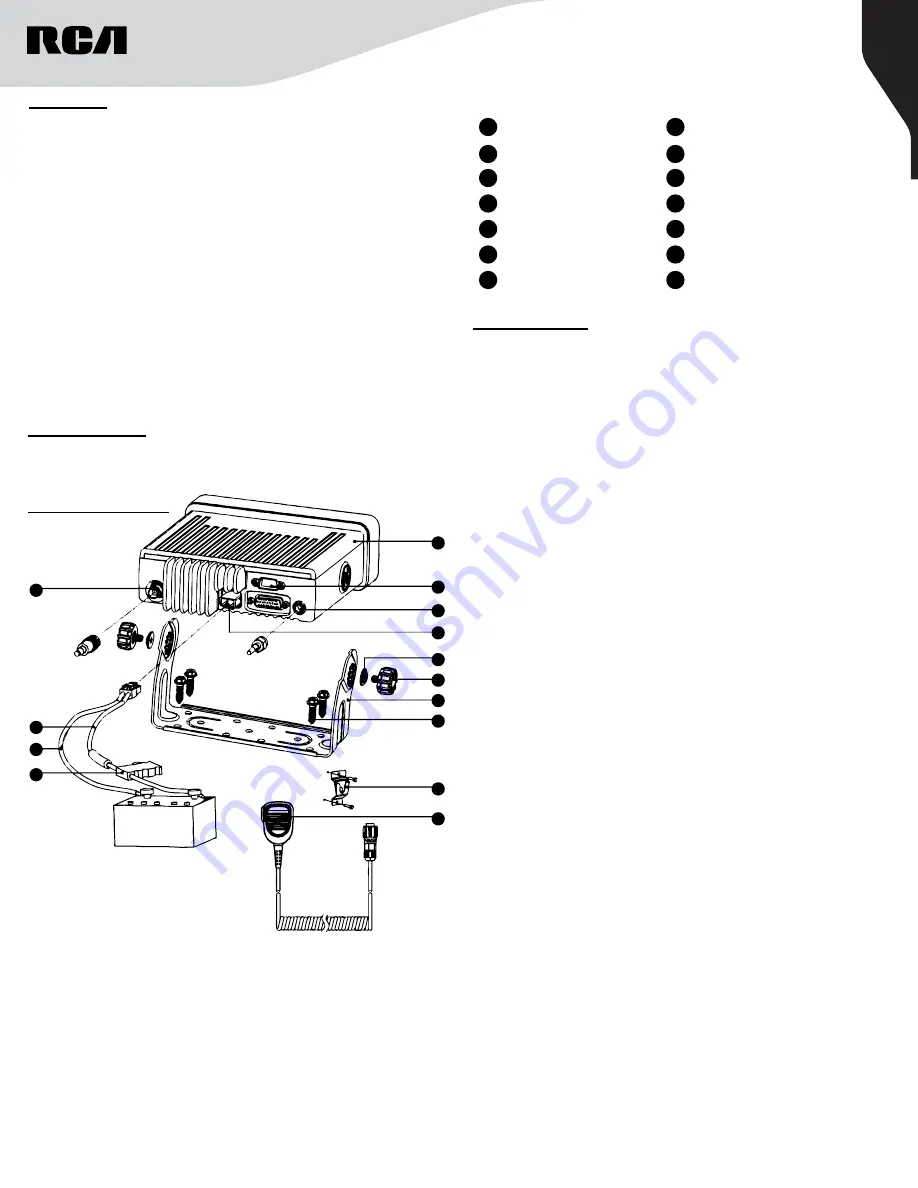
Installation Diagram:

Installation Tools:

Electric Drill, Philips Head Screwdriver, and Hex Socket Sleeve

10

14

13

12

11

9

8

7

6

5

4

3

2

1

A. Install the bracket 7 with cross screw 8 in a proper position.

B.  Connect the accessories such as the radio antenna and power cord 

to the mobile 1.

C.  Slide the mobile radio 1 into the mounting bracket 7 and fix it with 

cross screw 6.

D.  Install the microphone hanger 9 in a location where it’s easy to 

reach the microphone.

E.  Plug the handheld microphone 10 into the microphone jack on the 

front panel of mobile radio 1 and place it on the hanger when not in 

use.

1

Mobile Radio

8

M6 Self-tapping Cross Screw

2

Accessory Interface

9

Handheld Microphone Hanger

3

Position Module Antenna 

Interface

10

Handheld Microphone

4

Power Supply Socket

11

RF Antenna Base

5

Hardware Bracket Knob 

Underlay

12

Red Power Line

6

Hardware Bracket Knob

13

Black Power Line

7

U-Shaped Bracket

14

Fuse

Basic Operations

Turning on/off radio

Short press 

[Power On / Off / On-hook]

 button to tum on the radio, 

LCD displays power-up LOGO, and then enter the standby screen, and 

then long press 

[Power On/ Off/ On-hook]

 button to shutdown. 

Note: If a fault occurs and the radio does not turn off, you can press 

and hold the 

[Power On / Off/ On-hook]

 button for more than 1O 

seconds with the forced shutdown and restart it.

Knob Switch Mode

Short press the knob, to switch the two modes between volume and 

channel/ group.

Radio Mode

The mobile terminal supports conventional and trunking mode, 

switching as below:

1.  Press 

[Option/ Back/ Home]

 button to bring up the option menu;

2.  Press 

[Up]/ [Down]

 button to select ‘Radio mode’ and press 

[Menu / 

Enter]

 button to enter the list of radio mode;

3.  Press 

[Up]/ [Down]

 button to select ‘Conventional’ or ‘Trunking’ 

mode, press 

[Menu / Enter]

 button to switch modes.

Note:

 In conventional mode the radio can communicate directly or via 

repeater inter-communicate; in trunking mode, the mobile terminal 

is connected by the base station, to realize the function of real-time 

dispatchment.

Adjust the volume

When the Volume Control / Channel Selector knob operates in volume 

adjustment mode, rotate the knob clockwise to increase the call 

volume, or counterclockwise to decrease volume. 

Adjusting the Power Level

Press 

[Power Level / Lock / Unlock]

 button to change the transmitting 

power level to ‘High/ Mid/ low’, and also the icon of the power level will 

be changed in the main menu.

Lock and Unlock

Long press 

[Power Level / Lock / Unlock]

 button can activate the 

keylock function, to stop unwanted operation. Deactivate the keylock 

by long.

Switching Channel / Group

When in the channel/ group switching mode, turn the knob to select 

channel/group.  

In addition you can also switch the channel/group in the menu:

1.  Press 

[Option/ Back/ Home]

 button to go to the ‘Option’ menu.

2.  Press 

[Up / Down]

 button to select ‘Channel Management / Group 

Management’, press 

[Enter]

 to enter the channel / group folder list.

3.  Press 

[Up]/ [Down]

 button to select the channel / group folder, 

press 

[Enter] 

to enter the channel / group list.

4.  Press 

[Up]/ [Down]

 button to select the channel/ group, press 

[Enter]

 button to switch channel / group.

Summary of Contents for RDR6350

Page 1: ...sponding to an Individual Call 6 Receiving and Responding to an All Call 6 Making Call with Channel Selector Knob Making a Group Call 6 Making an Individual Call 7 Making an All Call 7 Making a Group or Individual Call w One Touch Access Button 7 Emergency Operations 7 Advanced Features Sending a Call Alert 7 Receiving and Responding to a Call Alert 8 Sending a Radio Check 8 Remote Monitor 8 Initi...

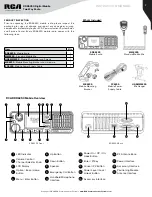
Page 2: ...ile Mounting Bracket and Hardware 1 PC6350 Mobile Power Supply Cable 1 RDR6350 Mobile Radio MB6350 Mobile Mounting Bracket PC6350 Mobile Power Supply Cable HGRMM6350 Mic Hanger MM6350 Standard Mobile Mic RCA RDR6350Mobile Overview 1 LED Indicator 6 Up Button 11 Power On Off On Hook Button 16 RF Antenna Base 2 Volume Control Channel Selector Knob 7 Down Button 12 Enter P1 Key 17 Power Interface 3 L...

Page 3: ... Power Line 7 U Shaped Bracket 14 Fuse Basic Operations Turning on off radio Short press Power On Off On hook button to tum on the radio LCD displays power up LOGO and then enter the standby screen and then long press Power On Off On hook button to shutdown Note If a fault occurs and the radio does not turn off you can press and hold the Power On Off On hook button for more than 1O seconds with th...

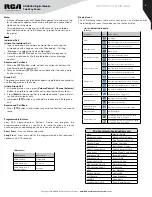
Page 4: ...duration of a button press Short Press Press and release quickly Long Press Press and hold for the programmed duration between 1 seconds and 3 75 seconds The Programmable Functions are None Monitor On Off Outgoing Call Log Nuisance Temp Delete Channel Display One Touch Access 1 15 Channel Down Power Low High Channel Up Alerts Tones Profiles Direct Channel Entry Public Address On Off Disconnect Rad...

Page 5: ...w and High for the radio Alerts Tones Profiles Quick access to the Alerts and Tones settings menu Public Address On Off Toggles between Public Address On and Off for the radio Radio Mode Toggle Switch Switches between the different radio modes available for the radio Conventional Analog and DMR Digital DMR Digital Trunking Record Playback Plays the selected recorded voice call Scan On Off Toggles ...

Page 6: ...ual radio There are two types of Individual Calls The first type is when a radio presence check is performed prior to setting up the call while the other sets up the call immediately When you receive an Individual Call 1 The LED indicator appear solid green 2 The first line of the display shows Individual Call The second line displays the subscriber alias or ID 3 Press the PTT button to respond to...

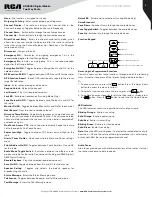
Page 7: ...unction is available only in digital mode Your radio supports 7 Emergency Alarms Emergency Alarm Emergency Alarm with Emergency Call Emergency Alarm with Voice to Follow Emergency Call Pre Status Message Pre Status Message with Emergency Call Pre Status Message with Voice to Follow Each alarm has the following default setting Disabled Radio cannot transmit alarm signal but can receive alarm from o...

Page 8: ...io Available If the target radio is not active in the system the radio beeps twice and the display briefly shows Target Radio Unavailable P1 P1 P1 P1 P1 P1 Remote Monitor Allows the radio to send Remote Monitor command to another radio This command activates the receiving radio s microphone and transmitter for the duration specified for the receiving radio in the Remote Monitor Hot Mic Time under ...

Page 9: ...avigate to desired subscriber alias or ID and press button to select 5 Press the PTT button to make the call The LED lights up solid red The display shows Individual Call and the subscriber alias or ID 6 Release the PTT button to listen when the target radio responds the LED lights up solid green and the display shows the transmitting user s ID 7 If there is no voice activity for a programmed peri...

Page 10: ...ss or button to select Status Messages press button to enter the Status Messages menu 4 Press or button to select the preset Status Message and press button to enter 5 Press or button to select the target radio you wish to send the Status Message to 6 If the message is sent the radio beeps twice and the display shows Sent If the message is not sent the radio beeps once and display shows Failed P1 ...

Page 11: ...s Sent If the message is not sent the radio beeps once and the display shows Failed P1 P1 P1 P1 P1 P1 P1 P1 P1 P1 P1 P1 P1 Deleting a Text Message from the Inbox 1 Press button to access the menu 2 Press or button navigate to the Message and press to select 3 Press or button to navigate to Inbox and press to select 4 Press or button to select the message and press to access the sub menu and select...

Page 12: ...d and Keypad Unlocked You can lock your radio s keypad to avoid an inadvertent key press You have two options to lock your keypad Shortcut key press the programmed keypad lock button to lock or unlock the keypad Use keypad to activate the setting 1 Press to access the menu 2 Press or to navigate to Settings and press to select 3 Press or to navigate to Keypad Lock and press to select 4 Press or to...

Page 13: ...evel for this channel This feature can be toggled between the levels using the radio menu or the programmable shortcut keys 1 Press to access the menu 2 Press or to navigate to Settings and press to select 3 Press or to navigate to Power Level and press to select 4 Press or to select Low Power or High Power Speech Enhancement This feature controls the your radio s microphone gain automatically whi...

Page 14: ... 3 Press or to navigate to GPS and press to select 4 Press or to turn On or Off the GPS Voice Recording This feature allows you to record each communication with other radios A microSDHC card UHS Speed Class U1 is required to store the voice recording files and is not included with the radio If the feature is not activated in the radio contact your RCA Communications Systems Dealer 1 Press to acce...

Reviews: