background image

19

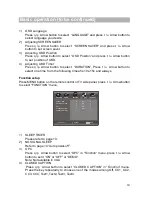
1)

OSD Language
Press 

q

/

p

 Arrow button to select  

LANGUAGE

 and press 

t

/

u

 Arrow button to

select language you desire.

2)

Adjusting SCREEN SAVER
Press 

q

/

p

 Arrow button to select  

SCREEN SAVER

 and press 

t

/

u

 Arrow

button to set screen saver.

3)

Adjusting OSD Position
Press 

q

/

p

 Arrow button to select  

OSD Position

 and press 

t

/

u

 Arrow button

to set  position of OSD.

4)

Adjusting OSD Timer
Press 

q

/

p

 Arrow button to select  

DURATION

, Press 

t

/

u

 Arrow button to

select one time from the following times:5s,10s,15s and always.

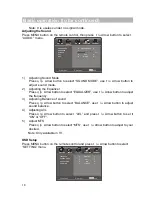
Function setup

Press MENU button on the remote control or TV side panel, press 

t

/

u

 Arrow button

to select 

FUNCTION

 menu.

1)

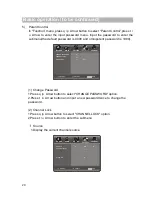
SLEEP TIMER
Please refer to page 10.

2)

NO SIGNAL SLEEP
Refer to page 14 

Auto power-off

.

3)

OPC
Press 

q

/

p

 Arrow button to select 

OPC

 in 

Function

 menu. press 

t

/

u

 Arrow

button to set it


ON

 or 

OFF

 or 

DEMO

.

        Note: Not available in VGA.
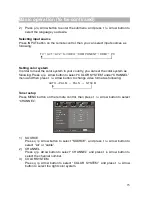
4)    CLOSED CAPTION
       Press 

q

/

p

 Arrow button to select 

CLOSED CAPTION

 in 

Function

 menu.

Press the key repeatedly to choose one of the modes among Off, CC1, CC2,
CC3, CC4, Text1, Text2, Text3, Text4.

Basic operation (to be continued)

PICTURE

AUDIO

CHANNEL

FUNCTION

SETTING

ME NU

EXIT

SELECT

ADJUST

OFF

CLOSED CAPTION

PARENT CONTROL

OPC

NO SIGNAL SLEEP

 SLEEP TIMER

OFF

ON

ON

Summary of Contents for RLC2626

Page 1: ...RLC2626 ...

Page 2: ...nt The apparatus is not suitable for children under 3 year to operate This product is equipped with a polarized plug aplug having one blade wider than the other This plug will fit into the power outlet only one way this is a Safety feature If you are unable to insert the plug fully into the outlet try to reverse the plug and if the plug should still fail to fit contact your electrical technician t...

Page 3: ...ed by covering the ventilation opening with items such as newspapers tablecloths curtains etc At least 10 cm space should be left around the apparatus for sufficient ventilation The product should be situated away from heat sources such as radiators heat registers stoves or other products including amplifiers that produce heat Place the apparatus in such a position that the screen is not exposed t...

Page 4: ... cloth for cleaning Do not place the set on an unstable cart stand table or shelf The set may fall causing serious personal injury as well as damage to the product Use only with the cart stand tripod bracket or table specified by the manufacturer or sold with the apparatus An appliance and cart combination should be moved with care Quick stops excessive force and uneven surfaces may cause the appl...

Page 5: ...eral description 5 Specifications and accessories 6 Overview 7 Basic operation 10 External connection 12 Basic operation 14 Trouble shooting 23 Picture defects and countermeasures 24 Basic operation Contents ...

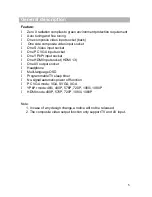
Page 6: ...nput socket l One YPbPr input socket l One HDMI input socket HDMI 1 3 l One AV output socket l Headphone l Multi language OSD l Programmable TV sleep timer l No signal automatic power off function l PC VGA mode VGA SVGA XGA l YPbPr mode 480i 480P 576P 720P 1080i 1080P l HDMI mode 480P 576P 720P 1080i 1080P Note 1 In case of any design change a notice will not be released 2 The composite video outp...

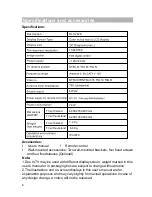
Page 7: ...ual or in packaging box are subject to change without notice 2 The illustrations and on screen displays in this user s manual are for explanation purposes and may vary slightly from actual operations In case of any design change a notice will not be released Specifications and accessories Description Dimensions LXWXH TV with stand TV without stand TV with stand TV without stand 1366X768 4WX2 74W 1...

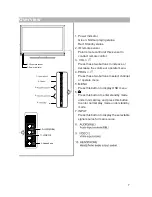
Page 8: ... or operate menu 4 PROG Press these two buttons to select channel or operate menu 5 MENU Press this button to display OSD menu 6 Press this button to enter standby mode under normal play and press this button to enter normal play mode under standby mode 7 INPUT Press this button to display the selectable signal source for main source AV2 IN Headphone IR remote sensor Power indicator 1 2 3 4 5 6 7 ...

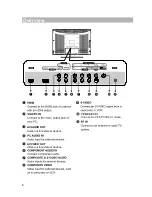
Page 9: ...8 Overview AV AUDIO OUT Audio out for external devices AV VIDEO OUT Video out for external devices YPb CbPr Cr Connect to YPbPr YCbCr video IN ...

Page 10: ... loading of batteries will last 1 year under normal use 2 If you don t intend to use the remote control for a long period of time remove them to avoid damage due to leakage 3 Do not mix old and new batteries or different types 4 Don t throw the batteries into fire or water 5 The batteries battery pack or batteries installed shall not be exposed to exces sive heat such as sunshine fire or the like ...

Page 11: ...er Use your remote control to set the sleep timer Press SLEEP button on the remote control then press this button again to set sleep timer Off 15Min 30Min 45Min 60Min 90Min 120Min Note The sleep timer you have set will be canceled when the TV turns off or if a power failure occurs When SLEEP TIMER is 60 seconds only left tunime will be displayed on the screen and any operation will cancel SLEEP TI...

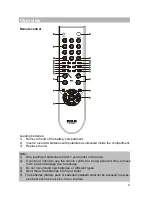
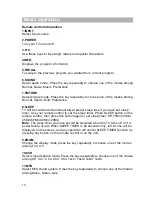
Page 12: ...y 17 HDMI Switch to HDMI mode directly 18 Press this button to shut off sound of the TV temporarily press again to restore TV sound 19 VOLq p Press these buttons to adjust TV volume 20 PROGq p Press these buttons to change program upward or downward 21 MENU Display the main menu 22 EXIT Exit the menu 23 Arrow buttons q p t u Press these buttons to move cursor up down left right for menu 24 OK Vali...

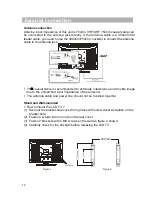
Page 13: ...recommended to eliminate interference and double image due to the unmatched input impedance of the antenna l The antenna cable and power line should not be bundled together Stand and Wall mounted 1 How to mount the LCD TV 1 Take out the bracket hole cover from groove with screw driver and place on the bracket hole 2 Fasten 4 screws into four nuts on the rear cover 3 Fasten 2 brackets with 4 M8 scr...

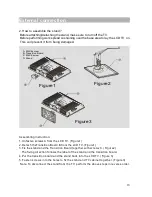
Page 14: ... Stand Assembling instruction 1 Unfasten screws A from the LCD TV Figure1 2 Detach theTransition Board B from the LCD TV Figure1 3 Fix the stand and the Transition Board together with screws C Figure2 The fixing direction follows the label of the stand and the transition board 4 Put the transition board and the stand back into the LCD TV Figure 3 5 Fasten screws into the holes to fix the stand and...

Page 15: ... button on the re mote control If you want to watch TV again you can press this button again 3 Unplug the power cord when the TV will not be used for a long period time Auto power off The TV will enter standby mode in 15 seconds in PC mode and in other modes it will enter standby mode in 5 minutes when no signal sleep is on Memorizing the Channels Your TV can memorize all of the available channels...

Page 16: ...hange video format as following Tuner setup Press MENU button on the remote control then press t u Arrow button to select CHANNEL 1 SOURCE Press q p Arrow button to select SOURCE and press t u Arrow button to select Air or cable 2 CHANNEL Press q p Arrow button to select CHANNEL and press t u Arrow button to select the channel number 3 COLOR SYSTEM Press q p Arrow button to select COLOR SYSTEM and...

Page 17: ...duct fine tuning from high frequency to low frequency or from low fre quency to high frequency till best picture or sound effect is obtained Note Only if AFT is set to OFF you can adjust the FINE TUNE 7 AUTO SEARCH Press q p Arrow button to select AUTO SEARCH then press u Arrow button to start Auto Search TV will tune automatically and all programs found will be saved Please don t interrupt it Not...

Page 18: ...r of picture Press q p Arrow button to select the COLOR then press t u Arrow button to set saturation to your desire 6 Adjusting the Sharpness of picture Press q p Arrow button to select the SHARPNESS then press t u Arrow button to set sharpness to your desire 7 Adjusting the Backlight of picture Press q p Arrow button to select the BACKLIGHT then press t u Arrow button to set backlight to your de...

Page 19: ...t EQUALIZER use t u Arrow button to adjust the frequency 3 Adjusting Balance of sound Press q p Arrow button to select BALANCE use t u Arrow button to adjust sound balance 4 Adjusting AVL Press q p Arrow button to select AVL and press t u Arrow button to set it ON or OFF 5 Adjust MTS Press q p Arrow button to select MTS use t u Arrow button to adjust to your desired Note Only available in TV OSD S...

Page 20: ...lways Function setup Press MENU button on the remote control or TV side panel press t u Arrow button to select FUNCTION menu 1 SLEEP TIMER Please refer to page 10 2 NO SIGNAL SLEEP Refer to page 14 Auto power off 3 OPC Press q p Arrow button to select OPC in Function menu press t u Arrow button to set it ON or OFF or DEMO Note Not available in VGA 4 CLOSED CAPTION Press q p Arrow button to select ...

Page 21: ...NGE PASSWORD option 2 Press t u Arrow button and input a new password twice to change the password 2 Channel Lock 1 Press q pArrow button to select CHANNEL LOCK option 2 Press t u Arrow button to enter the submenu l Source 1 Display the current channel source PICTURE AUDIO CHANNEL FUNCTION SETTING MENU EXIT SELECT ADJUST CHANNEL INPUT SOURCE AIR _ _ _ CLEAR ALL _ _ _ _ _ _ _ _ _ _ _ _ _ _ _ _ _ _ ...

Page 22: ...nction 2 Press q p Arrow button to select CLEAR ALL function 3 Press t u Arrow button to clear the channel list in the source you select 3 Video Lock 1 Press q pArrow button to select VIDEO LOCK option 2 Press t uArrow button to select VIDEO VIDEO or OFF l Video Lock all sources except TV l Video Lock Channel 3 and channel 4 of TV and all other sources l Off Close VIDEO LOCK function and all sourc...

Page 23: ...sting Clock When PC is connected to TV set because of the difference of PC parameter you should adjust the CLOCK item in WINDOW menu until you get a good picture 4 Adjusting Phase When PC is connected to TV set because of the difference of PC parameter you should adjust the PHASE item in WINDOW menu until you get a good picture 5 Auto Adjust If there are unexpected problems happened when you adjus...

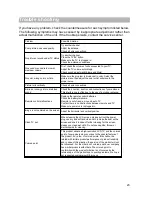
Page 24: ...plugged in Image is not centered on the screen Adjust the horizontal and vertical position Clean TV set When cleaning the LCD screen please pull out the power plug use dry and soft and clean cloth to clean the dust on the screen and shell In case of further cleaning for the screen please use clean wet cloth Do not use naphtha thinner or similar liquids for cleaning Colored point This product adopt...

Page 25: ...lly caused by reflections from tall buildings Adjust the direction of the antenna or raise it RADIO WAVE INTERFERENCE Wave pattern are moving on the screen which are usually caused by nearby radio transmitter or shot wave receiving equipment HIGH TEMPERATURE ELECTROTHERMAL INTER FERENCE Diagonal or herring bone patterns appear on the screen or part of picture is missing This is probably caused by ...

Page 26: ...RLC2626 ...
Reviews: