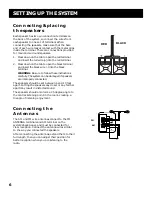
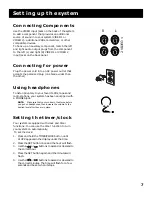
background image

13

Using the system

Shuffling Play Order

Turning on the Shuffle feature causes the tracks to
play in a random order.

Press the SHUFFLE button to start random track
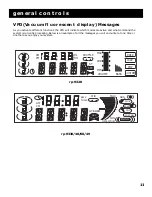
play. SHUFFLE appears in the display while the
feature is active.

Press the SHUFFLE button a second time to turn it
off.

Repeating Play Order

You can repeat one track, one disc or all discs.

Press the REPEAT button once to repeat the current
track.   appears in the display.

Press REPEAT a second time to repeat the whole
disc. 

 appears in the display.

Press REPEAT a third time to repeat all discs. 
will appear in the display.

Press REPEAT a fourth time to turn the feature off.

Playing and Loading Discs
Simultaneously

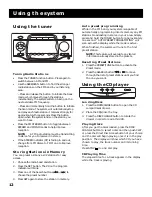
You can open the disc tray without stopping the disc
currently in play. Simply press the OPEN/CLOSE
button and the tray opens, providing access to the
front disc compartments. Play continues without
interruption while the front two discs can be
changed. If you open the disc tray while a disc is
playing and then press DISC CHANGE, the disc tray
will close, play stops and the disc tray rotates to
begin playing the next available disc.

Programming Play Order

You must be in Stop mode in order to program play
order.

1.

Press the SET button.

•  ---- appears beside the TRACK indicator and
blinks.

•  PR 01 appears in the display indicating that this
is first programmed track.

2.

Press the DISC CHANGE button to choose a disc.

3.

Press 

 or 

 to choose a track.

4.

Press SET to save the track in the program memory.

5.

Repeat steps 2-4 above to program up to 32 tracks.

•  FULL appears in the Front Panel Display when
the program is full.

6.

Press PLAY ( ) to begin programmed play while in
Program mode.

Repeating a Program

When you program tracks into memory, you can
repeat the entire program by pressing the REPEAT
button twice after the program begins playing.

Recalling and Editing the Program

You must be in Stop mode in order to recall and edit
the program.

1.

Press the SET button to enter Program mode.

•  The display shows first programmed track.

2.

Press SET to move to the next program number
until you get to the programmed track you want
to change.

3.

Press DISC CHANGE to choose the disc and then
press 

 or 

 to choose a replacement track.

4.

Press SET to change the current programmed track
to the one you just selected.

Clearing the program

You cannot select tracks within a program to clear.
Upon completion of the following steps, the entire
program will be cleared.

1.

Press SET to enter Program mode.

2.

Press and hold the STOP button until CLEAR shows
in the display. If the program is already empty,
EMPTY will show in the display.

Using ATS (Auto Track Skip)

ATS (Auto Track Skip) is the opposite of
programmed play. Instead of programming the
tracks you want to hear, you indicate which tracks
you do not want to hear.

You can choose as many as 32 tracks to be
automatically skipped.

The process for creating and editing an ATS program
is nearly identical to that of programming disc play.

Creating an ats program

1.

Press the ATS button. AUTO  TRACK SKIP blinks in
the display.

2.

Press the DISC CHANGE button to choose a disc.

3.

Press 

 or 

 to choose the first track to be

skipped.

4.

Press SET to add the selected track to the ATS
program.

5.

Repeat the preceding steps to add more tracks to
the ATS program.

6.

Press PLAY ( ) to begin playing the ATS program.

Summary of Contents for RP-9328

Page 1: ...RP 9328 RP 9338 RP 9348 RP 9349 RP 9368 AUDIO SYSTEM USER S GUIDE ...

Page 2: ...sion equipment that is receiving interference Move the unit away from the equipment that is receiving interference Plug the unit into a different wall outlet so that the unit and the equipment receiving interference are on different branch circuits If these measures do not eliminate the interference please consult your dealer or an experienced radio television technician for additional suggestions...

Page 3: ...ing from components 15 Using the remote control 16 Battery Installation 16 General Controls 16 Troubleshooting tips 17 Care and maintenance 18 Cleaning the Exterior 18 Handling Compact Discs 18 Cleaning Compact Discs 18 Tape Care 18 Cleaning the Tape Heads 18 INDEX 19 canadian warranty 20 US warranty 20 FCC Information 2 Safety Precautions 2 For Your Safety 2 Service Information 2 For Your Records...

Page 4: ...erceive a more spacious stereo sound effect like Home Theatre SRS allows you to hear multiple sound sources Audio frequencies are processed to establish directional cues which give the impression that sound is coming from all parts of the room Additional speakers are not required but the addition of a subwoofer optimizes the sound performance CUSTOM EQ This feature allows you to custom set your sy...

Page 5: ... location away from direct sunlight radiators air ducts and other sources of heat Avoid locations that are subject to moisture mechanical vibration shock or excessive dust Make sure that the location has adequate air circulation Good ventilation is essential to protect the system from internal heat build up Be a Pack Rat It is a good idea to keep the box and all of the packing materials your syste...

Page 6: ...w these instructions carefully The system can be damaged if speakers are improperly connected The speakers should be set between 6 and 10 feet apart Putting the speakers any closer or any farther apart may result in distorted sound The speakers should also form a 45 degree angle to the central listening point in the room creating a triangle of listening enjoyment Connecting the Antennas The AM and...

Page 7: ... favorite CDs tapes and radio stations your system has been equipped with a PHONES jack NOTE Make sure that you turn down the stereo before you put on headphones then increase the volume to the desired level after they are in place Setting the timer clock Your system is equipped with clock and timer functions You can use the timer function to turn your system on automatically To set the clock 1 Pr...

Page 8: ...s in use The system will turn off after one hour if activated by the timer feature However any adjustment made to the system during the one hour period will deactivate the automatic turn off feature 3 To turn the Timer off manually press the TIMER CLOCK button until the red clock symbol disappears from the display To activate the Timer again press the TIMER CLOCK button once The red clock symbol w...

Page 9: ...xt disc in the tray without opening the disc compartment door If the button is pushed while the tray is out and a CD is playing it will immediately retract shift to the next available disc and begin play If in Stop mode when pushed the tray will simply rotate F FWD This button winds the tape quickly toward the end FM STEREO This feature allows you to improve FM reception by switching between Stere...

Page 10: ...Press and hold the button momentarily to activate the Scan mode The system will stop for approximately five seconds at each of the FM stations received until the button is pushed again SET demo This feature allows you to store preset radio stations or programmed track lists in the system s memory This works in both the CD and TUNER functions It also allows you to set the clock and timer SHUFFLE Th...

Page 11: ...ctive and what command the system is currently processing Below is an example of all the messages you will encounter at one time or another as you enjoy your system rp 9328 rp 9338 48 68 49 ROCK JAZZ POP CUSTOM BASS VOLUME MIN 0dB MAX SHUFFLE ST REC MHz kHz PM AM SRS PM AM MHz kHz STEREO MIX REC MAX VOLUME MIN ROCK JAZZ POP CUSTOM BASS ...

Page 12: ...rogramming into its memory any FM stations broadcasting in stereo in your area Simply press and hold the TUNER button for approximately one second AUTO PRESET PROGRAMMING will scan across the display while the mode is active When finished the system will tune to the first preset station NOTE This feature will overwrite any stored information already stored in the presets Recalling Preset Stations ...

Page 13: ...t Panel Display when the program is full 6 Press PLAY to begin programmed play while in Program mode Repeating a Program When you program tracks into memory you can repeat the entire program by pressing the REPEAT button twice after the program begins playing Recalling and Editing the Program You must be in Stop mode in order to recall and edit the program 1 Press the SET button to enter Program m...

Page 14: ... begin playing the second tape Using the system Recalling and Editing the ATS Program Editing the ATS program is a lot like editing a regular program 1 Press the ATS button to go to AUTO TRACK SKIP mode 2 Press SET to move to the next program number until you get to the programmed track you want to change 3 Press DISC CHANGE to choose the disc and then press or to choose a replacement track 4 Pres...

Page 15: ...ert a blank cassette tape into deck 1 2 Make sure the video auxiliary device is connected correctly then press the VIDEO to activate the function 3 Press the REC button for the cassette and the PLAY button for the component Recording continues until the tape ends or you press the STOP EJECT or PAUSE button on the tape deck Using the system DON T INFRINGE This product used for the purposes for whic...

Page 16: ...ide PLAY FWD Press to begin play of CD or tape PAUSE Press once to temporarily suspend CD or tape activity Press again to resume activity TRACK REV In CD mode press once to search backward through all the tracks or hold to scan back through the current track In tape mode press to rewind toward the beginning of the tape TRACK FWD In CD mode press once to search forward through all the tracks or hol...

Page 17: ...e sure CD function is selected CD sound skips Clean the disc as explained in Care and Maintenance Check disc for warping scratches or other damage Check for vibration or shock that may affect the CD player Move system if necessary CD buttons won t respond Switch the function from CD to Tuner or Tape and then switch back to CD CD player won t change discs Switch the function from CD to Tuner or Tap...

Page 18: ...ures may warp the shell or damage the tape itself Keep cassettes in their boxes when not in use Cassette tapes can be erased by magnetic fields produced by magnets electric motors electrical transformers and other devices Keep tapes away from magnets and magnetic fields Cleaning the Tape Heads Iron oxide particles from the magnetic tape can build up on the parts that come in contact with the tape ...

Page 19: ...TION BUTTONS 10 H Handling Compact Discs 18 L Loading Discs 12 O Open close 10 OPEN CLOSE button 13 P PHONES jack 7 PLAY PAUSE 10 Playing Discs 12 PRESET TUNE 10 PRESET TUNE button 12 Programming Play Order 13 R REC 10 Recalling 13 Recalling Preset Stations 12 Recording from CD 15 Recording from components 15 Recording from Radio 15 Recording from tape to tape 15 Remote control 16 Repeating Play O...

Page 20: ...ecessary The return of the card is not required for warranty coverage How state law relates to this warranty This warranty gives you specific legal rights and you may have other rights which vary from state to state If you purchased your product outside the USA This warranty does not apply Contact your dealer for warranty information US warranty Canadian warranty Thomson Consumer Electronics Canad...

Page 21: ...l RP 9328 38 48 49 68 20887680 E S F Rev 1 98 27 Printed in Hong Kong P O Box 1976 Indianapolis IN 46206 1998 Thomson Consumer Electronics Inc Trademark s Registered Marca s Registrada s Marque s déposée s ...

Page 22: ...1 RP 9328 RP 9338 RP 9348 RP 9349 RP 9368 SYSTEMA AUDIO GUIA DEL USUARIO ...

Page 23: ...erencia favor de consultar al distribudor o un técnico experto en radio televisión para sugerencias adicionales También la Comision Federal de Comunicaciones ha preparado un manual útil Como Identificar y Resolver los Problemas de Interferencia Radio Televisión How to Identify and Resolve Radio TV Interference Problems Este manual puede obtenerse en U S Government Printing Office Washington D C 20...

Page 24: ...amación de emisoras de radio en la memoria 12 Programación automática de emisoras en la memoria 12 Sintonización de emisoras en memoria 12 Utilización del lector de discos compactos 12 Cargar discos 12 Reproducción de discos 12 Duración de la reproducción 12 Reproducción aleatoria 13 Repetición de la reproducción 13 Carga y reproducción simultáneas de discos 13 Programación del orden de reproducci...

Page 25: ...sonoro más amplio como el del cine residencial El SRS le permite escuchar múltiples fuentes sonoras Las frecuencias de audio se procesan para establecer las señales que dan la impresión de que el sonido procede de todas las direcciones de la pieza No se requieren altavoces adicionales pero la conexión de un altavoz para subgraves optimizará el rendimiento sonoro Ecualizador personalizado Custom EQ...

Page 26: ...ra o goma espuma Elija un lugar alejado de la luz solar directa radiadores conductos de aire y otras fuentes de calor Evite los lugares que están expuestos a la humedad vibraciones mecánicas choques o polvo excesivo Control remoto Altavoces principales Antena para FM Antena de bucle para AM Unidad principal Altavoces de sonorización periférica RP 9328 RP 9349 RP 9368 1 2 3 DISC 1 2 3 OPEN CLOSE M ...

Page 27: ...ncia siga estas instrucciones cuidadosamente El equipo puede dañarse si los altavoces se conectan de manera errónea Los altavoces deberían colocarse a una distancia de entre seis y 10 pies El situar los altavoces a menor o mayor distancia puede distorsionar el sonido Los altavoces deberían asimismo estar a un ángulo de 45 grados en relación al punto convergente de sonido del cuarto para crear un t...

Page 28: ...cos compactos cintas o programas de radio preferidos su sistema viene equipado con un jack para audífonos PHONES Observación antes de colocarse los audífonos baje el volumen del estéreo luego con los audífonos puestos auméntelo al nivel deseado Puesta en hora del temporizador reloj Su sistema viene con un reloj y temporizador La función de temporizador sirve para encender el sistema automáticament...

Page 29: ... función del temporizador no se activará El sistema se apagará después de una hora si ha sido activado por el temporizador Sin embargo si durante esa hora se ajusta el sistema de algún modo la función de apagado automático se desactivará 3 Para desactivar el temporizador manualmente oprima la tecla TIMER CLOCK hasta que el símbolo de reloj rojo desaparezca del visor Para volver a activar el tempor...

Page 30: ...próximo disco de la bandeja sin abrir la puerta del compartimiento de discos Cuando se oprime esa tecla mientras la bandeja está afuera y se está reproduciendo un disco la bandeja se cerrará inmediatamente pasará al próximo disco disponible y empezará a reproducirlo Cuando se oprime la tecla en el modo de parada la bandeja girará simplemente F FWD avance rápido Esta tecla avanza la cinta rápidamen...

Page 31: ...erda Oprima para grabar desde un disco compacto otro casete la radio o un componente auxiliar REPEAT repetición En el modo de lector de discos esta tecla permite repetir una pista o todas las pistas de un disco o un programa REW rebobinado Esta tecla rebobina la cinta hasta el comienzo SEEK SCAN búsqueda barrido Esta función puede activarse solamente en el modo de sintonizador en la banda FM Oprim...

Page 32: ...a en curso o pasar por las pistas del disco en curso En el modo de sintonizador le permiten hacer una búsqueda ascendente rápida o lenta dentro de la banda o de las emisoras programadas VOLUME volumen Gire esta perilla para ajustar la intensidad del sonido Gire hacia la izquierda para bajar el volumen Cuando el sonido está apagado un mensaje pasará en forma continua por el visor Gire hacia la dere...

Page 33: ...ogramar automáticamente en la memoria cualquier emisora de FM que transmita en estéreo en su zona Simplemente mantenga oprimida la tecla TUNER durante un segundo En el visor aparecerá AUTO PRESET PROGRAMMING programación automática mientras el modo está activo Cuando haya terminado el sistema sintonizará la primera emisora programada Observación esta función anulará cualquier información guardada ...

Page 34: ...ra programar hasta 32 pistas En el visor del panel delantero aparecerá FULL cuando la memoria está llena 6 Oprima PLAY para comenzar la reproducción programada mientras está en el modo de programación Para repetir un programa Para volver a escuchar el programa guardado en la memoria oprima la tecla REPEAT después de que empezó a reproducirse Para cambiar un programa 1 Oprima la tecla SET para colo...

Page 35: ... 2 Oprima SET para pasar al número siguiente del programa hasta que llegue a la pista que desea cambiar 3 Oprima DISC CHANGE para seleccionar un disco luego oprima o para seleccionar la pista que reemplazará a la que desea cambiar 4 Oprima SET para sustituir la pista eliminada actual por la pista que acaba de seleccionar Para borrar un programa de eliminación automática de pistas El procedimiento ...

Page 36: ...ponentes 1 Coloque una cinta virgen en el compartimiento 1 2 Asegúrese de que el video dispositivo auxiliar esté conectado correctamente luego oprima VIDEO para activar la función 3 Oprima REC para el casete y PLAY para el componente La grabación continúa hasta que termine la cinta o hasta que usted oprima STOP EJECT o PAUSE en el grabador Utilización del sistema No sea infractor Este producto si ...

Page 37: ...ucir el disco o la cinta PAUSE pausa oprima una vez para detener temporariamente el lector de discos o el grabador Oprima nuevamente para reanudar el funcionamiento TRACK REV búsqueda hacia atrás en el modo de lector de discos oprima una vez para buscar hacia atrás en todas las pistas o mantenga la tecla oprimida para barrer la pista en curso hacia atrás En el modo de grabador oprima para rebobina...

Page 38: ...CD El sonido del disco compacto salta Limpie el disco como se explica en Cuidados y mantenimiento Verifique que el disco no esté doblado rayado o que tenga otros daños Verifique que no haya vibraciones o choques que puedan afectar al lector Mueva de lugar el sistema si es necesario Las teclas del tocadiscos no responden Pase del modo de tocadiscos al del sintonizador o grabador y luego de nuevo al...

Page 39: ...calientes Las temperaturas elevadas pueden deformar la cubierta de la cinta o dañar la cinta directamente Mantén los cassettes en sus cajas cuando no los estés utilizando Las cintas contenidas en los cassettes pueden borrarse por la acción de campos magnéticos producidos por imanes permanentes motores eléctricos transformadores eléctricos y otros artefactos eléctricos Mantén las cintas lejos de im...

Page 40: ...memoria 12 i Indicador de estéreo ST 12 Información sobre servicio 3 L Limpieza de discos compactos 18 Limpieza de los cabezales de grabación 18 m Manejo de los discos compactos 18 Mensajes del lector de discos 14 Modificación de un programa ATS 13 Modos de ecualizador programados 10 O OPEN CLOSE tecla 13 P Parada 10 12 Parada automática 15 Pila 16 PHONES entrada 7 PLAY PAUSE reproducción pausa 10...

Page 41: ...Thomson Consumer Electronics Inc Product Exchange Center 32B Spur Drive El Paso Texas 79906 Pagar todos los cargos que le cobre el Centro de Canjes por los servicios no cubiertos por la garantía Asegure su envío contra pérdidas o daños ya que en esos casos Thomson no aceptar ningúna responsabilidad Se le enviará un aparato nuevo o reacondicionado con porte pagado Aspectos no cubiertos por la garan...

Page 42: ...21 Model RP 9328 38 48 49 68 20887680 E F S Rev 1 98 27 Impreso en Hong Kong P O Box 1976 Indianapolis IN 46206 1998 Thomson Consumer Electronics Inc Trademark s Registered Marca s Registrada s ...

Reviews: