background image

EN

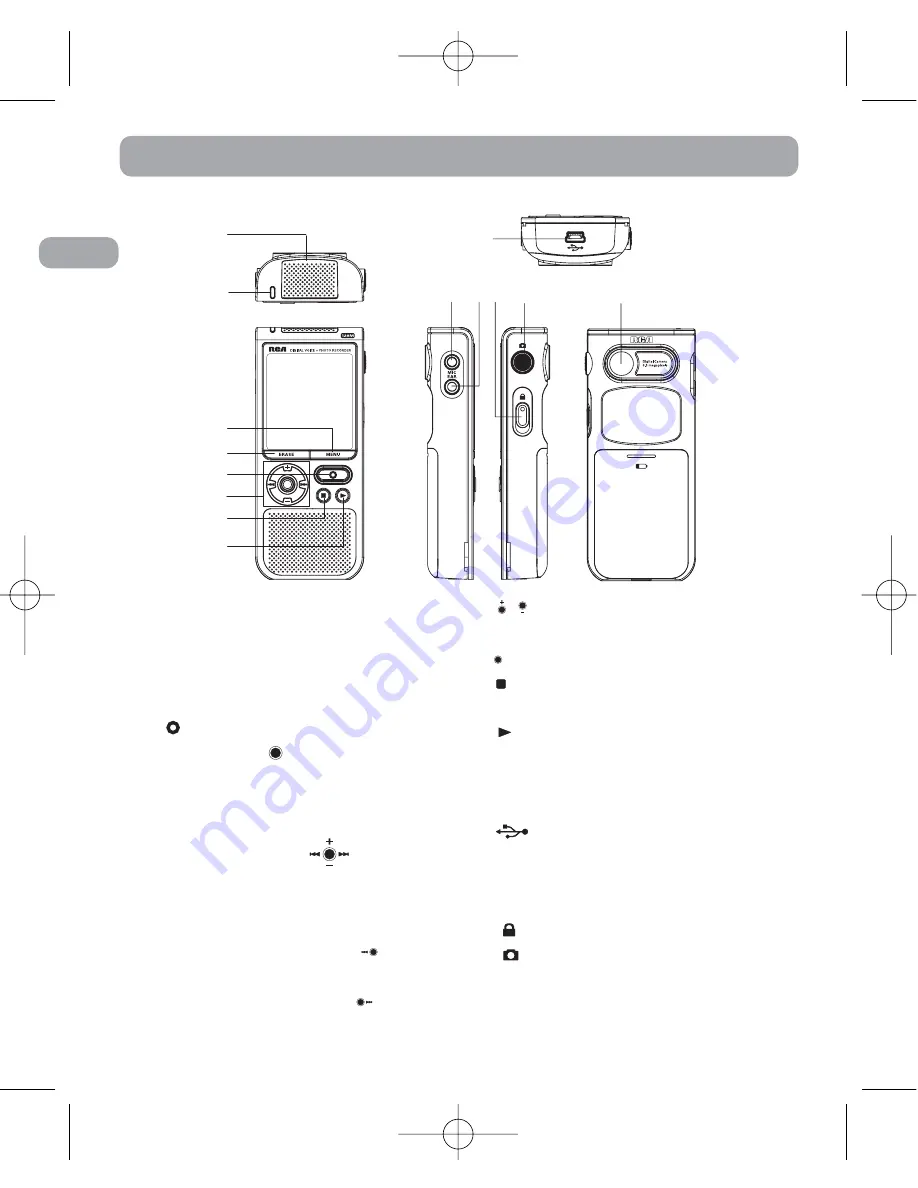
General Controls

14

1

2

3

4

5

6

7

8

10

11 12

13

9

1.

Built-in microphone

2.

Recording indicator

3. MENU

-  Accesses the Function

menu or Main Menu.

4. ERASE

- Erases the selected item.

5.

- Starts or pauses recording.

6. Center Key 

•  Press in the center of the Navigation

key to select or enter the menu
options.

Navigation Key 

• Move through

menus and options in each
direction.

•  In playback mode, press 

to skip

and search backward.

•  In playback mode, press

to skip

and search forward.

• 

/

- In playback mode,

increases/decreases volume.

• 

- Confirms your selection.

7.

- Turns off the player. Stops

playback or recording. 

8.

- Turns on the player. Starts or

pauses playback. In music and voice
stop mode, press and hold to enter
IntroScan mode.

9.

- Connects computer.

10

.

MIC

- Connects external 

microphone.

11

.

EAR

- Connects earphones

12.

- Turns on/off lock function.

13.

- Enters Capture Mode or

captures a picture.

14.

Camera lens

3

RP5050 EN  18/10/06  11:16 AM  Page 7

Summary of Contents for RP5050 - Digital 128 MB Built

Page 1: ... first time Nous vous recommandons de lire ce manuel d instructions avant d utiliser votre nouveau produit pour la première fois Es importante leer este manual antes de usar por vez primera su euipo u s e r m a n u a l Guide de l utilisateur Manual de usuario RP5050 EN 17 10 06 5 51 PM Page 2 ...

Page 2: ...to an outlet on a circuit different from that to which the receiver is connected Consult the dealer or an experienced radio TV technician for help Also the Federal Communications Commission has prepared a helpful booklet How To Identify and Resolve Radio TV Interference Problems This booklet is available from the U S Government Printing Office Washington DC 20402 Please specify stock number 004 00...

Page 3: ...arged Power Supply 2 x AAA size batteries For Your Records In the event that service should be required you may need both the model number In the space below record the date and place of purchase Date of Purchase Place of Purchase Service Information This product should be serviced only by those specially trained in appropriate servicing techniques For instructions on how to obtain service refer t...

Page 4: ... Time Setting 7 Clock Mode 7 Clock Set 8 Basic Operation 8 Navigation Mode 8 Selecting Folder and File 8 Playback Features 8 In Music Mode and Voice Mode 8 In Picture View Mode 9 Bookmark 9 Creating a Bookmark 9 Skipping to a Bookmark 9 Deleting Bookmarks 9 Recording Mode 10 Setting Recording Mode 10 Setting Record Quality 10 Navigating Recorded Voice Files 11 Manual Recording 11 Setting AVR Autom...

Page 5: ...asing File 17 Erasing Selected File 17 Advanced Operation 17 CAUTION 17 Insert 17 Append 18 Cut 18 Format 19 Connecting to the Computer 19 Computer System Requirements 19 Connecting to the Computer 19 Using your player as a file storage player 20 Transfer Files via Windows Explorer Drag and Drop 20 Disconnecting from the Computer 20 Troubleshooting Tips 22 U S Limited Warranty 23 Canadian Limited ...

Page 6: ...irection In playback mode press to skip and search backward In playback mode press to skip and search forward In playback mode increases decreases volume Confirms your selection 7 Turns off the player Stops playback or recording 8 Turns on the player Starts or pauses playback In music and voice stop mode press and hold to enter IntroScan mode 9 Connects computer 10 MIC Connects external microphone...

Page 7: ...correctly and the player is off 2 Connect the USB dock to the computer Then connect your player to the USB dock 3 Recharging begins automatically It should take about 6 hours to fully recharge 650mAh NiMH batteries Using Headphones and External Microphone When headphones are connected the sound output from speaker will be cut When external microphone is connected no record can be made from the bui...

Page 8: ...n the player To unlock the keys slide the button downward Beep Mode You can activate this feature so that beep sound can be heard whenever you press on any button except during recording Default is On 1 Press and hold MENU to display Main Menu 2 Push or to select System Menu and press to confirm selection 3 Press or to select Beep Mode and press to confirm selection 4 Press or to set beep sound On...

Page 9: ...usic or voice file press will start playback Press to confirm your selection Press to exit the Function Menu or the Main Menu and go back to Playback mode Basic Operation Refer to the following for basic operations For detailed operations and advanced features please refer to the relevant sections Playing Pausing In Music or Voice Playback mode press to begin playback In Picture Viewing mode press...

Page 10: ...ess or to increase or decrease volume level Recording In Function Menu press to start recording Press to pause recording press again to resume recording Press to stop recording Connecting the Player to your Computer Refer to page 19 for details 7 Year Date 12 24 Time Setting You can still use this player for normal recording without setting the time However no correct recording date and time can b...

Page 11: ...Press to stop music or voice playback To skip to the next file press and release To skip to the previous file press and release within the beginning 4 seconds of the current file Otherwise press and release twice To fast reverse press and hold To fast forward press and hold Press or to increase or decrease volume in playback pause or stop mode Music Mode Voice Mode Picture Mode Clock Set 1 In Syst...

Page 12: ...ich contains bookmarks Skipping to a bookmark You can skip to a bookmark anytime during playback 1 During playback press to go to the bookmark if available 2 Press or to search different bookmarks of the file Deleting Bookmarks 1 Select the file you want to delete all the bookmarks 2 During playback of a file press and hold ERASE to delete all the bookmarks in the file 3 will not be displayed afte...

Page 13: ...ault is HQ Definition HQ High Quality This allows about 498 minutes recording SP Standard Play This allows about 990 minutes recording LP Long Play This allows about 1990 minutes recording 1 In Main Menu Mode press or to select Record Menu and press to confirm your selection 2 Press or to select Rec Quality and press to confirm your selection 3 Press or to toggle between HQ SP and LP 4 Press or ME...

Page 14: ...Press to start recording The recording indicator will be on 2 Optionally you can press MENU to enter Function Menu Press or and to select Voice Playback mode and then press to start recording The recording indicator will be on 3 Press to pause recording press again to resume recording The recording indicator will be flashing when recording is paused 4 Press to stop recording Recording Mode Note Yo...

Page 15: ...t the sensitivity of the microphone from level 1 to 8 by pressing or The AVR value displays 7 Start dictation Recording starts automatically 8 Press to end AVR recording 9 Repeat step 2 4 and select AVR off for de selection AVR Level You can adjust the AVR value before recording 1 In Main Menu Mode press or to select Record Menu and press to confirm your selection 2 Press or to select AVR Level an...

Page 16: ... or to select Auto Off and press to confirm your selection 2 Press or to select among Off 1 min and 3 min 3 Press or MENU to save and exit the current option Back Light You can adjust the time period before the backlight turns off automatically Default is 10 sec 1 In System Menu mode press or to select Backlight and press to confirm your selection 2 Press or to select among On 5 sec 10 sec 20 sec ...

Page 17: ...to confirm your selection 2 Press or to select EV Effect and press to confirm your selection 3 Press or to adjust the value from level 2 to 2 4 Press or MENU to save and exit the current option Capture Picture 1 Press and hold CAMERA in any mode except in voice recording or pause mode to enter Camera Mode 2 Press CAMERA again or press capture picture 3 Press MENU to quit CAMERA mode 4 The captured...

Page 18: ...oom in the picture then press or to navigate inside the picture Press and hold to zoom out into normal size Deleting Pictures In Picture Viewing mode press or to select the unwanted picture in Picture Viewing mode Press and hold ERASE to enter Erase Mode Press ERASE to delete the current picture Speed Control You can adjust the playback speed 1 In Main Menu Mode press or to select Play Menu and pr...

Page 19: ... Normal Classic Pop Jazz Rock and Bass 4 Press or MENU to save and exit the current option A B Repeat You can repeat a certain part of a file with the help of this function 1 During voice playback press to set the start repeat position A will be displayed 2 Press again to set the end repeat position B Press when is flashing to confirm your selection Repeat from position A to B will start displays ...

Page 20: ...ress to pause playback 3 Press to enter Insert mode Do you want Insert displays 4 Press again to start recording new segment displays 5 Press to stop recording 6 will be flashing until the memory rearrangement completed Then the player will go to stop mode 17 Erasing Selected File You can delete a specific file 1 Select folder A B C or D and file 2 In music and voice stop mode or in picture naviga...

Page 21: ...C or D and file with the unwanted part 2 Press to start playback 3 During playback press ERASE to indicate the start point of the unwanted part displays 4 Press ERASE again to indicate the end point of the unwanted part displays 5 Press ERASE again to confirm cutting the indicated part 6 will be flashing until the memory rearrangement completed Then the player will go to stop mode Note Insert appe...

Page 22: ... 4 The player may appear to be a removable drive in your computer Format Caution All data inside the memory will be erased You can format the internal memory when needed e g compatibility problem etc 1 In Main Menu Mode press or to select System Menu and press to confirm your selection 2 Press or to select Format and press to confirm your selection 3 Press or to select between Yes or No 4 Press to...

Page 23: ... to transfer to your player to the Music Folder in the drive while dragging picture files to the My Album folder in the drive When data is transferring Transferring is flashing on the display Your files can be found in these folders in the player once it is disconnected from the computer Disconnecting from the Computer After you have copied files to or from the player you can disconnect the player...

Page 24: ...C again 21 Note Do not disconnect the USB connection during music download Doing so may corrupt system files or the files being downloaded To play the mp3 files or jpg files correctly you need to store all mp3 files and jpg files in the Music and My Album folders respectively when transferring files to the player Files in subfolders could not be read The player may not be able to display some of t...

Page 25: ... files in Folder A B C or D can be edited Files in folders other than Folder A B C or D or in their subfolders cannot be edited Cannot activate the player after pressing on keys There may be software problems Remove the batteries to reset the player Recordable time becomes shorter You may have set the recording quality to HQ refer to section Setting Record Quality Cannot perform playback Ensure yo...

Page 26: ...g materials Include evidence of purchase date such as the bill of sale Also print your name and address and a description of the defect Send via standard UPS or its equivalent to Thomson Inc Product Exchange Center 11721 B Alameda Avenue Socorro Texas 79927 Insure your shipment for of loss or damage Thomson accepts no liability in case of damage or loss en route to Thomson Pay any charges billed t...

Page 27: ...IMPLIED WARRANTY ON THIS PRODUCT THIS DISCLAIMER OF WARRANTIES AND LIMITED WARRANTY ARE GOVERNED BY THE LAWS OF THE STATE OF INDIANA EXCEPT TO THE EXTENT PROHIBITED BY APPLICABLE LAW ANY IMPLIED WARRANTY OF MERCHANTABILITY OR FITNESS FOR A PARTICULAR PURPOSE ON THIS PRODUCT IS LIMITED TO THE APPLICABLE WARRANTY PERIOD SET FORTH ABOVE How state law relates to this warranty Some states do not allow ...

Page 28: ...ultimedia Ltd 6200 Edwards Blvd Mississauga Ontario L5T 2V7 Canada The provisions of this written warranty are in addition to and not a modification of or subtraction from the statutory warranties and other rights and remedies contained in any applicable legislation and to the extent that any such provisions purport to disclaim exclude or limit any such statutory warranties and other rights and re...

Page 29: ...s Registrada s Marque s Deposée s www rca com Printed in China Impreso en China 56368400 EN F Comercializadora Thomson de México S A de C V Álvaro Obregón No 151 Piso 13 Col Roma Delegación Cuauhtémoc C P 06700 México D F Telefono 52 55 11 020360 RFC CTM 980723 KS5 RP5050 EN 17 10 06 5 51 PM Page 1 ...

Reviews: