background image

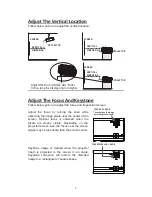
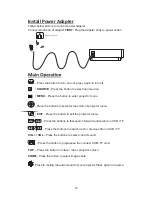
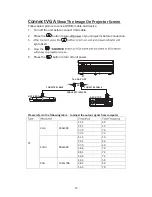
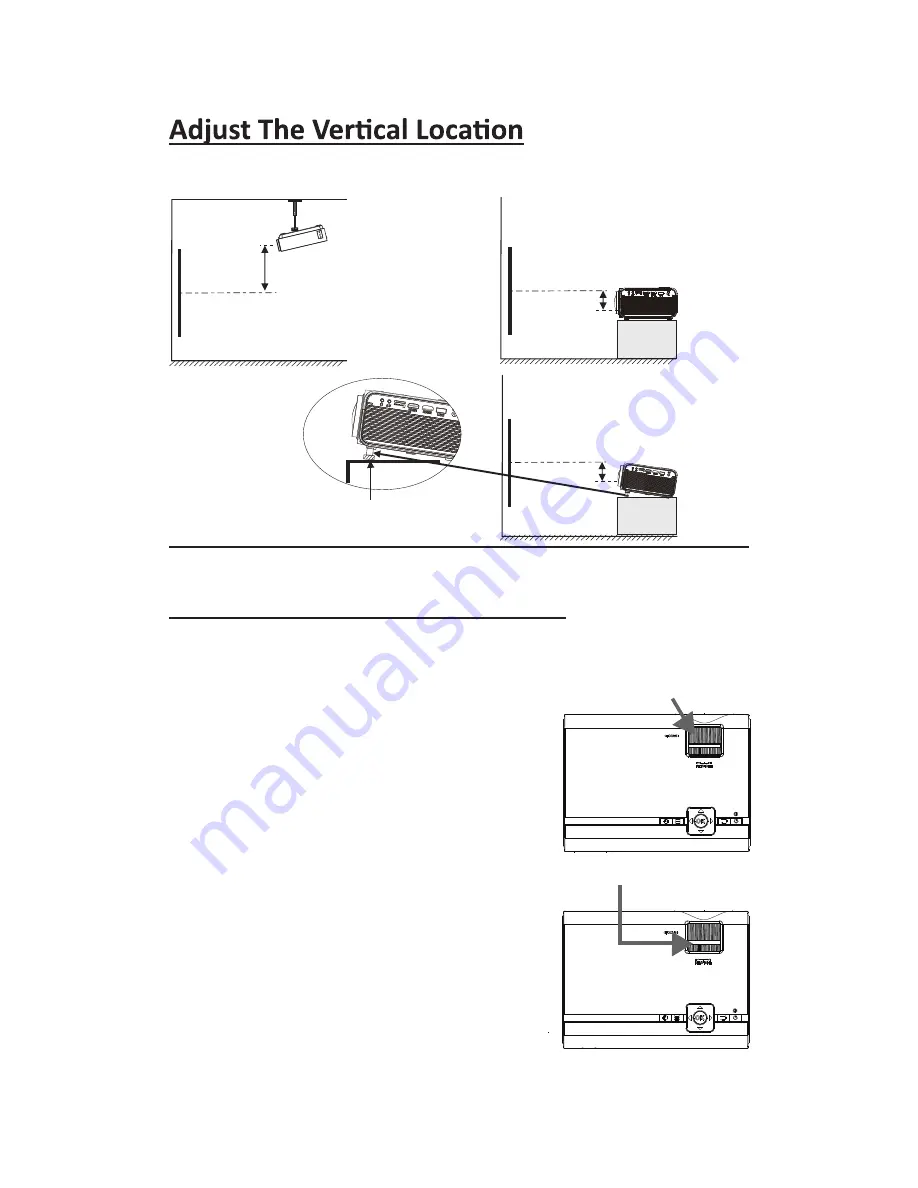
Follow below picture to adjust the vertical location. 


Adjust The Focus And Keystone 

Follow below picture to adjust the focus and trapezoidal screen. 

Adjust  the  focus  by  turning  the  knob  while 

observing the image pixels near the center of the 

screen.  Optimal  focus  is  obtained  when  the 

pixels  are  clearly  visible.  Depending  on  the 

projected screen size, the focus near the screen 

edges may be less sharp than the screen center. 


Keystone  image  is  created  when  the  projector 

beam  is  projected  to  the  screen  in  an  angle. 

Keystone  correction  will  restore  the  distorted 

image to a rectangular or square shape. 


7

SCREEN

PROJECTOR

VERTICAL
DIMENSION

VERTICAL

DIMENSION

SCREEN

PROJECTOR

VERTICAL

DIMENSION

SCREEN

PROJECTOR

Adjust this knob ( ANGLE ADJ. knob) 

to 

fin

e- tune the display angle to higher.

FOCUS ADJ. KNOB

Then sharpen the image

by rotating focus knob.

TRAPEZOIDAL ADJ. KNOB

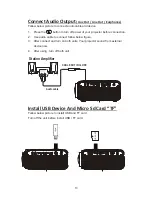
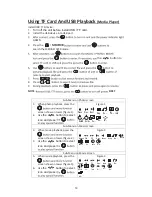
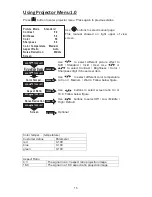
Summary of Contents for RPJ119

Page 1: ...尺寸 210 145MM 80克书纸 黑白印刷 ...

Page 2: ... Ltd RCA the RCA logo the two dogs Nipper and Chipper logo are registered trademarks or trademarks of RCA TrademarkManagement and are used under license by Curtis International Ltd Any other product service company trade or product name and logo referenced herein are neither endorsed nor sponsored by RCA Trademark Management or its affiliates ...

Page 3: ... point where they exit from the apparatus 10 Only use a achments accessories specified by the manufacturer 11 Unplug this apparatus during lightning storms or when unused for long periods of me 12 Refer all servicing to qualified service personnel Servicing is required when the apparatus has been damaged in any way such as power supply cord or plug is damaged liquid has been spilled or objects have ...

Page 4: ...5 WARNING Changes or modified to this unit not expressly approved by the party responsible for compliance could void the user s authority to operate the equipment 6 WARNING Use of this unit near fluorescent lighting may cause interference regarding use of the remote If the unit is displaying erratic behavior move away from any fluorescent lighting as it may be the cause 7 WARNING Shock hazard Do N...

Page 5: ...ergy and if not installed and used in accordance with the instructions may cause harmful interference to radio communications However there is no guarantee that interference will not occur in a particular installation If this equipment does cause harmful interference to radio or television reception which can be determined by turning the equipment off and on the user is encouraged to try to correc...

Page 6: ... Remote P8 Install Remove Battery Of Remote P8 Controls of Projector P9 Install Power Adapter P10 Main Operation P10 Connect HDMI show the Image On Projector Screen P11 Connect AV Show The Image On Projector Screen P11 Connect VGA Show The Image On Projector Screen P12 Connect Audio Output Aux Out Line Out Earphones P13 Install USB Device And Micro Sd Card TF P13 Using TF Card and USB Playback P14...

Page 7: ...f the screen NOTE A projector mount is required to install the projector in a ceiling Rear Table Select this location with the projector placed near the floor behind the screen NOTE That a special rear projection screen is required Rear Ceiling Select this location with the projector suspended upside down from the ceiling behind the screen NOTE A projector mount is required to install the projecto...

Page 8: ...he ceiling please purchase a projector mount recommended by an installation professional and follow the instructions that come with the mount Before installing the projector in the ceiling please check to make sure the ceiling structure can support the weight of the projector and the mount If in doubt please ask the advice from an installation professorial NOTE Projector mount and screw s not incl...

Page 9: ...jected screen size the focus near the screen edges may be less sharp than the screen center Keystone image is created when the projector beam is projected to the screen in an angle Keystone correction will restore the distorted image to a rectangular or square shape 7 SCREEN PROJECTOR VERTICAL DIMENSION VERTICAL DIMENSION SCREEN PROJECTOR VERTICAL DIMENSION SCREEN PROJECTOR Adjust this knob ANGLE ...

Page 10: ... cover NOTES Batteries shall not be exposed to excessive heat such as sunshine fire Be sure that the batteries are installed polarity correctly Do not mix old and new batteries Only same or equivalent type batteries as recommend are to be used Do not dispose of batteries in fire battery may explode or leak Do not try to recharge a battery 8 EXIT MUTE IR FLIP SKIP SEARCH PLAY PAUSE VOLUME SOURCE ME...

Page 11: ... 14 15 16 1 3 4 5 6 7 8 910 12 11 VGA 2 IR 17 18 19 20 LENS FOCUS ADJ Knob TRAPEZOIDAL ADJ Knob POWER on Indicator DC IN jack OK IR Window Rear Side IR Window Front Side ANGEL ADJ Knob EAR PHONE Jack AV OUT Jack Micro SD Card HDMI Port 1 USB Port VGA Port HDMI Port 2 ...

Page 12: ... buttons to select screen item of projector menu EXIT Press the button to exit the projector menu Press the buttons to fast search forward and rewind on USB TF Press the buttons to search next or previous file on USB TF VOL VOL Press the buttons to select correct sound Press the button to play pause the connect USB TF card FLIP Press the button to rotate mirror projector screen ZOOM Press the butt...

Page 13: ... on unit and power indicator will light GREEN 4 Press the SOURCE button to AV mode and the video of AV device will show on projector screen 5 Press the button to turn off unit power 11 HDMI CABLE CABLE NOT INCLUDE LEFT CHANNEL RIGHT CHANNEL VIDEO CABLE VIDEO PLAYER VIDEO CABLE YELLOW AUDIO LEFT CHANNEL WHITE AUDIO RIGHT CHANNEL RED CABLE NOT INCLUDE In rare cases if the projector s speaker has no ...

Page 14: ... light GREEN 4 Press the SOURCE will show on projector screen 5 Press the button to turn off unit power Please refer to the following table to adjust the output signal from computer PC VGA 640x480 31 5 60 34 7 70 37 9 72 37 5 75 SVGA 800x600 31 4 50 35 1 56 37 9 60 46 6 70 48 1 72 46 9 75 XGA 1024x768 40 3 50 48 4 60 56 5 70 12 To VGA PORT NOTE BOOK DECK TOP OR C OMPUTER CABLE C OMPUTER CABLE CABL...

Page 15: ...nnection 2 Use audio cable to connect follow below figure 3 After connect and turn on both units Your projector sound from external device now 4 After using turn off both unit Install USB Device And Micro Sd Card TF Follow below picture to install USB and TF card Turn off the unit before install USB TF card 13 MICRO SD CABLE NOT INCLUDE Station Amplifier Audio cable ...

Page 16: ...ow on lower figure 1 2 Use the button to select icon and press Figure 1 Sub Menu on Music screen 3 When music playback press the screen show on lower figure 2 4 Use the button to select icon and press Figure 2 Sub Menu on Movie screen 5 When movie playback press the screen show on lower figure 3 6 Use the button to select icon and press Figure 3 14 Pause Next Prev Stop Re PL Info i Rotate Zo Zo M Rot...

Page 17: ... ratio 4 3 or 16 9 Follow below figure Use buttons to select Off Low Middle High Default Color temper temperature Customer define Parameter red 0 100 blue 0 100 green 0 100 Aspect Ratio 4 3 The signal in a 4 3 aspect ratio projection image 16 9 The signal in a 16 9 aspect ratio projection image USE TO SELECT USE TO SELECT USE TO SELECT USE TO SELECT Picture Mode Standard Contrast 5 0 Brithness 50 ...

Page 18: ...select User follow below figure to set digit Use to select Balance level to 0 50 To select Off On Use to select different sound effect to Off Surround Sound Mode User Parameter 0 0 1 0 e l b e r T 0 0 1 0 s s a B Sound Mode Standard Treble 50 Bass 50 Balance 0 Auto Volume Off Surround Sound Off USE TO SELECT USE TO SELECT USE TO SELECT PRESS OK PRESS OK USE TO SELECT PRESS OK PRESS OK Balance 0 Au...

Page 19: ...i Nederlands Chinese Franais Deutech Slovenina Slovak Espanol Italiano Norsk Portugues Magyar Srpski Esky Polski Svenska Dansk Romnete Suomi OSD Language English Restore Factory Default Panel Rotate 0 Info OSD Language Restore Factory Default USE TO SELECT USE TO SELECT PRESS OK PRESS OK USE TO SELECT OK OK button to select different Use to select rotate 0 rotate 1 rotate 2 rotate 3 to set screen ...

Page 20: ... Day Hour Minutes Use to select timer turn on to Day Hour Minutes To select sleep timer turn to Off 10min 20min 30min 60min 90min 120min 180min 240min To select auto sleep function to turn Never 4 hour 6 Hour 8 hour Clock Off Timer Off On Timer Off Sleep Timer Off USE TO SELECT USE TO SELECT USE TO SELECT USE TO SELECT PRESS OK PRESS OK USE TO SELECT PRESS OK PRESS OK Auto Sleep Never Clock Off Ti...

Page 21: ... 0 8W Power Input Connect Included Adapter DC 12V 3 5A Included Adapter Connect DC input of unit Input AC100 240V 50 60Hz Output DC12V 3 5 A Display Color 16 7K Projection Size 30 100 inch Signal Port Video VGA HDMI USB Port Support USB device up to 32GB Support format mpeg1 Mpeg2 mpeg4 mp3 Jpeg SD Card Support SD card up to 32GB Support format mpeg1 Mpeg2 mpeg4 mp3 Jpeg Weight 0 9 KG Dimension 20...

Page 22: ...off automatically 1 Leave the projector to cool for a few moments 2 Once cooled check nothing is blocking the ventilation vents 3 Check the air filter is clean and clean if necessary 4 Turn on the projector If the issue persists please contact your support provider for further assistance The Image is wider at the top bottom of the screen This is called keystone and is due to the projection angle n...

Page 23: ......

Reviews: