background image

29

Playing a Tape

Using the Playback Features

Time Counter

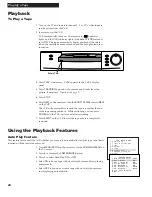
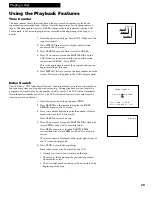
The time counter shows the actual time it takes to record a program or play back a
segment of a prerecorded tape.  It helps locate the beginning or end of programs you
taped.  The time counter resets to 

0:00:00

whenever the tape is ejected from the VCR.

For example, if a 30-minute program was recorded at the beginning of the tape, you
would:  

1.

Insert the prerecorded tape.  Press 

STOP

.  Make sure the

tape is rewound.

2.

Press 

DISPLAY

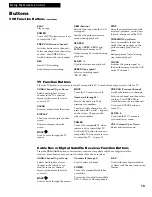
three times to display only the time

counter on the TV screen.

3.

Press 

CLEAR

to reset the time counter to 

0:00:00.

4.

Press 

FF 

on remote or turn the 

SHUTTLE DIAL

on the

VCR clockwise to fast forward the tape until the time
counter reads 

0:30:00

.   Press 

STOP

.  

This is the approximate end of the program and you can
begin recording at this spot.

5.

Press 

DISPLAY

twice to remove the time counter from the

screen.  The clock will appear in the VCRÕs display panel.  

Index Search 

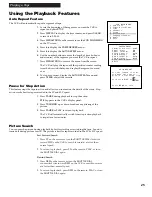
The VCR has a ÒVHS Index Search SystemÓ that automatically records an index mark on
the tape every time you stop and start recording.  During playback you can locate the
program you want to play by the number of index marks.  The VCR will automatically
locate the index number you select.  The VCR will search forward or reverse from the
location you are on the tape.

1.

Insert the prerecorded tape and press 

STOP

2.

Press 

SEARCH 

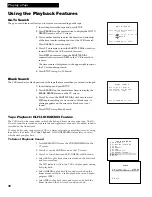
on the remote to display the 

INDEX

SEARCH

menu on the TV screen.

3.

Press two number buttons to enter the number of index
marks you want the VCR to search.

Press 

CLEAR 

to correct an entry.

4.

Press 

FF 

on remote or turn the 

SHUTTLE DIAL

clockwise

toward 

FWD 

on the VCR to search forward.

Press 

REW

on remote or turn the 

SHUTTLE DIAL

counterclockwise toward 

REW 

on the VCR to search in

reverse.

The time counter is displayed in the upper right corner of
the TV screen during search.

5.

Press 

STOP 

to stop index searching.

Some index marks may be missed by the VCR.

¥ A mark too close to your location on the tape.

¥ The mark at the beginning of a recorded segment of

five minutes or less.

¥ The first index mark on the tape when you start at the

beginning of the tape.

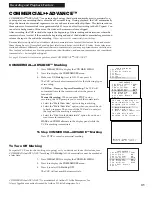
0:30:00

Hours

Seconds

Minutes

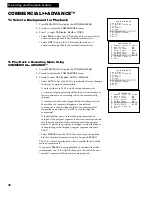
INDEX SEARCH

Enter Index Number

01 

Press FWD or REW
Press SEARCH to exit

0:30:00

Summary of Contents for VR689HF

Page 1: ...USER S GUIDE VR689HF VIDEO CASSETTE RECORDER ...

Page 2: ...ial No _____________________________________________________________________ Purchase Date ________________________________________________________________ Dealer Address Phone ________________________________________________________ _______________________________________________________________________________ _______________________________________________________________________________ Import...

Page 3: ...cks ____________________ 50 52 Questions and Answers About COMMERCIALAADVANCEª_____ 53 Index _____________________________ 54 57 Important Information _____________________________i Hooking Up the VCR Choosing a Hookup ____________________ 2 Antenna or Cable System Without a Cable Box _________________________ 3 Cable System With Cable Box to Unscramble All Channels ___________ 4 Cable System With...

Page 4: ...ion 3 2 What type of Cable TV system do you have Choose one answer from below A Cable without a box Ð Turn to page 3 B Cable box to unscramble all the channels Ð Turn to page 4 C Cable box to unscramble only pay channels such as HBO Showtime Cinemax etc Ð Turn to page 5 You may need to contact your local cable company for assistance 3 What type of satellite system do you have Choose one answer fro...

Page 5: ... in power cords of VCR and TV 4 B Advanced hookup Use this hookup for slightly improved picture quality hi fi stereo sound and more convenient operation Ñ use of TV VCR button not required 1 Connect as shown This connection requires additional accessories not provided If your TV is not stereo you may need a Y adapter to hear sound from both left and right channels 2 Plug in power cords of VCR and ...

Page 6: ...a basic connection which requires fewer accessories 1 Set the CH3 CH4 switch on back of VCR to either channel 3 or 4 Tune the TV to this channel and use the TV VCR button to watch the VCR 2 Connect as shown This connection may require additional accessories not provided 3 Plug in power cords of VCR TV and cable box 4 B Advanced hookup Use this hookup for slightly improved picture quality hi fi ste...

Page 7: ...ality hi fi stereo sound and more convenient operation Ñ use of TV VCR button not required 1 Connect as shown This connection requires additional accessories not provided If your TV is not stereo you may need a Y adapter to hear sound from both left and right channels 2 Plug in power cords of VCR TV and cable box 3 You will tune the TV to its video input to watch the VCR All pay channels are viewe...

Page 8: ... impair performance or damage your receiver and other components Also do not stack the receiver on top of a Òhot componentÓ such as an audio power amplifier A Basic hookup Use this hookup if your TV does not have audio video jacks 1 Set the CH3 CH4 switch on back of satellite receiver to either channel 3 or 4 Tune the VCR to this channel or its line input L1 to record from the receiver To watch th...

Page 9: ... 3 Connect as shown This connection may require additional accessories not provided 4 Plug in power cords of VCR TV and receiver 5 C Advanced hookup with deluxe receiver Use this hookup if your TV has audio video jacks and your receiver has two sets of AUDIO VIDEO jacks 1 Set the CH3 CH4 switch on back of VCR to either channel 3 or 4 You will tune the TV to this channel and use the TV VCR button t...

Page 10: ...this connection 2 Set the CH3 CH4 switch on the playback VCR to either channel 3 or 4 You will tune the recording VCR to this channel to receive the signal from the playback VCR 3 Connect as shown This connection may require additional accessories not provided 4 Plug in power cords of VCRs and TV 5 Option B hookup Use this hookup for slightly improved copy quality hi fi stereo sound and more conve...

Page 11: ... with this connection 2 Connect as shown This connection requires additional accessories not provided 3 Plug in power cords of amplifier receiver VCR and TV 4 Turn to page 42 for ÒRecording Audio Only Ó You will select the L1 input audio video on the VCR to receive the audio signal from the amplifier receiver 5 Play back stereo tapes or receive a stereo broadcast through an amplifier receiver Conn...

Page 12: ...No 221321 RF Coaxial Cable Stock No 221396 2 AAA Batteries Startup Power Cord Stock No 218104 2nd 1st 3 Insert batteries in remote A V DUB SEARCH SLOW TRACKING VOL VOL MUTE PREV CH DISPLAY INPUT TV VCR CLEAR SPEED REW PLAY FF STOP PAUSE REC 3 _ 4 M E N U P R O G POWER VCR1 DSS CABLE TV CHAN CHAN 6 1 4 7 3 9 2 5 8 0 VCR2 LD AUX J O G SHUT T L E ...

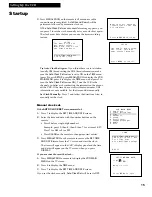
Page 13: ...or change the item Only the number buttons are referenced throughout this manual to explain the VCR features and operations 6 Turn on the VCR A Press VCR1 on the remote Setup Menu Appears Automatically The first time you turn on the VCR the SETUP menu will appear Follow the steps on the screen to automatically set up a satellite receiver or cable box auto channel search automatically set the time ...

Page 14: ...n the remote to correct an entry C Press MENU PROG to proceed This message appears The VCR will now receive all signals from the DSS receiver on É D Press MENU PROG to proceed Digital satellite receiver turned on The receiver should turn on and tune to channel 200 Press 1 and proceed to step E The VCR will now turn on and tune your receiver to the correct channel during timer recordings DSS will a...

Page 15: ...ol your cable box during VCR Plus or timer recordings Press MENU PROG to exit the CABLE BOX SETUP Proceed to Step 8 Manual cable box or DSS setup If you ever want to individually set up the cable box or satellite receiver A Press MENU PROG to display the VCR MAIN MENU on the TV screen B Press 4 to select CHANNELS menu C Select Cable box or DSS Setup Press 5 to select Cable box Setup Press 6 to sel...

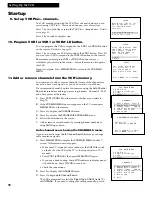
Page 16: ... broadcast C When the auto channel search SETUP screen appears Press 1 if you would like the VCR to search for and store all available channels Press 2 if you wish to skip this step If you skip auto channel search during setup the auto clock set feature will not be performed in this sequence SET TIME ZONE What is your time zone 1 Eastern 2 Central 3 Mountain 4 Pacific 5 Alaska 6 Hawaii 7 Automatic...

Page 17: ...DATE screen B Enter the time and date with the number buttons on the remote Press 0 before single digit numbers Example press 0 then 5 then 0 then 7 for a time of 5 07 Press 1 for AM or 2 for PM Press CLEAR on the remote to change incorrect entries C Press MENU PROG on the remote to remove the SET TIME AND DATE screen from the TV screen and start the clock The time will appear in the VCRÕs display...

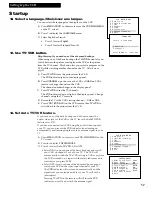
Page 18: ...move more channels by entering channel numbers or using CHAN up or down Auto channel search using the CHANNELS menu If you ever need to repeat Auto Channel Search because you change cable or antenna signals A Press MENU PROG to display the VCR MAIN MENU on the TV screen If this menu does not appear Make sure TV is tuned to same channel as the CH3 CH4 switch on the back of the VCR or the TVÕs video...

Page 19: ...he audio video jacks of the VCR to the TV leave the Auto TV VCR feature set to ON If you have connected your VCR using the audio video input of your TV you can prevent the VCR indicator from turning on automatically and interrupting the cable or antenna signal to your TV A Press MENU PROG on remote to see VCR MAIN MENU on the TV screen B Press 6 to display PREFERENCES C Press 3 to select Auto TV V...

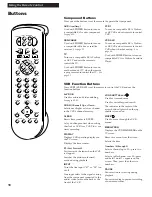
Page 20: ...esets time counter to 0 00 00 Lets you change entries when setting the clock or VCR for a VCR Plus or a timer recording DISPLAY Displays VCR operating displays on the TV screen Displays the time counter FF Fast Forward Fast forwards the tape when the VCR is stopped Searches the picture in forward motion during playback INPUT Turns the line input ÒL1Ó or ÒL2Ó on or off Line input refers to the sign...

Page 21: ...tellite Press twice turn off all compatible RCA ProScan or GE components REC Used with some digital satellite systems with the one touch record feature PLAY Plays a tape POWER Turns off VCR when remote is set to control the VCR PREV CH Previous Channel Switches between two channels Select one channel and then select another Press PREV CH to switch between the two channels REC Starts VCR recording ...

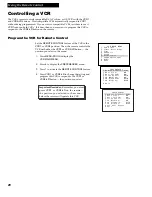
Page 22: ...splay the VCR MAIN MENU 2 Press 6 to display the PREFERENCES menu 3 Press 1 to activate the REMOTE CONTROL feature 4 Press VCR1 or VCR2 LD to change the setting and program this VCR to respond to the VCR1 or VCR2 LD button Ñ the position you select Important Reminder Remember you must press VCR1 or VCR2 LD on the remote Ñ the position you selected in the menu Ñ before the remote will operate this ...

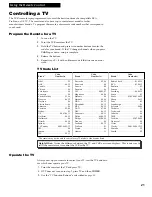
Page 23: ...mote to control your TV test the TV buttons to see which ones operate your TV 1 Point the remote at the TV and press TV 2 If TV does not turn on in step 1 press TV and then POWER 3 Use the ÒTV Function ButtonsÓ as described on page 19 Code Brand Number s Akai 03 AOC 06 12 Candle 06 Citizen 06 Colortyme 06 Concerto 06 Curtis Mathes 01 06 Daewoo 06 12 Daytron 06 Electrohome 06 Emerson 06 Envision 05...

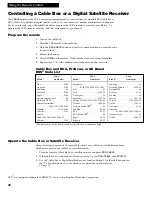
Page 24: ...oint the remote at the cable box or satellite receiver and press DSS CABLE 2 If the cable box or receiver does not turn on in step 1 press DSS CABLE then POWER 3 Use the ÒCable Box or Digital Satellite Receiver Function ButtonsÓ for the cable box and test the ÒTV Function ButtonsÓ to see which ones operate the satellite receiver See page 19 DSS is a registered trademark of DIRECTV Inc a unit of Hu...

Page 25: ...Auxiliary Component 1 Turn on the component 2 Point the VCR remote at the component 3 Hold the AUX button and press two number buttons to enter the code for your component 4 Release the buttons 5 Press POWER on the remote If the component turns off setup is complete Operate the Auxiliary Component After you have set up your remote to control your component test the buttons to see which ones operat...

Page 26: ...ng you can press POWER and the VCR will turn off after rewinding 7 Press EJECT on the VCR to eject the tape once it is completely rewound Using the Playback Features Auto Play Feature This feature lets you tell the VCR whether you want it to automatically start playing a tape that is inserted with the safety tab removed 1 Press MENU PROG on the remote to see the VCR MAIN MENU on the TV screen 2 Pr...

Page 27: ...s TRACKING up or down to reduce any jittering of the picture 3 Press PAUSE or PLAY to return to playback The VCR will automatically switch from stop action playback to stop after a few minutes Picture Search You can search a picture during playback by fast forwarding or rewinding the tape Sound is turned off during picture search The picture is best for tapes recorded in the SP or SLP speed Fast F...

Page 28: ...th forward and reverse The JOG SHUTTLE button and the up 4 or down 3 arrow let you view one stop action frame after another Sound is turned off during picture search and frame advance The picture is best for tapes recorded in the SP or SLP speed 1 Press JOG SHUTTLE on the remote during playback The indicator in the center of the arrows lights and the VCR enters pause Press and quickly release 6on ...

Page 29: ...cture 4 Release the SHUTTLE DIAL on the VCR to return to pause Press PLAY to return to playback The VCR will automatically switch from slow motion playback to stop after a few minutes Automatic Tracking The VCR has automatic tracking which adjusts the picture when playing back a tape recorded on another VCR Automatic tracking is turned on whenever a tape is inserted or the VCRÕs power is turned on...

Page 30: ...you do not press DISPLAY again these displays will time out 2 Press DISPLAY again to display information about the program that is playing if available If program information is not available Title Unavailable will appear 3 Press DISPLAY again to have only the time counter remain on the TV screen The time counter will appear instead of the time in the VCRÕs display panel 4 Press DISPLAY again to r...

Page 31: ...s an index mark on the tape every time you stop and start recording During playback you can locate the program you want to play by the number of index marks The VCR will automatically locate the index number you select The VCR will search forward or reverse from the location you are on the tape 1 Insert the prerecorded tape and press STOP 2 Press SEARCH on the remote to display the INDEX SEARCH me...

Page 32: ...layback HI FI LINEAR MIX Feature The VCR records the same audio on both the hi fi and linear tracks on the tape The Hi Fi stereo sound is recorded on separate left and right stereo channels Monaural sound is recorded on the linear track To enjoy hi fi sound connect your VCR to a stereo television or amplifier receiver using the audio video jacks The Tape Playback HI FI LINEAR MIX feature lets you ...

Page 33: ... minutes long During playback the VCR automatically skips the detected commercial segments or you can choose to manually skip them This feature reduces three minutes of commercials into approximately 8 12 seconds of fast forwarding in the SLP speed You can select a background of blue or see the video as the commercials are skipped After recording the VCR rewinds the tape to the beginning of the re...

Page 34: ...cial segment one isolated commercial is shown without others or a commercial is longer than one minute Press FF to scan through the commercial It is possible that part of a recorded program might be skipped if the program segment is between commercials and less than one minute or there are frequent dark and quiet scenes If part of the program is skipped rewind the tape to the beginning of the skip...

Page 35: ...e slow motion picture search and frame advance work well Using the Recording Features Recording Pause This feature allows you to prevent recording short passages of unwanted material Press PAUSE during recording to stop and start recording REC P appears in the VCRÕs display panel The VCR will automatically switch from pause to stop after a few minutes Pro Tect Plus Locking Feature To protect your ...

Page 36: ...ator appears in the VCRÕs display panel and on the TV screen 5 Select the channel to be recorded The channel number appears in the VCRÕs display panel and on the TV screen 6 Press RECORD on the VCR or REC on the remote to begin recording REC appears in the VCRÕs display panel while the VCR is recording Watch a TV Channel While VCR is Recording a Different Channel 1 Follow steps 1 through 6 above 2...

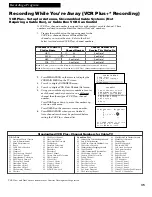
Page 37: ...wer s Choice 1 94 Viewer s Choice 2 55 WGN Chicago 43 WTBS Atlanta 60 WWOR New York Canadian List 67 AllarcomPayTelevision Superchannel 44 Arts Entertainment 72 CableNewsNetwork HeadlineNews 61 Cable News Network 70 Canadian HomeShopping Network 56 Canal Famille 69 Cathay International Television Inc 68 Chinavision Canada Corp 60 Country Music Television 63 Family Channel 62 First Choice 96 First ...

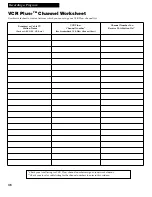
Page 38: ...Cable TV Station Name Such as ABC NBC CBS etc Channel Number You Receive This Station On VCR Plus Channel Number See Standardized VCR Plus Channel Chart Recording a Program Check your local listing for VCR Plus channel numbers assigned to network stations Check your local or cable listing for the channel numbers to enter in this column ...

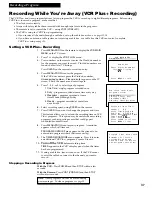
Page 39: ...Weekly Ð program recorded at same time once a week 6 Select recording speed using SPEED on the remote 7 Press CLEAR if you want to change the program end time This feature allows you to extend the recording time on VCR Plus programs This option may be useful when recording programs such as sporting events that could go past scheduled broadcast times 8 Press MENU PROG to enter your program A remind...

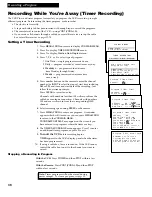
Page 40: ...ble box or antenna connection Channels with numbers 100 and over will record from the corresponding DSS channel 6 Select recording speed using SPEED on the remote 7 Press MENU PROG to enter your program A reminder appears which will time out or you can press MENU PROG to return to the VCR MAIN MENU PROGRAMS OVERLAP may appear on the screen if you have entered two programs where the times overlap 8...

Page 41: ...r the next program Edit the Program Press DISPLAY to edit the program The frequency menu appears first so you can change how often you want to record the program Press a number button to select the type of program you want to record Edit the rest of the program using the CLEAR and number buttons Clear the Program Press CLEAR when the program appears Timer Recording From the VCR s Line Input The li...

Page 42: ... VCR record and X REC appears in the VCRÕs display panel You can increase the amount of recording time by pressing REC on the remote or RECORD on the VCR 1 Turn on the VCR 2 Insert a tape with safety tab in place 3 Select the channel you want to record 4 Select the desired recording speed using SPEED on the remote 5 Press RECORD twice on the VCR or REC twice on the remote to activate express recor...

Page 43: ...eception STEREO MONO or SAP Set to STEREO for normal recording and to record broadcast stereo TV The STEREO indicator lights in the VCRÕs display panel when the station you are tuned to is broadcasting stereo Set to MONO if the stereo signal is weak and the sound is too ÒnoisyÓ Set to SAP to record SAP second audio program instead of the main audio on the linear track The main or normal audio will...

Page 44: ...the appropriate input on your amplifier or receiver Do not use the phono input Refer to your amplifier or receiver userÕs guide for information Audio and Video Dubbing Audio dubbing records new audio in place of the audio formerly recorded on the linear mono track of the tape Audio dubbing does not affect the audio recorded on the Hi Fi tracks or the recorded video To playback the dubbed audio set...

Page 45: ...o dub with the safety tab in place in the recording VCR 5 Press PLAY then PAUSE on the recording VCR when you reach the point on the tape where you want to begin dubbing 6 Press A V DUB on the recording VCRÕs remote until V DUB appears in the VCRÕs display panel The VCR enters the video dubbing mode and V DUB remains in the VCRÕs display panel 7 Press PLAY then PAUSE on the playback VCR The VCR en...

Page 46: ... the playback VCR press DISPLAY four times See page 28 for details 5 Press PLAY then PAUSE on playback VCR when you reach the point on the tape or program where you want to begin copying If the tape was not recorded on the playback VCR streaks may appear and you may need to adjust tracking 6 Press RECORD then PAUSE on recording VCR 7 Press PAUSE buttons on both VCRs at the same time to begin copyi...

Page 47: ...e audio video input jacks on the back L1 or front of the VCR L2 PAUSE Pauses action for viewing during playback Pauses recording to prevent recording of unwanted scenes PLAY Plays a tape POWER Turns the VCR on or off RECORD Starts VCR recording Used for express recording XPR Remote Sensor Receives signals from the remote control Aim the remote at this sensor with no objects between them Shuttle Di...

Page 48: ...not stereo to the L MONO jack to hear sound on both channels VIDEO and AUDIO R and L OUT Jacks Sends signals from VCR to another component like a TV monitor or VCR when it is connected to these jacks IN CH 3 4 AUDIO VIDEO MONO FROM ANTENNA L L R R IN OUT IN OUT OUT TO TELEVISION Display Panel This VCR has a feature where you can change the brightness level of the fluorescent display panel 1 Press ...

Page 49: ... Turned on or unlocked MARK 30 Marking process countdown PLAY Playback REC Record REC P Record pause REW Rewind SRCH Forward search SRCH Reverse search SLOW Slow motion STILL Frame advance STILL Play pause STOP VCR stopped TAPE flashes Set for timer Ð no tape TIMER Timer recording set V DUB Video Dubbing X REC Express recording in progress STEREO Indicator Lights when the station you are tuned to ...

Page 50: ...deep 318 mm Weight 9 3 pounds 4 2 kg Other Automatic Head Cleaner Storage Temperature Range 22ûF 30ûC to 149ûF 65ûC Operating Temperature Range 41ûF 5ûC to 104ûF 40ûC Check your cable companyÔs compatibility requirements Cleaning the VCR Use a soft cloth or dusting attachment of your vacuum cleaner to dust your VCR Remove dust from the ventilation holes on the top back sides and bottom of the cabi...

Page 51: ...s not cover Customer instruction Your OwnerÕs Manual clearly describes how to install adjust and operate your VCR Any additional information should be obtained from your Dealer Installation and related adjustments Signal reception problems not caused by your VCR Damage from misuse or neglect Cleaning of video audio heads Remote control batteries A VCR that has been modified or incorporated into ot...

Page 52: ...he corresponding compatible TV See page 20 Reprogram remote for RCA TV See page 20 Aim remote at TV with no objects between them Change batteries Remove batteries and hold down one or more buttons for several seconds to drain the microprocessor inside the remote to reset it Reinstall the batteries and try remote again Press TV AUX VCR2 LD or DSS CABLE to set remote to control a compatible componen...

Page 53: ...ow Check to see if time and date are correct Ñ including AM PM Program exceeded tapeÕs length or tape was not rewound beforehand VCR was not turned off at the time recording was to start No tape in VCR or cassetteÕs safety tab broken off VCR is removing tape from heads This is normal The head cylinder inside the VCR will continue to rotate for a few minutes after you put the VCR in the stop mode C...

Page 54: ...rking Set the CA Playback feature in the PREFERENCES menu to MANUAL The commercial advance feature does not mark commercials under the following situations CA Marking ON OFF feature set to OFF See page 31 Recording is less than 15 minutes A single isolated commercial cannot be marked Recording started in the middle of a commercial segment The commercial is longer than one minute A commercial group...

Page 55: ...peed a 3 minute commercial break is scanned through in approximately 8 12 seconds In SP it takes about 25 35 seconds Yes The recorded program including commercials can be viewed by setting the CA Playback feature to MANUAL Simply rewind the tape to just before the skipped segment and press PLAY to view the program Yes If the CA Playback feature is set to AUTO the marked commercials should be skipp...

Page 56: ...nnections 2 3 Card Registration i Cassette In Indicator 24 34 47 CH3 CH4 Switch 3 9 46 CHAN and CHANNEL TRACKING Buttons 17 19 21 45 Channel Number Indicator 47 CHANNELS Menu 16 Checking Timer and VCR Plus Programs 37 Checks Trouble 50 52 Choisissez une Langue 17 Choosing a Hookup 2 Cleaning the VCR 48 CLEAR Button 13 18 19 25 29 30 38 39 Clearing Timer and VCR Plus Programs 39 Clock Set Manual 15...

Page 57: ...18 42 45 J Jog Shuttle Buttons 18 19 Feature 28 L L1 and L2 Indicators 42 43 47 Languages Select for Displays 17 Limited Warranty 49 Line Indicators L1 and L2 42 43 47 Line Input Recording From 39 Linear Search Playback 30 Locking the VCR 33 LP Indicator 47 LP Speed 33 M Manual Clock Set 15 Manual Tracking 27 MARK COMM Indicators 31 47 MENU PROG Button 11 18 25 37 39 42 MOVE Arrow Buttons 11 18 19...

Page 58: ...on Card i Remote Batteries Inserting 10 Remote Control Buttons 18 19 Remote Control VCR1 VCR2 Feature 18 19 Remote Sensor 45 Remove or Add Channels from Memory 13 REMOVE ADD CHANNEL Menu 13 Removing Displays for Copying 44 REW Rewind Button 18 25 30 47 Rewind Search 25 S Safety Precautions i SAP Indicator 41 47 SAP Recording 41 Satellite Receiver Codes 22 Satellite Receiver Connections 2 6 7 Savin...

Page 59: ... 19 TV Turn On 11 TV VCR Button 17 19 U Use the On Screen Menu System 11 Using the VCR2 LD Button 20 V VCR Controls 45 47 VCR Function Buttons on Remote 18 19 VCR Indicator 47 VCR Plus Recording Channel List 35 Channel Worksheet 36 Checking Programs 39 Clearing Programs 39 Editing Programs 39 PlusCodes 35 Setup 38 Stopping 37 VCR PLUS Menu 35 37 Worksheet for Channels 36 VCR Cleaning 48 VCR Turn O...

Page 60: ... 10330 North Meridian Street Indianapolis IN 46290 1024 1996 Thomson Consumer Electronics Inc Trademark s Registered Marca s Registrada s Printed in Singapore Part Number 96 VR689HF 1 If you would like a copy of this manual in French please follow the instructions below Si un livret d instructions en français n est pas inclus avec votre appareil vous pouvez en obtenir un indiquer le numéro de modè...

Reviews: