background image

ENGLISH

7.

 Do not connect this product to any equipment or accessories not foreseen.

For suspended installation, only use the dedicated anchoring points and do not try to hang this 
product by using elements that are unsuitable or not specific for this purpose.
Also check the suitability of the support surface to which the product is anchored (wall, ceiling, 
structure,  etc.),  and  the  components  used  for  attachment  (screw  anchors,  screws,  brackets  not 
supplied by RCF etc.), which must guarantee the security of the system / installation over time, also 
considering, for example, the mechanical vibrations normally generated by transducers.
To  prevent  the  risk  of  falling  equipment,  do  not  stack  multiple  units  of  this  product  unless  this 
possibility is specified in the instruction manual.

8.


RCF S.p.A

strongly recommends this product is only installed by professional qualified 

installers (or specialised firms) who can ensure correct installation and certify it according to 
the regulations in force.
The entire audio system must comply with the current standards and regulations regarding 
electrical systems.

9. 

Supports and trolleys

The equipment should be only used on trolleys or supports, where necessary, that are recommended 
by the manufacturer. The equipment / support / trolley assembly must be moved with extreme caution. 
Sudden stops, excessive pushing force and uneven floors may cause the assembly to overturn.

10.

  There  are  numerous  mechanical  and  electrical  factors  to  be  considered  when  installing  a 

professional audio system (in addition to those which are strictly acoustic, such as sound pressure, 
angles of coverage, frequency response, etc.).

11. 

Hearing loss

Exposure to high sound levels can cause permanent hearing loss. The acoustic pressure level that 
leads to hearing loss is different  from person to person and depends on the duration of exposure. 
To  prevent  potentially  dangerous  exposure  to  high  levels  of  acoustic  pressure,  anyone  who  is 
exposed to these levels should use adequate protection devices. When a transducer capable of 
producing high sound levels is being used, it is therefore necessary to wear ear plugs or protective 
earphones.
See  the  technical  specifications  in  the  instruction  manual  for  the  maximum  sound  pressure  the 
loudspeaker is capable of producing.

IMPORTANT NOTES

To prevent the occurrence of noise on the cables that carry microphone signals or line signals 
(for example, 0 dB), only use screened cables and avoid running them in the vicinity of:

• equipment that produces high-intensity electromagnetic fields (for example, high power
  transformers);
• mains cables;
• lines that supply loudspeakers.

OPERATING PRECAUTIONS

• Do not obstruct the ventilation grilles of the unit. Situate this product far from any heat sources
  and always ensure adequate air circulation around the ventilation grilles. 
• Do not overload this product for extended periods of time.
• Never force the control elements (keys, knobs, etc. ).
• Do not use solvents, alcohol, benzene or other volatile substances for cleaning the external
  parts of this product.

• Keep any flame far from the device

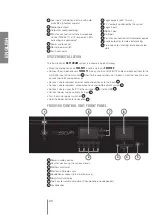
•  The  FMU  9100  must  always  stand  around  1  cm.  above  the  surface  of  the  desk  (or  shelf),  in 

order to allow correct heat dissipation. For this purpose 4 rubben feet are provided with the unit: 

please remuve only when 19” rack mounted. Above the FMU 9100 5 cm. must be kept empty to 

guarantee proper ventilation as well.


Summary of Contents for FM S9411

Page 1: ...the rules of sound User manual Manuale d uso RCF FORUM SISTEMA 9000 FMS9411 RCF FORUM...

Page 2: ...ato o schiacciato da oggetti al fine di salvaguardarne la perfetta integrit e Per evitare il rischio di shock elettrici non aprire mai l apparecchio all interno non vi sono parti che possono essere ut...

Page 3: ...enza ecc 11 Perdita dell udito L esposizione ad elevati livelli sonori pu provocare la perdita permanente dell udito Il livello di pressione acustica pericolosa per l udito varia sensibilmente da pers...

Page 4: ...nsioni di facile leggibilit Le icone associate ai tasti e messaggi interattivi rendono il sistema facile da usare anche per utilizzatori non esperti Mediante un apposito men possibile selezionare la l...

Page 5: ...la prima linea dell unit centrale 4 poi alla seconda e cos via Si tenga presente che possono essere collegate massimo 30 basi microfoniche per linea Collegare se ci fosse la necessit le sorgenti audio...

Page 6: ...uffie o altoparlante 7 5 tasti multifunzione 8 Led richiesta di parola 9 Led microfono attivo 10 Tasto richiesta di parola o prioritario 11 Tasto accensione spegnimento microfono 12 Altoparlante 13 Us...

Page 7: ...d intervento 10 e attivazione microfono 11 sono abilitati I tasti della votazione 7 sono disabilitati Si pu inoltre regolare il volume dell altoparlante o della cuffia 6 Nel terzo caso tutti i tasti s...

Page 8: ...viene visualizzato il messaggio su due righe Se si desidera ritornare alla schermata base senza memorizzare la scelta baster premere il tasto tornare alla schermata base Il pulsante mute permette di...

Page 9: ...rvento 11 o il tasto 10 Lo spegnimento del led verde 8 conferma la cancellazione Nelcasodiconferenzaliberaper attivare il microfono sar sufficientepremereiltastod accensionedel microfono 11 Se non si...

Page 10: ...stema Nel caso di risposta con scelta multipla per esprimere la preferenza bisogna premere i tasti corrispettivi all icone L evidenziazione dell icone render visibile l opzioni di voto scelte Per modi...

Page 11: ...alla schermata base Premendo il tasto si passa alla schermata di gestione della votazione Premendo il tasto si passa alla schermata di settaggio della lingua display Selezionare lingua display Lingua...

Page 12: ...evidenziata Per disattivarla bisogna ripremere l icona Premendo il tasto si manda un segnale acustico di richiamo Passando in modalit conferenza manuale sul display saranno visualizzati 1 Data 2 Ora 3...

Page 13: ...utilizzato se il relatore non si spegne il microfono impedendo il funzionamento dell automatismo Passando in modalit conferenza automatica a tempo sul display saranno visualizzati 1 Data 2 Ora 3 5 ico...

Page 14: ...e conferma presenza per avviare la procedura automaticamente registrato come presente Se richiesto oltre alla scritta potrebbe apparire un conto alla rovescia Premendo il pulsante si blocca la richies...

Page 15: ...voto mio pu ritornare alla schermata delle opzioni di risposta per rivotare Espresso il voto dopo 3 secondi ritorna automaticamente la schermata della modalit voting con l aggiunta dello stato di voto...

Page 16: ...i pulsanti sel lingua e sel lingua Chi ha la smart card pu memorizzare la lingua display selezionata con il tasto set In assenza di smart card con set si memorizza sulla console Premendo il tasto si r...

Page 17: ...microfono attivo La disattivazione del microfono si pu effettuare premendo uno dei due tasti microfonici 10 o 11 Nel secondo caso per entrare in priorit sar sufficiente premere il tasto microfonico 1...

Page 18: ...rmare presenza Favorevole si Contrario no Astenuto Non voto Tornare alla schermata base Selezionare controlli Conferenza automatica Conferenza automatica a tempo Conferenza libera Conferenza gestita C...

Page 19: ...no assegnate Il segretario pu attivare il microfono e intervenire nel seguente modo In miscelazione con i microfoni gi attivi Per entrare in miscelazione sar sufficiente premere il tasto microfonico 1...

Page 20: ...Arancio 3 Verde Bianco 4 Blu 5 Blu Bianco 6 verde 7 Marrone Bianco 8 Marrone CAVO STANDARD CAT 5 1 2 3 4 5 6 7 8 1 2 3 4 5 6 7 8 1 2 3 4 5 6 7 8 CONNETTORE CONNETTORE CAVO DI COLLEGAMENTO CAT5 CABLATO...

Page 21: ...scite IN OUT Note Cavi Connessione automatica 110 240 V 10 massimo 350 W con 120 basi collegate da 70 Hz a 15 KHz 0 5 90dB 90dB 80 dB SPL 110 dB SPL 3 dB 6 dB Fissa Portatile 20 55 C 10 50 C 90 430x14...

Page 22: ...e in Neodimio 1W Display retroilluminato 128x64 punti LED status prenotazione parola LED ad anello su asta microfonica status microfono 2 tasti volume altoparlante cuffie 2 tasti prenotazione parola 5...

Page 23: ...nnot be stepped on or crushed by objects e To prevent the risk of electric shock never open the product there are no parts inside that the user needs to access 2 2 POWER SUPPLY BY MEANS OF AN EXTERNAL...

Page 24: ...essure angles of coverage frequency response etc 11 Hearing loss Exposure to high sound levels can cause permanent hearing loss The acoustic pressure level that leads to hearing loss is different from...

Page 25: ...interactive messages make the system easy to use even for untrained users Thanks to an appropriate menu it is possible to select the language of displayed messages and indications as well as special...

Page 26: ...ed audio output to sound reinforcement system 2 Connect where used the PC to the serial port 11 or to the USB 12 Connect power supply cable to its input 5 Turn the master power switch on 6 Hold the po...

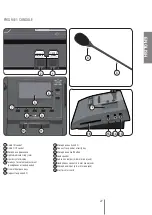
Page 27: ...adjustment headphones or loudspeaker 7 Five multipurpose keys 8 Request to speak LED 9 Microphone active LED 10 Request to speak or priority key 11 Microphone on off button 12 Loudspeaker 13 Audio li...

Page 28: ...hone activation 11 and voting 7 keys are not enabled The delegate can only adjust the loudspeaker or headphones volume 6 In the second case the request to speak 10 and microphone activation 11 keys ar...

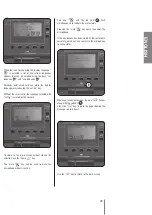
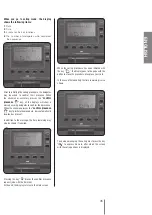
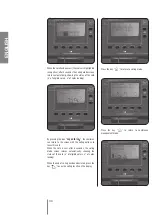
Page 29: ...he page showing the message on two lines To return to the main screen without storing the selection use the home key The mute key can be used to mute the microphone when it is active Use the key to re...

Page 30: ...r the key 10 The cancellation is confirmed when the green LED 8 goes off In the case of free discussion to activate the microphone just press the microphone activation key 11 If it does not switch on...

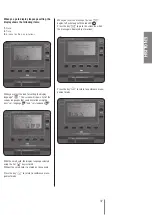
Page 31: ...oting with multiple choices to express your vote press the keys corresponding to the icon The icon chosen is highlighted to show the voting options chosen To change your vote press the key correspondi...

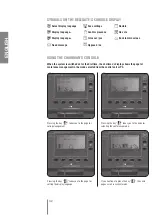
Page 32: ...C Abstain No vote Back to main screen Pressing the key takes you to the page for voting management Pressing the key takes you to the page for setting the display language Select display language Displ...

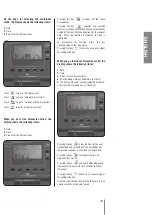
Page 33: ...To disactivate the function press the key corresponding to that icon again Pressing the key transmits an acoustic signal for calling attention When you go to manual discussion mode the display shows t...

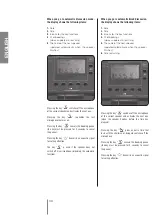
Page 34: ...key is used if the speaker does not switch off his microphone impeding the automatic function When you go to automatic timed discussion the display shows the following items 1 Date 2 Time 3 5 icons f...

Page 35: ...sses the confirm presence key to initiate the procedure he is automatically recorded as present In addition to the message the time remaining may also be shown if required Pressing the key blocks the...

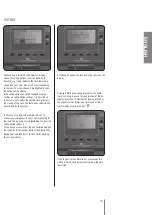
Page 36: ...y vote the chairman can return to the screen with the voting options to recast his vote When the vote is cast after 3 seconds the voting mode screen returns automatically showing the status of the vot...

Page 37: ...be scrolled using the keys sel language and sel language With the smart card the display language selected using the set key is stored Without the smart card it is stored on the console Press the key...

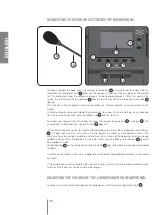
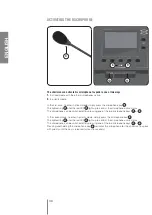
Page 38: ...e active status The microphone can be switched off by pressing one of the two microphone keys 10 or 11 In the second case to enter in priority mode simply press the microphone key 10 The lighted ring...

Page 39: ...e settings Confirm presence In favour yes Opposed no Abstain No vote Return to home page Select controls Automatic discussion Timed automatic discussion Free discussion Managed discussion Cancel booki...

Page 40: ...e functions assigned to it The secretary can activate the microphone to speak in this way In mixed mode with the other microphones active To enter in mixed mode simply press the microphone key 11 The...

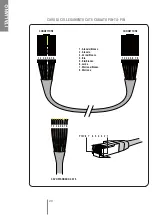
Page 41: ...White 2 Orange 3 Green White 4 Blue 5 Blue White 6 Green 7 Brown White 8 Brown STANDARD CAT5 CABLE 1 2 3 4 5 6 7 8 1 2 3 4 5 6 7 8 1 2 3 4 5 6 7 8 CONNECTOR CONNECTOR CAT5 PIN TO PIN CONNECTION CABLE...

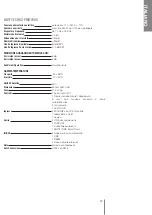
Page 42: ...Output IN OUT Note Connections and Wires Automatic 110 240 V 10 max 350 W with 120 consoles 70 Hz to 15 KHz 0 5 90dB 90dB 80 dB SPL 110 dB SPL 3 dB 6 dB Fixed Transportable 20 55 C 10 50 C 90 430x140...

Page 43: ...KHz High quality high efficiency with Neodymium magnet 1W Back lit display 128x64 pixel LED status talk book Ring LED on a gooseneck 2 keys volume loudspeaker headphone 2 buttons talk book 5 multi fu...

Page 44: ...2 274411 fax 39 0522 274484 e mail rcfservice rcf it Salvo eventuali errori ed omissioni RCF S p A si riserva il diritto di apportare modifiche senza preavviso Except possible errors and omissions RCF...

Reviews: