background image


25 


ENTRETIEN 


Balai central 

 
Le balai central est la partie qui ramasse les 
déchets et les verse dans le bac arrière. 
 

Attention


Ne jamais ramasser de fils, cordes etc...car ils 
peuvent endommager les soies s'ils s'enroulent au 
balai. Un contrôle périodique du balai est 
conseillé. 


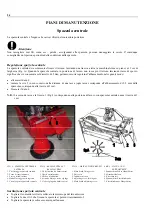
Réglage du balai central 

Le balai central ne doit qu'effleurer le sol en 
laissant une trace par terre (avec machine arrêtée 
sur sol) de 3 cm de largeur (Fig.A). Lorsque le 
balai central, en position de travail, ne touche plus 
le sol et laisse des traces de saleté, cela signifie 
qu'il est usé sur le diamètre de 5 mm, et qu'il faut 
donc en régler la descente comme suit: 


desserrer l’écrou 4. 


tourner la vis 5 d’un cran dans le sens des 
aiguilles d’une montre. (Chaque cran 
correspond à la descente de 2,5 mm du balai 
et à une trace de 3 cm). 


bloquer l’écrou 4.  


NOTA: 

le deuxième cran et la flèche 3 (Fig. 4) 
correspondent à la position de travail 
avec le nouveau balai central (trace de 3 
cm). 


Remplacement du balai central 


Enlever le bac à déchets et soulever la 
balayeuse par le côté avant. 


Desserrer les deux vis 1 fixant le balai au 
pivots d’entraînement 2. 


Enlever le balai usé et monter le nouveau balai. 


MAINTENANCE 


Main brush 

 
The main brush sweeps dust and refuse into the 
bin at the rear of the motor-sweeper. 


Warning


Never sweep up string, wire, etc., which can 
become entangled in the brush and damage the 
bristles. Periodically check the condition of the 
brush. 


Adjusting the main brush 

The main brush should just touch the floor. 
While the motor-sweeper is stationary on an 
even floor the section of floor covered by the 
bristles should be 3 cm wide (see Fig. A). If the 
main brush no longer touches the floor, or leaves 
lines of dirt, it has worn down (5 mm) and must 
be lowered. Proceed as follows to lower the 
main brush: 


slacken off nut 4 


turn screw 5 clockwise by 1 notch (each 
notch corresponding to 2.5 mm lowering - 3 
cm wide trace) 


re-tighten nut 4. 


N.B.:

  the second notch and arrow 3 (Fig. 4) 

correspond to the work position with a 
new main brush (3 cm trace) 


Replacing the main brush 


Remove the refuse bin and lift up the motor-
sweeper at the front. 


Remove the two bolts 1 securing the brush to 
the drive pins 2. 


Remove the old brush and mount the new 
one. 


WARTUNGSARBEITEN 


Hauptbürste 

 
Die Hauptbürste lädt die Abfälle in den hinteren 
Behälter. 


Achtung


Keine Seile, Kabel und dergleichen aufwischen, 
denn beim Verfangen in der Bürste könnten die 
Borsten beschädigt werden. Auf jeden Fall ist es 
empfehlenswert, die Bürste regelmäßig zu 
kontrollieren. 


Einstellung der Hauptbürste 

Die Hauptbürste darf den Boden nur streifen und 
ihre Spur auf ebener Fläche bei stillstehender 
Maschine muß 3 cm breit sein, (siehe Abb. A). 
Wenn die Hauptbürste in Arbeitsposition den Boden 
nicht mehr berührt und Schmutzspuren hinterläßt, 
bedeutet dies, daß ihr Durchmesser  abgenutzt ist (5 
mm), und daß ihre Absenkung folgendermaßen 
reguliert werden muß. 


die Mutter 4 lösen 


die Schraube 5 in Uhrzeigersinn um eine Raste 
verstellen (eine Raste beträgt 2,5 mm = Spur 
von 3 cm). 


die Mutter 4 wieder festziehen. 


MERKE:

  Die Arbeitsstellung der Hauptbürste im 

Neuzustand ist durch die zweite Raste 
und Pfeil 3 (Abb. 4) dargestellt. 


Ersetzung der Hauptbürste 


Den Abfallbehälter entfernen und die 
Kehrmaschine von der Vorderseite anheben. 


Die beiden Schrauben 1, die die Bürste an die 
Mitnehmerbolzen 2 festhalten, entfernen. 


Die alte Bürste entfernen und mit der neuen 
ersetzen. 


Summary of Contents for 37.00.202

Page 1: ...E USE AND MAINTENANCE MANUAL NOTICE D UTILISATION ET ENTRETIEN HANDBUCH FÜR GEBRAUCH UND WARTUNG 1 9 07390 09 2010 R C M S p A 41041 Casinalbo MO Via Tiraboschi 4 Tel 39 059 51 53 11 Telefax 39 059 51 07 83 Internet http www rcm it E mail info rcm it ...

Page 2: ...RCM ...
Page 3: ...1 MANUALE DI USO E MANUTENZIONE NOTICE D UTILISATION ET D ENTRETIEN INSTRUCTIONS AND MAINTENANCE HANDBOOK BEDIENUNGS UND INSTANDHALTUNGSHINWEISEN ...

Page 4: ...ta esclusivamente all impiego come spazzatrice Pertanto per qualsiasi altro impiego diverso da questa destinazione non ci assumiamo alcuna responsabilità per gli eventuali danni risultanti Il rischio è a pieno carico dell utente 2 Questa macchina non è adatta ad aspirare sostanze tossiche pertanto è da classificarsi di categoria U 3 La motoscopa deve essere usata solamente da personale addestrato ...

Page 5: ... us for any requirements Caution 1 This machine is intended for use as a sweeper only We therefore accept no responsibility for any damage deriving from its use for any other purpose All risks are for the user s account 2 This motor sweeper is not suitable for sweeping toxic substances It is a U class machine 3 The motor sweeper must only be used by trained and authorised personnel 4 Always park t...

Page 6: ...unzione della motoscopa 20 Norme da seguire durante il funzionamento 22 Norme per la manutenzione 22 PIANI DI MANUTENZIONE 24 Spazzola centrale 24 Spazzola laterale 26 Sistema di avanzamento 28 Cinghie di comando 28 Filtro a pannello 30 Freno di stazionamento 32 Contenitore rifiuti 33 Sostituzione olio motore 34 Operazioni periodiche di controllo e manutenzione e controlli di sicurezza 35 Ricerca ...

Page 7: ...r pour la mise en service de la balayeuse 21 Normes à suivre au cours du fonctionnement 23 Normes d entretien 23 ENTRETIEN 25 Balai central 25 Balai latéral 27 Système d avance 29 Courroies de commande 29 Filtre à poussière en panneau 31 Frein de stationnement 32 Conteneur à dechets 33 Vidange d huile moteur 34 Opérations périodiques de contrôle et entretien et contrôles de sécurité 36 Recherche d...

Page 8: ...or the first time 21 Starting work 21 Regulations to be followed during operation 23 Maintenance regulations 23 MAINTENANCE 25 Main brush 25 Side brush 27 Sweeper drive system 29 Drive belts 29 Panel type dust filter 31 Parking brake 32 Refuse container 33 Changing the engine oil 34 Routine controls and maintenance operations and safety checks 37 Troubleshooting 41 Safety information 41 Electrical...

Page 9: ...Inbetriebnahme der Kehrmaschine 21 Vorschriften für einen störungsfreien Betrieb 23 Wartungsvorschriften 23 WARTUNGSARBEITEN 25 Hauptbürste 25 Seitenbürste 27 Antriebssystem 29 Antriebsriemen 29 Flachfilter zum Staubluftfiltrieren 31 Feststellbremse 32 Schumtzbehälter 33 Motorölwechsel 34 Arbeiten zur regelmäßigen Überprüfung und Wartung und Sicherheitskontrollen 38 Fehlersuche 42 Informationen üb...

Page 10: ...s pour l identification de la balayeuse GENERALITIES Data for motor sweeper identification ALLGEMEINES Kenndaten der Kehrmaschine Targhetta riassuntiva del tipo di motoscopa Plaquette d identification du type de balayeuse Motor sweeper type plate Typenschild der Kehrmaschine ...

Page 11: ...ENSIONI MOTOSCOPA CAPACITA CONTENITORE Capacità geometrica l 60 PRESTAZIONI Velocità di lavoro km h 0 4 Minimo spazio per inversione a U mm 1500 Pendenza massima superabile impiego saltuario con contenitore carico e spazzola laterale alzata 20 LARGHEZZA DI PULIZIA Con la sola spazzola centrale mm 700 Con spazzola centrale e spazzola laterale mm 950 Giri spazzola centrale giri min 480 Giri spazzola...

Page 12: ...2780 Depressione in colonna d acqua cassa filtro mm 30 Ventola ø mm 230 Chiusura aspirazione a farfalla SCUOTITORE FILTRO POLVERE Sistema elettrico V W 12 40 MOTORE Fabbricante HONDA Modello GX160K1 Alesaggio mm 68 Corsa mm 45 Cilindrata cm 163 Potenza massima HP 5 5 Giri motore g min 2780 Avviamento elettrico V 12 Raffreddamento aria Autonomia h 4 Capacità serbatoio carburante l 3 6 Capacità copp...

Page 13: ... 1 DIMENSIONS DE LA BALAYEUSE CAPACITE DU BAC Capacité géométrique l 60 PERFORMANCES Vitesse de fonctionnement km h 0 4 Espace minimal pour inversion en U mm 1 500 Inclinaison maximale surmontable emploi occasionnel avec le bac plein et le balai latéral soulevé 20 LARGEUR DE NETTOYAGE Avec balai central mm 700 Avec balai central et balai latéral mm 950 Tours balai central tr mn 480 Tours balai lat...

Page 14: ... d eau caisse filtre mm 30 Ventilateur ø mm 230 Fermeture aspiration par vanne papillon VIBRATEUR FILTRE POUSSIERES Système electrique V W 12 40 MOTEUR Marque du moteur HONDA Modèle GX160K1 Alésage mm 68 Course mm 45 Cylindrée cm 163 Puissance maximale HP 5 5 Tours moteur tr mn 2780 Mise en marche electrique V 12 Refroidissement par l air Autonomie h 4 Capacité du réservoir à carburant l 3 6 Capac...

Page 15: ... mm 825 Weight packing only kg FIG 1 DIMENSIONS OF MOTOR SWEEPER BIN CAPACITY Bin volume l 60 PERFORMANCE Working speed km h 0 4 Min turning circle mm 1500 Max negotiable gradient occasional with bin full and side brush raised 20 CLEANING DATA Cleaning width main brush only mm 700 Cleaning width main and side brush mm 950 Main brush speed rpm 480 Side brush speed rpm 65 ...

Page 16: ...speed rpm 2780 Suction vacuum filter body column of water mm 30 Fan diameter ø mm 230 Suction shut off throttle FILTER CLEANER Electrical type V W 12 40 MOTOR Make HONDA Model GX160K1 Bore mm 68 Stroke mm 45 Displacement cm 163 Max power HP 5 5 Motor revolutions rpm 2780 Starting up electrical V 12 Cooling air Working autonomy h 4 Fuel tank capacity l 3 6 Motor oil sump capacity l 0 6 FUEL TYPE un...

Page 17: ...CHINE FASSUNGSVERMÖGEN DES BEHÄLTERS Geometrisches Fassungsvermögen l 60 LEISTUNGEN Arbeitsgeschwindigkeit km h 0 4 Mindest Wendebereich mm 1500 Maximal erreichbarer Neigungswinkel nicht bei Dauerbetrieb bei vollem Auffangbehälter und angehobener Seitenbürste 20 KEHRDATEN Kehrbreite mit nur der Hauptbürste mm 700 Kehrbreite mit der Haupt und Seitenbürste mm 950 Drehzahl der Hauptbürste U Min 480 D...

Page 18: ...ehzahl U Min 2780 An der Wassersäule gemessener Unterdruck Filtergehäuse mm 30 Ventilatordiameter mm 230 Verschlußart Klappe STAUBFILTERRÜTTLER Elektrisches System V W 12 40 MOTOR Fabrikat HONDA Typ GX160K1 Bohrung mm 68 Hub mm 45 Zylinderhubraum cm3 163 Max Leistung HP 5 5 Drehzahl U Min 2780 Elektrisches Anlassen V 12 Kühlung Luft Autonomie h 4 Inhalt Kraftstofftank l 3 6 Inhalt Ölsumpf l 0 6 KR...

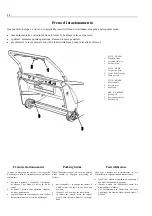
Page 19: ...et descente du balai latéral 3 Bouton de fermeture aspiration 4 Poignée d entraînement 5 Bouton de levage flap avamt 6 Interrupteur de démarrage moteur 7 Bouton vibrateur FIG 2 CONTROLS 1 Rear wheel brake handle 2 Side brush lifting and lowering level 3 Suction off knob 4 Drive control handle 5 Front flap lifting handle 6 Motor starter key switch 7 Shaker button ABB 2 STEUERELEMENTE 1 Handgriff Hi...

Page 20: ...amento della macchina controllare che il funzionamento non metta in pericolo nessuno Astenersi da qualsiasi modo di lavorare che possa pregiudicare la stabilità della macchina Pericolo Oltre alle norme previste dalla legislazione il responsabile della gestione della macchina deve istruire gli operatori su quanto segue Le protezioni fisse devono rimanere sempre nella loro sede correttamente fissate...

Page 21: ...hich might impair its safety Before switching on and starting up the machine check that its operation will not put anyone in danger Never work in any way which may impair the stability of the machine Caution Apart from the regulations envisaged the person in charge of the machine must inform the operators of the rules which follow The fixed housings must always be left in place correctly secured I...

Page 22: ...ettendo in funzione le ruote posteriori mediante la catena 4 La distanza fra il rullo 3 e la ruota 2 a motoscopa in riposo deve essere di 1 2 mm circa Per mantenere i rulli alla quota sopra indicata registrare mediante il registro 5 FIG 3 SCHEMA COMANDO TRAZIONE 1 Leva comando trazione 2 Ruota comando trazione 3 Rullo trazione 4 Catena di comando trazione 5 Registro cavo trazione FIG 3 SCHÉMA D EN...

Page 23: ...Raise the side brush by means of handle 2 Fig 2 Starting the motor Follow the instructions in the motor handbook The motor sweeper is ready to work as soon as the motor has started Starting work Forward drive If the sweeper is motor driven pull lever 1 Fig 3 This moves drive wheel 2 forward to engage roller 3 which drives the rear wheels via chain 4 There must be a gap of 1 2 mm between drive whee...

Page 24: ...tito solo agli operatori autorizzati dal responsabile della gestione della macchina e a conoscenza del contenuto del presente manuale Detti operatori devono essere persone fisicamente ed intellettualmente idonee non sotto l effetto di alcool droghe o farmaci Accertarsi che non vi siano sulla macchina oggetti estranei utensili stracci attrezzi ecc la macchina dopo l accensione non emetta rumori str...

Page 25: ...sed by the person in charge of the machine who are familiar with the contents of this manual These operators must be physically and mentally suitable and must not be under the influence of alcohol drugs or medication Make sure that there are no foreign bodies such as tools rags equipment etc on the machine the machine does not make strange noises after switch on in this case stop it immediately an...

Page 26: ...accia di 3 cm bloccare il dado 4 N B La seconda tacca e la freccia 3 Fig 4 corrispondono alla posizione di lavoro con spazzola centrale nuova traccia di 3 cm FIG 4 SPAZZOLA CENTRALE E LATERALE 1 Vite fissaggio spazzola centrale 2 Perno di trascinamento 3 Frecce di indicazione 4 Dado bloccaggio vite registro 5 Vite di registro spazzola centrale FIG 4 BALAI CENTRAL ET BALAI LATÉRAL 1 Vis de fixation...

Page 27: ...les should be 3 cm wide see Fig A If the main brush no longer touches the floor or leaves lines of dirt it has worn down 5 mm and must be lowered Proceed as follows to lower the main brush slacken off nut 4 turn screw 5 clockwise by 1 notch each notch corresponding to 2 5 mm lowering 3 cm wide trace re tighten nut 4 N B the second notch and arrow 3 Fig 4 correspond to the work position with a new ...

Page 28: ...sollevata da terra onde evitare deformazioni piegatura alle setole della spazzola FIG 5 TRACCIA SPAZZOLA LATERALE 1 Registro abbassamento spazzola laterale 2 Ghiera 3 Maniglia sollevamento spazzola laterale 4 Supporto spazzola 5 Vite fissaggio spazzola A Traccia spazzola FIG 5 TRACE DU BALAI LATERAL 1 Vis de réglage descente balai latéral 2 Bague 3 Poignée de levage balai latéral 4 Support balai 5...

Page 29: ... brush is as shown A Fig 5 As the bristles of the side brush wear down adjust the height of the brush from the floor by means of cable adjuster 1 Fig 5 by slackening ring nut 2 Replacing the side brush Remove the three screws 5 to free the brush from its support 4 N B when the motor sweeper is not in use the side brush must always be raised above the ground to prevent its bristles from becoming be...

Page 30: ...comando spazzola centrale 4 Cinghia comando spazzola laterale 5 Cinghia comando spazzole e meccanismo trazione 6 Dado fissaggio ruota trazione 7 Ruota trazione FIG 6 COURROIES DE COMMANDE 1 Vis de fixation de la roue d entraînement 2 Chaîne d entraînement 3 Courroie de commande du balai central 4 Courroie de commande du balai latéral 5 Courroie de commande des balais et mécanisme d entraînement 6 ...

Page 31: ...ically If necessary tighten drive chain 2 as follows slacken screw 1 and nut 6 push drive wheel 7 upward and re tighten screw 1 and nut 6 N B After this adjustment check and adjust as necessary the gap between the wheel 7 and the drive roller The belt and chain tension must be set correctly in order to avoid creating excessive loads on the bearings Antriebssystem Triebriemen Jede 100 Arbeitsstunde...

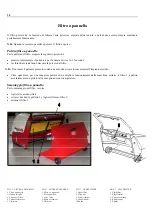
Page 32: ...ogni mese per una maggiore pulizia ed un migliore funzionamento della macchina estrarre il filtro 1 e pulirlo accuratamente con getto di aria o meglio ancora con aspiratore Smontaggio filtro a pannello Per lo smontaggio del filtro occorre togliere il cassetto rifiuti svitare i due dadi a galletto 2 e togliere il fermo filtro 3 estrarre il filtro 1 FIG 7 FILTRO A PANNELLO 1 Filtro a pannello 2 Dado...

Page 33: ...Cleaning the panel type filter Proceed as follows to clean the dust filter press button 4 rhythmically for about 10 15 seconds this causes filter striker 5 to strike against filter 1 frame and shake dust off the filter N B Do not keep the button pressed this might cause damage to the electrical system About once a month remove filter 1 and clean it with a jet of compressed air or better still a va...

Page 34: ...ur le levier de déblocage 2 Parking brake When the motor sweeper is at rest the parking brake should be engaged proceeding as follows pull the handle 1 to engage the retainer 2 which secures the lever in the limit stop position the pads 3 will now lock the rear wheels to release the wheels press the release lever 2 with the index finger of your right hand Feststellbremse Nach dem Anhalten der Kehr...

Page 35: ...ttention Lorsqu on démonte le conteneur à dechets pour n importe quelle raison il faut toujour arréter le moteur Rémonter le conteneur dans son émplacement en ayant soin de l accrocher correctement au chassis de la machine et raccrocher le levier 2 fig 9 Refuse container When the machine leaves dust on the ground this indicates that the refuse container is full it is necessary to empty it Switch o...

Page 36: ...uile moteur voir les instructions fournies par le livret d utilisation et d entretien HONDA Pour la vidange de l huile moteur procéder comme suit 1 retirer le bouchon sur le tuyau de vidange 1 2 verser l huile dans un récipient 3 replacer le bouchon sur le tuyau de vidange 1 4 remplir le moteur d huile DIESEL GAMMA SAE 30 Changing the engine oil N B For engine oil change intervals see the instruct...

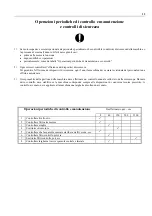
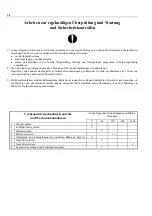
Page 37: ...nata dal personale di una officina autorizzata 3 Il responsabile della gestione della macchina deve effettuare un controllo annuale sullo stato della motoscopa Durante detto controllo deve stabilire se la macchina corrisponde sempre alle disposizioni di sicurezza tecnica prescritte A controllo avvenuto deve applicare alla macchina una targhetta di collaudo avvenuto Operazioni periodiche di control...

Page 38: ...sée par le personnel spécialisé tous les 5 ans 3 Le responsable de la gestion de la machine doit effectuer un contrôle annuel sur l état de la balayeuse Au cours de ce contrôle il doit établir si la machine est toujours bien conforme aux dispositions de sécurité prescrites Après avoir exécuté le contrôle il doit appliquer à la machine une plaquette attestant l essai effectué Opérations périodiques...

Page 39: ...ices are operating properly the machine must be overhauled by specialist staff every 5 years 3 The person in charge of the machine must make an annual check on its condition During this check he must decide whether the motor sweeper still complies with the technical safety regulations and then apply a marker plate to the machine to indicate that the check has been made Periodical maintenance check...

Page 40: ...eit der Sicherheitsvorrichtungen gewährleistet ist muß die Maschine alle 5 Jahre von einer autorisierten Fachwerkstatt überholt werden 3 Der Maschinenführer muß die Kehrmaschine jährlich auf einwandfreien Zustand überprüfen Hierbei ist sicherzustellen ob die Maschine den sicherheitstechnischen Regeln entspricht Nach Abschluß dieser Überholung ist auf der Maschine ein Schild zur Prüfbescheinigung a...

Page 41: ...e La spazzola centrale non gira Cinghia trasmissione rotta Sostituire Informazioni di sicurezza 1 Pulizia Nelle operazioni di pulizia e di lavaggio della macchina i detergenti aggressivi acidi ecc devono essere usati con cautela Attenersi alle istruzioni del produttore dei detergenti e nel caso usare indumenti protettivi tute guanti occhiali ecc 2 Atmosfera esplosiva La macchina non è stata costru...

Page 42: ...Informations de sécurité 1 Nettoyage Quant aux opérations de nettoyage et de lavage de la machine utiliser avec précaution les détergents agressifs les acides etc S en tenir aux instructions du producteur des détergents et au besoin utiliser des vêtements de protection tels que survêtements gants lunettes etc 2 Atmosphère explosive La machine n a pas été prévue pour travailler dans des milieux où ...

Page 43: ... entangled material The main brush does not turn Drive belt broken Fit new drive belt Safety information 1 Cleaning When cleaning and washing the machine take care when using aggressive detergents acids etc Follow the instructions provided by the detergent producer and wear protective clothing if appropriate e g overalls gloves goggles etc 2 Explosive atmosphere The machine is not constructed to w...

Page 44: ...r betriebsfremde Geräuschbildung der Hauptbürste In der Bürste verwickeltes Material Entfernen Die Hauptbürste dreht nicht Antriebsriemen kaputt Ersetzen Informationen über die Sicherheit 1 Reinigung Korrosionsfördernde oder säurehaltige Reinigungsmittel sind zur Säuberung der Maschine nur mit größter Vorsicht zu verwenden Die Herstellerangaben befolgen und ggf Schutzkleidung Arbeitsanzüge Handsch...

Page 45: ...r courant alterné 12V 5 Relais de démarrage 6 Régulateur 7 Moteur de démarrage 8 Fusible 16 A 9 Batterie 10 Moteur vibrateur 11 Interrupteur combiné à clé 12 Bouton vibrateur FIG 11 ELECTRICAL SYSTEM 1 Spark plug 2 Ignition coil 3 Oil level switch 4 Coils for 12VAC 5 Starting relay 6 Regulator 7 Starting motor 8 Fuse 16 A 9 Battery 10 Shaker motor 11 Combined key switch 12 Shaker button ABB 11 ELE...

Reviews: