56
Attenzione!
Prima di procedere alla sostituzione delle spazzole, togliere la chiave dal quadro di avviamento, evitando
così l’accensione accidentale di qualche motore.
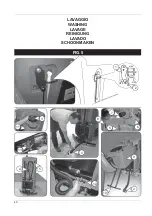
Smontaggio / montaggio spazzole a disco
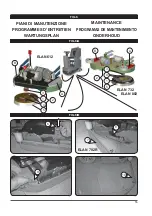
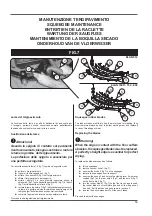
Il basamento spazzole è dotato di due sportelli d’ispezione A, B utilizzati per controllare l’usura delle spazzole e agevolare la sostituzione delle
stesse, procedere come segue per smontare e rimontare il gruppo spazzola 2:
1. allargare la molla 1 (
fi
g.6-6/A) verso l’esterno, come frecce in
fi
gura, in modo che il gruppo spazzola 2 (
fi
g.6-6/A) si s
fi
li dal mozzo 3
(
fi
g.6-6/A).
2. Per rimontare il gruppo spazzola 2 (
fi
g.6-6/A) sul mozzo 3 (
fi
g.6-6/A) eseguire una semplice operazione ad incastro.
Sostituzione spazzole a disco
1. allargare la molla 1 (
fi
g.6-6/A) verso l’esterno, come frecce in
fi
gura, in modo che il gruppo spazzola 2 (
fi
g.6-6/A) si s
fi
li dal mozzo 3
(
fi
g.6-6/A).
2. svitare le viti 4 con relativi piastrini (
fi
g.6-6/A) per togliere la spazzola 5 (
fi
g.6-6/A)
3. montare la nuova spazzola, ripetendo le stesse operazioni in modo inverso.
4. rimontare il gruppo spazzola 2 (
fi
g.6-6/A) sul mozzo 3 (
fi
g.6-6/A) con una semplice operazione ad incastro.
Sostituzione spazzole a rullo
1. tirare verso l’alto la levetta laterale sinistra 6 (
fi
g.6-6/B) del basamento spazzole per sganciare il
fl
ap 7 (
fi
g.6-6/B).
2. ruotare il supporto spazzola 8 (
fi
g.6-6/B) in senso orario
fi
no a
fi
ne asola.
3. s
fi
lare il supporto 8 (
fi
g.6-6/B) dal basamento e togliere la spazzola sul lato sinistro come indicato in foto.
4. montare la nuova spazzola ripetendo le operazioni in modo inverso.
Per sostituire la spazzola sul lato destro bisogna rimuovere la copiglia 9 (
fi
g.6-6/B) e sganciare il
fl
ap 10 (
fi
g.6-6/B), quindi procedere alla
sostituzione come descritto nei punti 2) 3) 4) per spazzola sinistra.
Pulizia delle spazzole
Per la pulizia occorre smontare le spazzole, procedere nel seguente modo:.
Per le “
spazzole a disco
” procedere solamente come descritto al punto 1 del paragrafo “
Smontaggio/Montaggio spazzole a disco
”
Per le “
spazzole a rulli
” procedere come descritto ai punti 1-2-3-4 del paragrafo “
Sostituzione spazzole a rulli
”
Pulire le spazzole con un getto d’acqua.
Warning!
Before replacing the brushes, remove the key from the starter panel, to ensure that no motor can be
started accidentally.
Demounting / mounting the disc brushes
The brushes base is equipped with two inspection hatches, A and B, used to check the wear of the brushes and ease their replacement;
proceed as follows to demount and remount brush assembly 2:
1. extend the spring 1 (FIG.6-6/A) outward, as shown by the arrows in the diagram, so that the brush assembly 2 (FIG.6-6/A) comes off
the hub 3 (FIG.6-6/A).
2. remount the brush assembly 2 (
fi
g.6-6/A) on the hub 3 (
fi
g.6-6/A) by simply
fi
tting it into place.
Replacing the disc brushes
1. extend the spring 1 (FIG.6-6/A) outward, as shown by the arrows in the diagram, so that the brush assembly 2 (FIG.6-6/A) comes off
the hub 3 (FIG.6-6/A).
2. unscrew the screws 4 and relative plates (
fi
g.6-6/A) to remove the brush 5 (
fi
g.6-6/A).
3.
fi
t the new brush repeating the same operation in reverse order.
4.
fi
t the brush assembly 2 (
fi
g.6-6/A) on the hub 3 (
fi
g.6-6/A) by simply
fi
tting it into place.
Replacing the roller brushes
1. pull up the lever 6 (
fi
g.6-6/B) on the left side of the brush support and unlock the
fl
ap 7 (
fi
g.6-6/B).
2. turn the brush mount 8 (
fi
g.6-6/B) clockwise to the end of its slot.
3. remove the mount 8 (
fi
g.6-6/B) from the support and remove the brush 4 as shown in the photo.
4.
fi
t the new brush by repeating the operations in reverse order.
To replacing the brush on right side, remove split pin 9 (
fi
g.6-6/B), and unlock
fl
ap 10 (
fi
g. 6-6/B) and repeat points 2-3-4 described for the left brush.
Cleaning the brushes
Un
fi
t the brushes to clean it, proceed as follows:
For the “
brush disc
” see point 1 described only at the paragraph “
Demounting/Mounting the disc brushes
”
For the “
roller brushes
” see points 1-2-3-4 described at the paragraph “
replacing the roller brushes
”
Use a water jet to clean the brushes.
Summary of Contents for Elan 612
Page 98: ...98 ...

