41
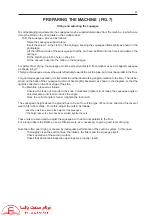
PREPARING THE MACHINE (FIG.7)
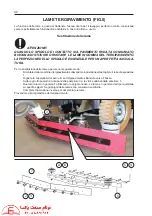
Fitting and adjusting the squeegee
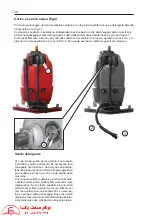
To suit packaging requirements, the squeegee may be supplied dismantled from the machine, in which case
it must be fi tted on the drive plate on the scrubber-drier.
To fi t the squeegee, proceed as follows:
·
Raise the squeegee support plate.
·
Insert the screw 1 in the slot 2 on the carriage, keeping the squeegee tilted slightly as shown in the
photograph.
·
Lift the left-hand side of the squeegee so that the pin 3 can be fi tted into the hole 4 provided on the
carriage.
·
Fit the R split-pin 4 in the hole on the pin 3.
·
Fit the vacuum hose into the collar on the squeegee.
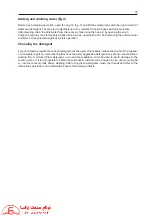
For perfect fl oor drying, the squeegee must be properly adjusted. fl oor-washer uses a V-shaped squeegee
as shown in fi g. 7.
This type of squeegee conveys the water effectively towards the suction pipe, but it must be parallel to the fl oor.
For good squeegee operation, it is important to set the ideal working angle in relation to the fl oor. The rubber
strip A on the back of the squeegee must work bent slightly backward, as shown in the diagram, so that the
liquid is collected on the front edge of the strip.
To obtain this, proceed as follows:
·
Unscrew the lock-nut 6 and turn the knob 7 clockwise (tighten) to increase the squeegee angle or
anti-clockwise (unscrew) to reduce the angle.
·
Once the correct angle is found, retighten the lock-nut 6.
The squeegee’s height above the ground has to be set to suit the type of fl oor to be dried and the level of
wear of its rubber strips. To do this, adjust the nuts 8 as follows:
·
loose the nuts 8 and set up the height of the squeegee.
·
if the height above the fl oor has been settled, tighten the nuts.
These nuts are also used to adjust the squeegee so that it works parallel to the fl oor.
For a long rubber strip lifetime, use as little pressure as is necessary to give a good level of drying.
Note that often poor drying is caused by inadequate performance of the suction system. In this case:
·
Thoroughly clean the suction lines, the intakes, the fi lters and the squeegee itself;
·
Check operation of the suction motors;
·
Check that all the tank inspection openings are properly closed.
Summary of Contents for JUMBO 1002 RN
Page 2: ...RCM ...
Page 3: ...ITA MANUALE USO E MANUTENZIONE GB INSTRUCTION AND MAINTENANCE HANDBOOK ...
Page 64: ...64 IMPIANTO ELETTRICO LINEA CRUSCOTTO FIG 15 ELECTRIC SYSTEM DASHBOARD LINE ...
Page 66: ...66 IMPIANTO ELETTRICO LINEA CENTRALE CRUSCOTTO FIG 15A ELECTRIC SYSTEM DASHBOARD MAIN LINE ...
Page 68: ...68 IMPIANTO ELETTRICO LINEA POSTERIORE FIG 15B ELECTRIC SYSTEM REAR LINE ...
Page 70: ...70 IMPIANTO ELETTRICO LINEA ATTUATORI PEDANA FIG 15C ELECTRIC SYSTEM ACTUATORS LINE BOARD ...
Page 72: ...72 1 FUSIBILI FIG 16 1 FUSIBILE GENERALE 150A ...


