20
BRUSHES
Disc brushes (only for KILO disc brush base)
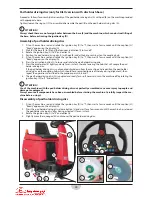
Proceed as follows for assembly/disassembly of the disc brush (A) on the machine provided with appropriate base:
!
ATTENTION!
Always check there are no foreign bodies between the base (J) and the machine, which can obstruct lifting of
the base, before activating the ignition key (B).
Assembly of disc brush
1. Sit on the machine seat and rotate the ignition key (B) to “I”, then wait a few seconds until the caption (D)
“Ready” appears on the display (C).
2. Wait for the brush base (J) to lift and the luminous indication (I) to turn off .
3. Rotate the ignition key (B) to “0” and extract it.
4. Position the disc brush (A) under the base (J), centring it on the coupling hub.
5. Sit on the machine seat and rotate the ignition key (B) to “I”, then wait a few seconds until the caption (D)
“Ready” appears on the display (C).
6. Press the activation button (E) to lower and rotate the brush.
7. Press the accelerator (F) lightly and only for an instant, thereby lowering the hub that will couple the brush.
If the brush is not coupled climb down from the machine and reposition the brush on the coupling hub,
which should have remained lowered (thereby easing alignment); then repeat the operations described in the
previous points 5, 6 and 7.
8. The disc brush (A) is coupled and ready for use; if necessary, turn the machine off by rotating the ignition key
(B) to “0” and extract it.
Disassembly of disc brush
1. Sit on the machine seat and rotate the ignition key (B) to “I”, then wait a few seconds until the caption (D)
“Ready” appears on the display (C).
2. Press the brush release button (G) and wait for a few seconds until the machine has released the brush after
having activated it for an instant.
3. Rotate the ignition key (B) to “0” and extract it.
4. Slightly move the squeegee (H) and recover the disc brush.
!
ATTENTION!
Use of the machine with the brush not perfectly assembled can cause injury to people and damage to equip-
ment.
Always ensure all components have been assembled before starting the machine. Carefully
inspect the machine before using it.
A
J
H
F
B
A
G
D
C
I
E
Summary of Contents for KILO
Page 2: ...2 KILO ...
Page 16: ...16 WIRING DIAGRAM 2 2 ...


