Instruction Manual
Innovative DisplayWorks
RCM-77
5
4
LEVELING/LOCATION
•
Place unit in a well-ventilated area.
WARNING: Warranty is void if ventilation is insufficient.
•
Unit must be leveled for proper operation, this will help prevent condensation.
•
The cooler should be leveled front to back and side to side with a leveler.
INSTALLATION AND OPERATION
1
Connect the empty RCM-77 to a Power Source for 12+ hours.
2
After the empty cooler has been operating for an initial period of 12 hours, the unit can then be loaded with products*.
3
The cooler can then be unplugged and rolled to any high traffic retail location for up to 12 hours. After 12 hours the
unit must be plugged in again for an additional 12 hours. (The Re-Charge cycle)
It is important to understand that the Re-Charge Cold Merchandiser (RCM-77) is designed to operate differently than typical beverage
coolers. Typical coolers circulate the cold the air inside the cabinet to chill the beverages. The RCM-77 does not follow this principle.
The RCM-77 freezes liquid filled coolant packs within the interior walls of the cabinet. It is important that these coolant packs are
completely frozen to ensure that the beverages will be kept at a cold temperature for the maximum amount of time while the unit
is unplugged and moved to the desired location. The initial time required to freeze these coolant packs can be between 12 and 24
hours depending on the operating environment.
*For best results, on initial set-up we recommend the RCM-77 is allowed 24 hours to completely freeze the coolant packs.
Following this initial 24 hour “charge” the subsequent “recharge” time will be much less. By following this extended initial
freezing period, you will be ensuring that consumers are receiving the coldest possible beverage for the best possible
extended time while the RCM-77 is unplugged.
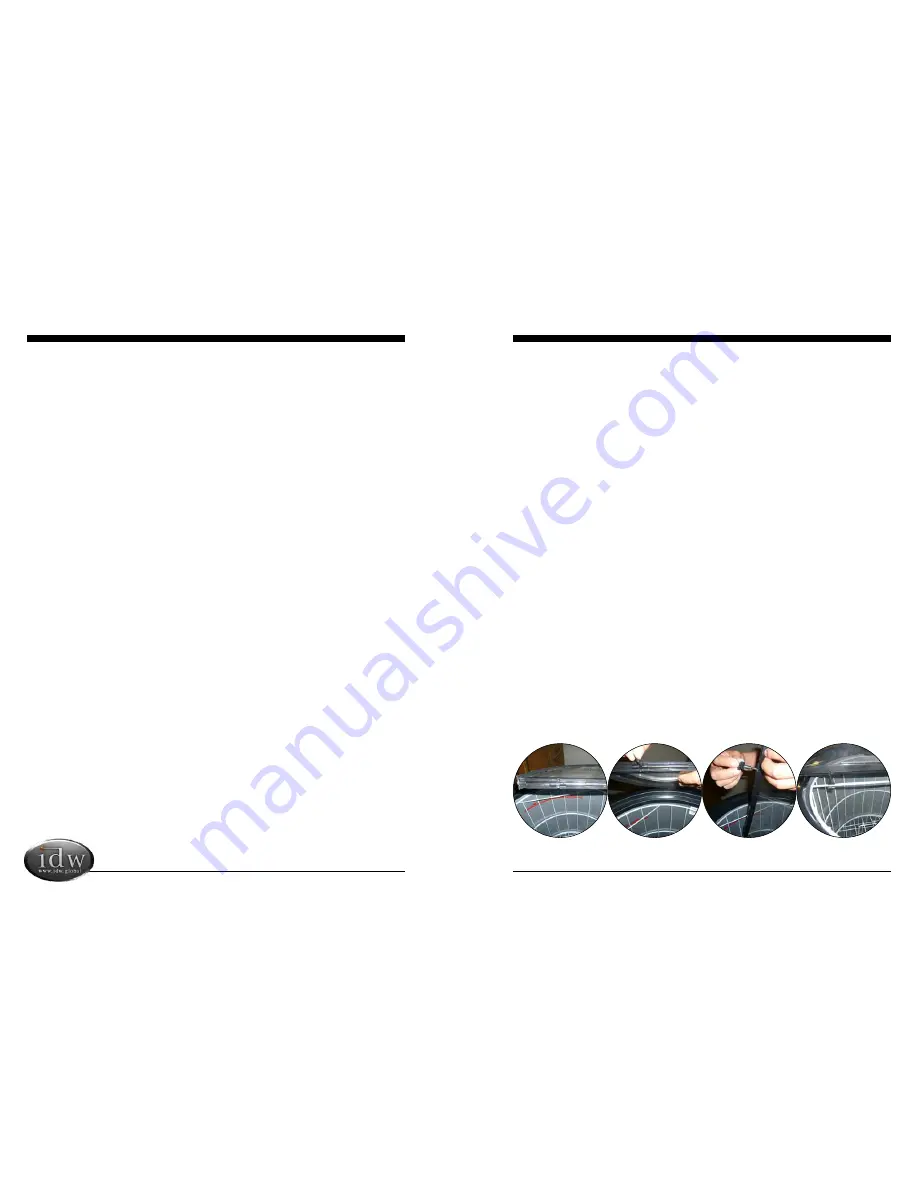
CLAMP INSTALLATION
•
The clamp secures the lid assembly to the main body of the cabinet
1
Locate the (2) notches
on the interior of the
lid
2
Snap the (2) bolts into
the notches of the lid.
3
Screw the clamps onto
the bolts.
4
Hook the two clamps
onto the center bar of
the basket.
INSTALLATION
Installation of the cooler must be done according to applicable local codes or equivalent.
Ambient Environment
• Place cooler on an even surface to reduce vibration and noise.
• To transport, do not tilt the cooler beyond a 45 degree angle.
• Do not place cooler in direct sunlight or near any heat sources.
• Do not place cooler in environment temperatures that exceed 109°F.
• Do not place cooler in below normal temperatures.
• Do not place cooler in extreme humid environments, this may cause components to rust.
• Do not place cooler near constant running or splattering water, this may cause immediate damage to refrigeration system.
• Must allow at least 4” between rear of cooler and wall for proper ventilation and heat dissipation of cooler.
• Do not place furniture or other articles with sharp edges near the cooler in order to prevent damage to the glass door.
• This cooler is for indoor use.
• Place unit in itʼs fi nal location, making certain there is adequate ventilation in the room.
WARNING:
Warranty is void if ventilation is insuffi cient.
PREPARATION PRIOR TO OPERATION
Unpacking
• Remove all packaging materials before using cooler. This includes: foam pedestal, adhesive tape (used to fi x accessories)
and protective gaskets.
• Inspect cooler for concealed damage. Immediately fi le a claim with the freight carrier if there is damage. IDW is not
responsible for damage incurred during shipping.
• Cooler must remain unplugged in an upright position for 1 hour prior to use.
• Clean the interior surface with a soft cloth and lukewarm water before operation.
• Ensure that drain hose or hoses are positioned in the pan.
• Remove plug and cord from inside the lower rear of the cooler.
• The unit should be placed close enough to the electrical supply so that extension cords are not used.
Electrical Requirements
• This model operates with a 110V/60Hz power supply. Check the electrical outlet for proper voltage.
• Dedicate one outlet for the use of the cooler.
• Do not use an extension cord or any other multiple connectors as this can lead to compressor failure.
• If the cord is damaged, it must be replaced.
• For your safety, plug the unit into a grounded wall outlet. Please check with a certifi ed electrician for details.
WARNING:
Do not use extension cords.
WARNING:
Compressor warranties are void if compressor burns out due to low voltage.
WARNING:
Power cord ground pin must NOT be removed!


