background image

Installation Guide

AED Sentinel Monitoring Hardware

Summary of Contents for AED Sentinel

Page 1: ...Installation Guide AED Sentinel Monitoring Hardware ...

Page 2: ...ee from defects in materials and workmanship Compliance Statement This device complies with Part 15 of the FCC Rules Operation is subject to the following two conditions 1 this device may not cause harmful interference and 2 this device must accept any interference received including interference that may cause undesired operation Contains FCC ID RI7ME910C1NA ...

Page 3: ...enna hole Install the antenna Install the battery pack Install the communications module Install the cable management clip Place the AED Install the camera Aim the camera Activate the AED Sentinel Monitoring Unit Troubleshooting You re Done Note for Non Metal and Stainless Steel Cabinet Owners Because most AED cabinets are metal AED Sentinel hardware is designed out of the box to be installed magn...

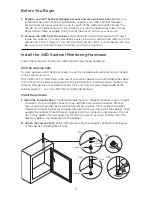
Page 4: ...rystal display LCD icons AED Sentinel can monitor both status indicator types AED Sentinel uses a camera to monitor the status indicator on each of your AEDs When you install AED Sentinel hardware in your AED cabinets make sure the AED Sentinel camera is properly aimed at each AED s status indicator What s in the Box Tools You ll Need AED Sentinel Installation Guide Communications module Self adhe...

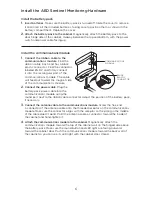
Page 5: ...ncluded external antenna to connect to the cellular network Drill a 9 32 inch 7 1mm hole in the top of your AED cabinet to accommodate the cable that connects the external antenna with the AED Sentinel communications module The antenna hole position should be 4 inches 10 2 cm from the door hinged side of the cabinet and 2 1 2 3 1 2 6 4 8 9 cm from the cabinet back Install the antenna 1 Install the...

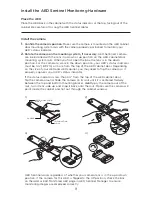
Page 6: ...unications module 2 Connect the power cable Plug the battery pack power cable into the communications module using the round port next to the ribbon cable connector Adjust the position of the battery pack if necessary 3 Connect the antenna cable to the communications module Screw the free end L connector of the antenna cable onto the threaded receptor on the communications module Make sure the con...

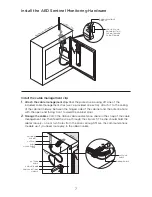
Page 7: ...the cabinet door 2 Manage the cables Catch the ribbon cable and antenna cable in the strap of the cable management clip then feed the strap through the clip latch The clip should hold the cables loosely one or two holes from the end is enough Move the communications module up if you need more play in the ribbon cable HINGED SIDE BACK WALL OF CABINET LED LIGHT AND ROUND BUTTON FACING TOWARD CABINET...

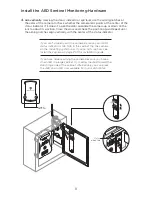
Page 8: ...must be 3 1 2 8 9 cm or more from the top of the AED cabinet door Depending on the size of your AED and AED cabinet you may need to flip the camera so it properly captures your AED s status indicator If the status indicator is less than 3 1 2 from the top of the AED cabinet door flip the camera around Slide the camera on its rails until it is centered midway between the top and bottom mounting blo...

Page 9: ...cated on page 14 of this installation guide Aim the camera For AED Sentinel to monitor your AED the camera lens must be properly aimed at the AED s status indicator The AED cabinet door mounting system allows the camera to be positioned horizontally along the cabinet door and vertically along the rails 1 Connect the ribbon cable to the camera Firmly plug the free end of the ribbon cable into the r...

Page 10: ...us indicator at eye level use the aiming notch at the bottom of the camera to check whether the camera lens points at the center of the status indicator If it doesn t open the door and using the left and right sides of the top mounting block NOT the camera or rails adjust the mounting system along the cabinet door or move the AED left or right Close the door and check the position again Repeat unt...

Page 11: ...epeat until the aiming notches align vertically with the center of the status indicator If you can t properly aim the camera because your AED s status indicator is too high in the cabinet flip the camera on the mounting system rails If you re not sure how see Install the camera on page 8 of this installation guide If you have trouble aiming the camera because you have a small AED in a large cabine...

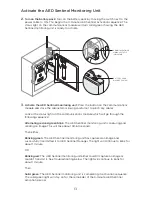
Page 12: ... camera to the up position skip this step 6 Check the cables When you re done aiming the camera close the door and double check that no cables obstruct the camera lens or hinders removal of the AED from the cabinet Also make sure the ribbon cable is not snagging or being pinched in the cabinet door frame Gently reposition the ribbon cable if needed Activate the AED Sentinel Monitoring Unit Follow ...

Page 13: ...owing sequence Alternating red and green blink The AED Sentinel monitoring unit is capturing and sending an image This will take about 30 60 seconds Then either Blinking green The AED Sentinel monitoring unit has captured an image and successfully transmitted it to AED Sentinel Manager The light will continue to blink for about 1 minute OR Blinking red The AED Sentinel monitoring unit either could...

Page 14: ...capture an image with the AED s status indicator in the center and the AED status shows Ready 5 If needed affix the AED cabinet door mounting system window plate Check that the small magnet on the bottom of the camera s mounting system magnetically attaches to the inside bottom of the cabinet door If it touches only the glass peel the protective backing off of the included window magnet 4a and adh...

Page 15: ...2 Wait a few seconds then turn it on 3 Try the installation process again using the steps in Activate the AED Sentinel Monitoring Unit above If you still see a blinking red light after your second installation process contact support at support aedsentinel com You re Done You have successfully installed your AED Sentinel monitoring unit It will monitor your AED and send you alerts and messages if ...

Page 16: ...We re here to help aedsentinel com support aedsentinel com AED Sentinel is a registered trademark of Readiness Systems LLC Patents pending 2018 Readiness Systems LLC All rights reserved Version 2018 2 ...

Reviews: