With some arched doorways, proper motor positioning can be a little
challenging. Door construction, radius, and overall width can all affect
motor placement. Below is a guide designed to assist you in mounting
while allowing for proper geometry of the opener system’s articulated
lever arm.
1.
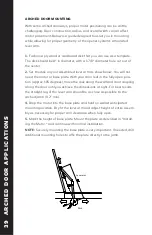
Fashion a plywood or cardboard disk that you can use as a template.
The disk should be 8” in diameter, with a 1-7/8” diameter hole cut out of
the center.
2.
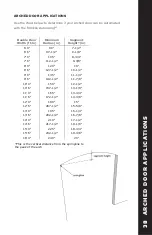
Set the disk on your assembled lever arm as show below. You will not
need the motor or base plate. With your door leaf in the fully open posi-
tion (approx 105 degrees), move the disk along the wall and door coupling
along the door until you achieve the dimensions at right. For best results,
the straight leg of the lever arm should be as close as possible to the
arched jamb (1/2” min).
4.
Drop the motor into the base plate and hold on wall at anticipated
mounting location. Dry fit the lever arm and adjust height of entire assem
-
bly as necessary for proper arm clearance when fully open.
5.
Mark the height of base plate. Mount the plate as described in “Install
-
ing the Motor,” and continue with normal installation.
NOTE:
Securely mounting the base plate is very important. If needed, drill
additional mounting holes to affix the plate directly to the jamb.
ARCHED DOOR MOUNTING
Appendix
D
(Alterna
�
ve
Moun
�
ng)
1.
Fashion
a
plywood
or
cardboard
disk
that
you
can
use
as
a
template.
The
disk
should
be
8”
in
diameter,
with
a
1
‐
7/8”
diameter
hole
cut
out
of
the
center.
2.
Set
the
disk
on
your
assembled
lever
arm
as
show
below.
You
will
not
need
the
motor
or
base
plate.
With
your
door
leaf
in
the
fully
open
posi
�
on
(approx
105
degrees),
move
the
disk
along
the
wall
and
door
coupling
along
the
door
un
�
l
you
achieve
the
dimensions
at
right.
For
best
results,
the
straight
leg
of
the
lever
arm
should
be
as
close
as
possible
to
the
arched
jamb
(1/2”
min)
.
3.
Mark
the
center
point
of
the
bracket
on
the
door
and
the
tangent
point
of
disk
on
the
wall.
4.
Drop
the
motor
into
the
base
plate
and
hold
on
wall
at
an
�
cipated
moun
�
ng
loca
�
on.
Dry
t
the
lever
arm
and
adjust
height
of
en
�
re
assembly
as
necessary
for
proper
arm
clearance
when
fully
open.
5.
Mark
the
height
of
base
plate.
Mount
the
plate
as
described
in
“Installing
the
Motor,”
and
con
�
nue
with
normal
installa
�
on.
NOTE:
Securely
moun
�
ng
the
base
plate
is
very
important.
If
needed,
drill
addi
�
onal
moun
�
ng
holes
to
a
ffi
x
the
plate
directly
to
the
jamb.
Disk
Lever
arm
With some arched doorways, proper motor posi
�
oning
can be a li
�
le challenging. Door construc
�
on, radius,
and overall width can all a
ff
ect motor placement. Below
is a guide designed to assist you in moun
�
ng while
allowing for proper geometry of the opener system’s
ar
�
culated lever arm.
TM
Franklin Autoswing Installation Manual
18
© 2012 Copyright Real Carriage Door Company, Inc
39
AR
CHED
DOOR APPLICA
TIONS

