background image

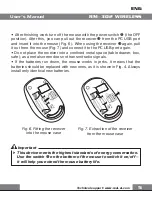
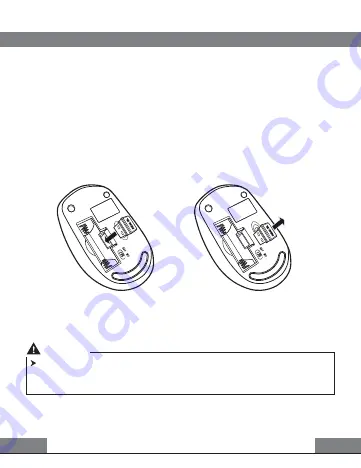
Fig. 6. Fitting the receiver

into the mouse case

Fig. 7. Extraction of the receiver

from the mouse case

 After 

fi

nishing work


turn o

 the mouse with the power switch 

 (the OFF 

position)

. After this, you can pull out the receiver 

 from the PC USB port 

and insert it into the mouse (Fig. 6). 

 When using the 

receiver 

 again, pull 

it out from the mouse (Fig. 7) and connect it to the PC USB port again.

 Do not place the receiver into a con

fi

ned metal space (table drawer, box, 

safe), as a metal screen does not transmit radio signals.

 If the batteries run down, the mouse works in jerks. It means that the 

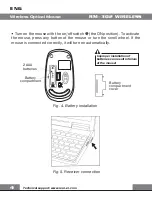
batteries should be replaced with new ones, as it is shown in Fig. 4. Always 

install only identical new batteries. 

This device meets the highest standards of energy conservation.

Use the switch 

 on the bottom of the mouse to switch it on/off –

it will help you extend the mouse battery life.

Important

Technical support: www.real-el.com

ENG

5

User’s Manual

RM-302 WIRELESS

Summary of Contents for WIRELESS RM-302

Page 1: ...RM 302 WIRELESS WIRELESS OPTICAL MOUSE USER S MANUAL ...

Page 2: ...t are copyrighted All rights reserved All trademarks are the property of their legal holders NOTICE OF RESPONSIBILITY RESTRICTION Despite the exerted efforts to make this Manual more exact some dis crepancies may occur The information in this Manual is given on as is terms The author and the publisher do not bear any liability to a person or an organization for loss or damage which has arisen from ...

Page 3: ...00 dpi USB interface Powered by 2 AAA batteries Long life battery fed operation Plug Play technology 2 PACKAGE CONTENTS Optical mouse 1 рс 2 4 GHz USB nano receiver 1 рс ААА batteries 2 рсs User s manual 1 рс Warranty card 1 рс 3 SYSTEM REQUIREMENTS Windows Mac Android Free USB port ENG Technical support www real el com 2 Wireless Optical Mouse RM 302 WIRELESS ...

Page 4: ...itch USB connector 5 INSTALLATION Open the cover of the mouse battery compartment insert two ААА batteries into the battery compartment matching the polarity and close the cover of the battery compartment see Fig 4 Сonnect the included nano receiver to a free PC USB port Fig 5 Technical support www real el com ENG 3 User s Manual RM 302 WIRELESS ...

Page 5: ...tallation of batteries can result in failure of the mouse Turn on the mouse with the on off switch the ON position To activate the mouse press any button of the mouse or turn the scroll wheel If the mouse is connected correctly it will turn on automatically Technical support www real el com ENG 4 Wireless Optical Mouse RM 302 WIRELESS ...

Page 6: ...port again Do not place the receiver into a confined metal space table drawer box safe as a metal screen does not transmit radio signals If the batteries run down the mouse works in jerks It means that the batteries should be replaced with new ones as it is shown in Fig 4 Always install only identical new batteries This device meets the highest standards of energy conservation Use the switch on th...

Page 7: ...ng range m Resolution dpi Quantity of buttons Interface Error free running time Battery type Dimensions mm Weight g Value Windows Mac Android wireless 2 4 GHz 10 1000 2 1 scroll wheel USB more than 3 000 000 strokes 2 ААA 110 63 35 53 6 TROUBLESHOOTING Solution 1 Make sure that the nano receiver has been inserted into the USB port and its distance to the mouse is less than 10 m 2 Check whether the...

Page 8: ...Model RM 302 Wireless Manufacturer ENEL GROUP OU Joe tn 5 39 Tallinn Harjumaa 10151 Estonia Made in China Registered Trademark of ENEL GROUP OU Estonia ...

Reviews: