background image

15


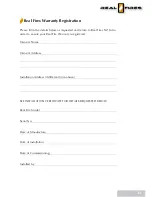
Real Fires Warranty Registration 


Please fill in the details below as requested and return to Real Fires NZ Ltd in 
order to ensure your Real Fire Warranty is registered.

Owner’s 

Name 


Owner’s 

Address 


Installation Address (if different from above) 


SEE INSTALLATION CERTIFICATE FOR DETAILS REQUESTED BELOW

Real Fire Model   


Serial 

No.     

Date of Manufacture

Date of Installation

Date of Commissioning

Installed by

Summary of Contents for Flameboyant RF800EN

Page 1: ...00 Including RF800 Modern Classic Minimal Pearl Electronic and Manual Natural Gas and Propane INSTALLATION INTO TIMBER FRAMING NEW AND EXISTING MASONRY Retain these instructions until installation is complete Flameboyant By Real Fires ...

Page 2: ... IS DESIGNED FOR INSTALLATION INTO A TIMBER FRAMED CONSTRUCTION AND NEW OR EXISTING MASONRY INSTALLATIONS THIS APPLIANCE MUST INSTALLED USING AN APPROVED TWIN SKINNED B VENT FLUE SYSTEM THIS APPLIANCE MUST BE INSTALLED INTO A WELL VENTILATED ROOM IN ACCORDANCE WITH AS 5601 NZS 5261 THIS APPLIANCE IS DESIGNED FOR INDOOR INSTALLATION ONLY NOT TO BE INSTALLED OUTDOORS REAL FIRES IS NOT RESPONSIBLE FO...

Page 3: ...tion of firebox 9 Installing Firebox 9 Burner Commissioning 10 Electronic Burner 10 Manual Burner 12 Aeration Sleeve Details 13 Pilot Burner Performance 13 Trim Installation 14 Notes 14 Modern and Classic Grated Fronts 14 Minimal Painted Front 15 Pearl Glass Front 16 Burner Media Installation 18 Logs Coals and Vermiculite 18 Pebbles Crystals crushed glass 18 Final Checks 19 Wiring 20 Schematic Dia...

Page 4: ...y only Minimum of 2 4 metres of flue 3 6 metres if off set bends are used Flue Cowl AGA Approved 200 mm Flue Cowl Gas Connection 3 8 BSPF Gas Flare onto gas control Power 230 240V a c 50hz 1 Amp l a u n a m d e e p s e l g n i s c i n o r t c e l e d e e p s 2 l a i t n e g n a T n a F Gas Types Natural gas Propane Inlet Pressure nominal 1 13 kPa 2 75 kPa Supply Pressure min max 1 0 5 0 kPa 2 0 3 ...

Page 5: ... by an electrician located preferably to the right of the Firebox facing into the room not inside the framing cavity This supply is used to isolate all power for the electronic fires or to control the fan in the manual fires The power cord is designed for a 230 240V a c 10 amp supply Electrical connection must comply with AS NZS 3000 note the manual fire will operate without power but the fan will...

Page 6: ...radiant heat and this might cause damage to carpets and furnishings that are too close Below are the recommended minimum dimensions for a hearth Recesses If the fire is to be installed into a recess the recess must comply with the following limitations Note The same limitations apply to the sides of the fire Flue requirements Only used an approved cowl The minimum flue height is 2 4 metres providi...

Page 7: ...0mm clearance above the firebox Remember that both gas and electricity are required within the cavity Refer to Notes on Installation page 5 It is recommended that the fire be installed on a solid platform If this is not possible then there must be support provided for at least the first 20mm and for 45mm at 307mm from the front finished face of the cavity If the fire is to be installed with a hear...

Page 8: ...ons where access is restricted If the cavity can be completed after the firebox and flue are installed then the adaptor might not be required The flue adaptor can also be used with rigid flue where space allows The flue should be self supporting before the firebox is installed This fire is not designed for installation without a dedicated flue liner This fire consists of a firebox and removable in...

Page 9: ...box Installing Firebox Place the firebox onto the hearth and carefully line up the gas supply pipe with the hole in the back left hand corner of the firebox Make sure that the power supply cord is passed through the cavity for connection by a registered electrician power is not required to operate the manual version of this fire if the fan is not being used but it is recommended that it is connect...

Page 10: ... To do this o Remove the fixing screws on the bottom of the assembly and carefully swing the left end of the assembly out of the cavity Take care not to pinch or strain the power connection at the back right corner or the Control Lead in the centre o If it is necessary to remove the assembly completely then use a POZI drive screw driver to loosen the single screw holding the control panel in place...

Page 11: ...oint Re start the burner and make sure that the burner is operating at maximum rate by pressing the Flame Up button until the pressure stops rising Check the maximum burner pressure against the data plate If adjustment is necessary then turn the High Pressure Adjustment Nut on the front of the Gas Control Take care not to turn the inner Low Pressure Adjustment Screw Reduce the burner pressure to m...

Page 12: ...a manometer to the inlet test point refer page 13 Rotate the Control Knob on the Gas Control to the pilot position push in to make the spark ignitor operate gas will begin to flow to the pilot The pilot should ignite within a few seconds Note If the pilot fails to ignite return the Knob to its original position and try again It may take some time to purge all the gas in a new pipeline Once the pil...

Page 13: ...hen operating at its best the pilot burner will produce a sharp blue flame with a light blue inner cone This inner cone should reach across to the flame rod or thermocouple and slightly beyond The size of the pilot flame can be adjusted using the screw on the front of the manual gas control but cannot be adjusted on the electronic version Signs of abnormal pilot operation could be A very short fla...

Page 14: ... M4 earthing screw with serrated washers at each end Slide the reflectors into the firebox between the sides of the firebox and the end of the Trim Grate Pull the two spring loaded Lower Trim Retainers forward and down until they lock in place as shown Fit the outer trim over the Upper Trim Hooks If adjustment of the hooks is required use a screwdriver to prise the hooks forward or push them back ...

Page 15: ...r Trim Retainers forward and down until they lock in place as shown Fit the outer trim over the Upper Trim Hooks If adjustment of the hooks is required use a screwdriver to prise the hooks forward or push them back until the trim fits flush with the wall Hold the leg of the trim against the Lower Trim Retainer and slide the Retainer upwards into the slot on the back of the trim the spring Retainer...

Page 16: ...n removed or flattened to give the trim a flat surface to fix to Remove the two spring loaded trim retainers and the front panel mounting brackets used on other models refer diagram on page 14 Fit the outer trim to the front of the firebox using 7 screws through the backing panel DO NOT OVER TIGHTEN THE SCREWS Once all of the screws are in place around the trim and front panel fix the stainless st...

Page 17: ...t the Front Panel Assembly and hold in place using 2 Earthing Screws 1 in each end of the front Fit the reflectors by fitting over the front trim at an angle and the standing up against the side of the firebox There is a catch above the top edge of the reflector to hold it in place refer to minimal instructions for detail Fit the Stainless Steel Louvre Overlay over the top louvre by hooking bottom...

Page 18: ...look of the flames If there are any areas that have very long streaky flames then using a pair of tongs move the top logs or coals to another position until the flames are more even across the whole burner Pebbles Crystals crushed glass Place DO NOT POUR all of the supplied Pebbles or Crystals evenly across the entire area of the burner The finished depth will be about 2 3 pebbles or about 20 mm o...

Page 19: ...stalled It is important that the customer is fully aware of how to operate the fire properly and safely Advise the customer of the need for regular servicing in order to maintain the warranty Advise the customer to fully read the User Guide to understand how to get the best out of their fire and keep it looking its best Fill in the Installer Details section in the back of the user guide ...

Page 20: ... 20 Wiring Schematic Diagram Electronic Wiring Diagram Electronic Wiring Diagram Manual ...

Page 21: ...ton for on second Air in gas pipe Purge gas pipes Fire is sparking then locks out Gas supply turned off empty Turn on gas supply or change bottles Faulty flame rod Service call Pilot flame starts but spark keeps going Dirty gas in bottles LPG Pro Replace or change over gas bottles Pilot ignites but main flame does not Faulty gas control Service call Gas Supply turned off or empty Check gas supply ...

Page 22: ...lot operation page 13 Faulty valve Service call Pilot lights but does not stay alight Not holding flame long enough to hold valve Hold pilot flame longer to allow thermocouple to generate enough voltage to hold valve open Burner media is blocking cross lighting holes on main burner Move any logs coals etc that might stop burner cross lighting Control valve not fully open Rotate control valve fully...

Page 23: ... 23 Notes on Installation Please write any installation specific notes on this page and leave with the customer for future reference ...

Page 24: ...F800 INSTALLATION GUIDE ISSUE B 66000 B Flameboyant com au Regency Fireplace Products Australia Pty Ltd 21 23 South Link Dandenong South Vic 3175 Australia Phone 1 800 081 978 Fax 03 9799 7822 Email salesau regency fire com ...

Page 25: ...Electronic Range RF800 User Guide Service Manual Models Minimal Pearl Modern Classic By Real Fires ...

Page 26: ...ealand inspired and manufactured from the finest materials This User Guide is designed to familiarise you with the fire its features operation and care We know you will get many years of enjoyment from your Real Fires fireplace Congratulations on your purchase Warmest regards Ali Fenton Company Director ...

Page 27: ...Failure 5 Cleaning 6 When to Call for Service 6 Warranty Statement 7 Conditions of Warranty 7 Service 7 Servicing Requirements 7 Service Instructions 8 Wiring Diagram 10 Parts Diagrams 11 Troubleshooting 12 Installation Information 13 Service Record 14 Real Fires Warranty Registration 15 Real Fires Electronic Range RF800 User Guide Service Manual Models Pearl Minimal Modern Classic Contents ...

Page 28: ... DO IF YOU SMELL GAS Do not try to light any appliances Do not touch any electrical switches do not use any phone in your building Shut off valve at the gas meter or cylinders Call a technician Real Fires gas fires are designed to provide warmth comfort and ambience for your home The Electronic range of Real Fires incorporates electronic flame control and an integrated two speed fan all operated f...

Page 29: ...hen restart the fire If the fire has not started after three attempts contact the installer or a Real Fires representative It is recommended that the fire is started on its maximum gas rate refer to the Remote Control section on page 4 Once the pilot has ignited then gas will begin to flow to the main burner The flames should be right across the burner within about 10 seconds If the burner does no...

Page 30: ...lame Control button to the high flame This ensures the fire ignites on high flame Always run the fire on high for at least a few minutes to ensure a quick warm up of the firebox and flue The fire can then be turned down if desired The flame can be controlled simply by pressing the remote Flame Control button or to increase or decrease the flame The electronic Real Fire has a two speed fan The fan ...

Page 31: ...ich ensures that in the event of an ignition failure gas supply failure or pilot flame being extinguished for any reason the fire will shut down The fire will attempt to restart automatically If the fire fails to reignite then the fire will lock out and will need to be reset manually by pressing the ON OFF button twice to reset and restart the ignition sequence Wait at least 10 seconds before atte...

Page 32: ... behind and can cause water spotting that can remain for some time When to Call for Service The following signs indicate that your fire requires a service call If long streaky flames are touching the back of the firebox this can cause the paint to blister and possibly damage the fire If you can smell gas whether the fire is going or not there could be a small smell of gas as the fire is going thro...

Page 33: ... period between servicing is two years before the warranty is void The warranty does not cover damage caused through building defects incorrect installation or incorrect use The warranty period is taken from the date of commissioning by the installer Ensure that the installer has filled in the Installer Information section of this User Guide on page 13 Service In order for your Real Fire to give y...

Page 34: ...e by pulling the top of the reflector out slightly and rotating the top of the trim towards the centre of the firebox and lifting it away from the burner Modern and Classic fires grated front This is done by pulling the reflectors straight out of the fire Take care not to scratch the outer trim if it is still attached Remove the front panel Remove the earthing screws on the top left and right of t...

Page 35: ...his should be removed to help ensure continued operation Service the fan Remove the fan cover by removing the 4 screws holding it in place With the cover removed it should be possible to inspect and vacuum the fan to remove any build up of dust and lint Note if replacement of the fan is required the gas will need to be disconnected and the gas control assembly removed to gain full access to the fa...

Page 36: ... and move any Logs Coals that appear to be causing long streaky flames Turn the fire off and remove the manometer Check the test point for leaks Replace the Front Panel reflectors and side trim Take care not to scratch the hearth when refitting the outer trim Re test all functions of the Remote Control burner high and low fan high and low on and off Wiring Diagram PILOT ACTIVE YL GR CONTROL BOX Mi...

Page 37: ...rew Pilot Head Pilot Bracket Pilot Front Bracket Pilot Body Pilot Spring Pilot Injector Pilot Injector Retainer Flame Rods Regulator Fuse Control Lead Grommet Control Panel Control Box Gas Contro Valvel Gas Control Assembly Pilot Assembly Fan Cover Control Box Cover Fan Main Injectors with Tube attached Power Supply Trim Retainer Trim Mounting Brackets Aeration Sleeves ...

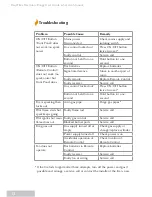
Page 38: ...wice to reset Button not held for one second Hold button for one second Fire is sparking then locks out Air in gas pipe Purge gas pipes Pilot flame starts but spark keeps going Faulty flame rod Service call Pilot ignites but main flame does not Faulty gas control Service call Blocked burner ports Service call Fire goes out Gas supply turned off or empty Check gas supply or change replace cylinder ...

Page 39: ...taller s Name Registration Number Certification Number Date of Installation Date of Commissioning Real Fire Model Burner Media Installed Serial No from data plate Date of Manufacture from data plate Owner s Name Installation Address ...

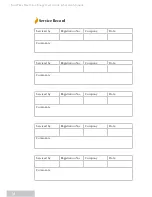
Page 40: ...viced by Registration No Company Date Comments Serviced by Registration No Company Date Comments Serviced by Registration No Company Date Comments Serviced by Registration No Company Date Comments Serviced by Registration No Company Date Comments Service Record ...

Page 41: ...Fires NZ Ltd in order to ensure your Real Fire Warranty is registered Owner s Name Owner s Address Installation Address if different from above SEE INSTALLATION CERTIFICATE FOR DETAILS REQUESTED BELOW Real Fire Model Serial No Date of Manufacture Date of Installation Date of Commissioning Installed by ...

Page 42: ...Real Fires Electronic Range User Guide Service Manual Affix stamp here Real Fires NZ Limited PO Box 100744 North Shore North Shore City 0745 New Zealand Fold here tape and return ...

Page 43: ...mpany Date Comments Serviced by Registration No Company Date Comments Serviced by Registration No Company Date Comments Serviced by Registration No Company Date Comments Serviced by Registration No Company Date Comments Service Record ...

Page 44: ...sue B User Guide RF800 Electronic Flameboyant com au Regency Fireplace Products Australia Pty Ltd 21 23 South Link Dandenong South Vic 3175 Australia Phone 1 800 081 978 Fax 03 9799 7822 Email salesau regency fire com ...

Reviews: