Instructions for kit #HB 1900
page 15
□
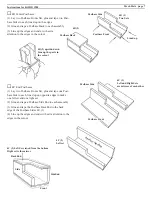
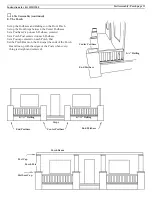
15A. Glue the Postbase Caps, Posts, and Post-
caps to the Postbases, centered and straight.
Glue the Steps and Treads in place.
Finish painting the Foundation.
□
15B. Glue the Porch Beam to the Postcaps. Temporarily
tape two Arches between the Center Posts. The Arches are
the guide for spacing the Center Posts.
Center the Postcaps under the Porch Beam.
Let the glue dry.
Postcap
Post
Postbase Cap
Porch Beam
□
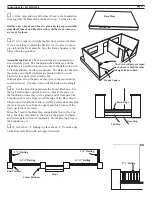
16A. Glue, tape, and weight the Mid Floor to the walls and
Porch Beam, lined up in back and side-to-side. The stairhole
is closer to the back. Line up the inside of the stair cutout
with the inside of the wall. Let the glue dry.
□
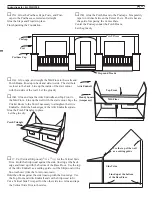
16B. Glue and tape the Attic Endwalls and Top Front to
the Mid Floor. Line up the wall with the stair cutout. Tape the
Cricket Roofs to the fl oor if necessary to straighten the Attic
Endwalls. Hold the back edges of the Attic Endwalls square.
Glue the Porch Triangles in place.
Let the glue dry.
Porch Triangle
Attic Endwall
Top Front
Handy Square
(temporary)
Mid Floor
□
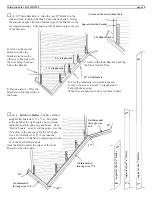
17. Cut Vertical Stripwood (
3
/
32
x
13
/
32
) for the Vertical Side
Trim. Hold the Stripwood against the side, lined up at the back
edge and lined up with the bottom of the Base Floor. Use the top
of the Attic Endwall as a cutting guide - cut the Stripwood with a
fi ne-tooth saw (like the X-Axto razor saw).
Hold the offcut against the side lined up with the front edge. Use
the Top Front and Attic Endwall and cut the Stripwood to fi t.
Cut a Vertical Side Trim pair for the other side too. Glue and tape
the Vertical Side Trim to the sides.
Steps and Treads
Side Trim
Lined up at the bottom
of the Base Floor
Use the top of the wall
as a cutting guide

