12
Note: Never attempt to disassemble the battery pack yourself as serious safety accidents may
result.
Charging Your Scooter
▪
Only charge the lithium battery in temperatures ranging from 32 degrees Fahrenheit to 114
degrees Fahrenheit.
▪
Turn the scooter OFF before charging.
▪
Charge for 6-8 hours at a time. A red light will illuminate during charging. The light will turn
green when the battery is full, and the charger should be unplugged within two hours of
achieving a full charge. Do not continue to charge the battery once full.
▪
Always use a constant current or constant voltage lithium battery charge controller and a
local charger with AC input voltage (100 ~ 250v).
▪
Ensure the charger is connected to the battery before plugging into an electrical outlet.
▪
Do not place the charger or board in wet conditions or near water or other liquids.
▪
Allow at least 8 inches of clearance on all sides of the charger when in use. Never place the
charger on or near combustible material or on sofas, beds or carpet. Do not cover the
charger and ensure it is properly ventilated.
▪
Do not place heavy objects on the charger.
▪
Carefully position the charger to ensure it does not become a hazard. Keep out of reach of
children.
Battery Storage Recommendations
▪
Store the battery in temperatures ranging from 32 degrees Fahrenheit to 114 degrees
Fahrenheit, in low humidity and away from corrosive gases.
▪
During long periods of storage (more than three months), store lithium battery in
temperatures ranging from 14 degrees Fahrenheit to 68 degrees Fahrenheit, in low
humidity and away from corrosive gases.
▪
Never place heavy objects on top of or press on the lithium battery.
Repair
Only qualified experts should perform repair or maintenance work on your scooter or its
electronic or mechanical parts. Never attempt to repair yourself. Please contact our customer
service department for repair or electrical or mechanical adjustment.
Summary of Contents for E4-9
Page 1: ...1 Foldable Electric Scooter USER MANUAL...
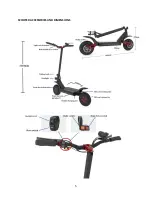
Page 5: ...5 SCOOTER ACCESSORIES AND DIMENSIONS...
Page 9: ...9...
Page 10: ...10...


