background image

Rear View Safety  

40

USER

 SET

TINGS

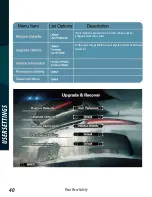
The User Preference option restores user video settings/window 
configurations and other options. 

Use this option to upgrade firmware or change the car model to better suit 
your vehicle   

Summary of Contents for RVS-77535

Page 1: ...ReverseWithConfidence 1 360 Surround View Camera System RVS 77535 Instruction Manual ...

Page 2: ...n 07 BriefIntroduction 08 Product Features 9 Applications 10 11 System Check 12 13 Wiring Diagram 14 Cameras Distribution 15 Wiring 16 17 Camera Installation 18 27 Camera Calibration 28 33 User Settings 34 41 VideoRecording 42 43 PowerManagement 44 45 Packing List 46 Specification 47 Troubleshooting 48 49 ...

Page 3: ...s intended to be installed as a supplement aid to your standard rear view mirror that already exists in your vehicle The Backup Camera System should not be used as a substitute for the standard rear view mirror or for any other mirror that exists in your vehicle In some jurisdictions it is unlawful for a person to drive a motorvehicleequippedwithaTVviewerorscreenlocatedforwardof the back of the dr...

Page 4: ...driver mustuseit properly Use of this system is not a substitute for safe proper or legal driving Neverbackupwhilelookingatthe monitor alone You should always check behind and around the vehi cle when backing up in the same way as you would if the vehicle did not have the RearView Camera System Ifyoubackupwhilelooking only at the monitor you may cause damage or injury Always back up slowly The Rea...

Page 5: ... immediately Wherethepowercablemaytouch a metal case cover the cable with friction tape A short circuit or disconnected wire may cause a fire While installing the Rear View System be careful with the wire positioning in order to avoid wire damage The RearView System should only be used when the vehicle is in reverse Do not watch movies or operate the monitor while driving as it may cause an accide...

Page 6: ...Safety 1797AtlanticAvenue Brooklyn NY11233 Tel 1 800 764 1028 IN NO EVENT SHALL SELLER OR MANUFACTURER BE LIABLE FOR ANY DIRECT OR CONSEQUENTIAL DAMAGES OF ANY NATURE OR LOSSES OR EXPENSES RESULTING FROM ANY DEFECTIVE PRODUCT ORTHE USE OF ANY PRODUCT SAFETY INFORMATION ...

Page 7: ...chmarktestbeforeinstallation toinsurethatallcomponentsareworkingproperly Step 1 Choose the monitor and camera locations Step 2 Install all cables in vehicle when necessary a 0 8 20mm hole should be drilled for passing camera cable through vehicles walls Install split grommets where applicable Step3 Onceallcablesandwiringhavebeenproperlyrouted perform a system function test by temporarily connectin...

Page 8: ... view of the vehicle Because this system generates a complete view of your vehicle and its surroundings blind spots are eliminated This view assists with park ing helps the driver navigate narrow roads and helps with turning The system offers various connection types including HDMI and AV It also features both 2D and 3D views The RVS 77535 is also a fully functional DVR capable of 24 hour loop rec...

Page 9: ...ed fish eye distortion correction Automatic brightness adjustment for each camera 3D video deinterlacing and noise reduction technology for CVBS signal decoding MicroSD card USB disk support Simple calibration procedure with included calibration tape The system will work on most types of vehicles Power management system to preserve vehicle battery Available 1080p video resolution OEM quality PRODU...

Page 10: ...RearViewSafety 10 APPLICATIONS Main Application Side Parking Reverse Parking Narrow Roads Blind Spot Coverage Turning Assist ...

Page 11: ...lind spot coverage Adjutable viewing angle in 3D mode Flexible omni directional monitoring Fish eye distortion correction Guided camera calibration Other Functions Video recording 24 hour parking monitoring G sensor triggered recording Proof of Fault in Accidents Car DVR Crowded Roads ...

Page 12: ...outsidedependsonthesize of the side mirrors and available installation space Be careful when disassemblingthesidemirrorsanddrillinginstallationholesunderthe plastic cover 3 Control Box Installation It is strongly recommended that the Control Box is installed inside be hindtheglovebox orinanotherlocationthatallowseasyaccesstothe microSD card USB disk 4 WiringTest Double check all wire connections b...

Page 13: ...ing The system menu provides a step by step camera calibration guide Onceallthecalibrationinformationiscollectedthesoftwarewillauto matically complete the video merging 7 Side Camera s Angle Adjusting Adjust the side camera s angle until the calibration tape overlaps the reference guide line on the screen 8 Troubleshooting How to fix wire connections cameras and host device ...

Page 14: ...RearViewSafety 14 WIRINDG DIAGRAM Wiring Diagram Control Box ...

Page 15: ...ReverseWithConfidence 15 CamerasDistribution CAMERAS DISTRIBUTION Perspective Drawing ...

Page 16: ...RearViewSafety 16 WIRING ...

Page 17: ...rs 2 Take glass lens off side mirrors and then distribute side camera ca bles from the original tube of side mirrors to the inside of the front doors 3 Distributecablesfrominsidethefrontdoorstotheglovebox central panel Instructions on how to disassemble the glass lens of side mirrors In general most Japanese cars have a plastic buckle structure for side mirrors the top buckle is L shaped and the b...

Page 18: ...extending cable 3 Double check the field of the view from the system preview menu win dow and adjust accordingly 4 Using screws and the metal pad accessories fix the front camera to the car Camera Installation Demonstration For Honda Note Different car models work differently with various cameras types Installation loca tion may vary Please see model installation drawings ...

Page 19: ...nter of the front vehicle logo 2 Connect the front camera to the extending cable 3 Double check the field of the view from the system preview menu window and adjust accordingly 4 Using screws and the metal pad accessories connect the front cam era to the car Camera Installation Demonstration Of Universal Front Camera ...

Page 20: ...gplateafterdrillingiscomplete 3 Distributerearextendingcablefromthelicenseplatelampalongthe original wire distribution tube to the glove box 4 Connect rear camera extending cable to 12V anode of the reversing lamp to create a reversing signal 5 After testing the video from the connected camera place the trunk inner panel back in the vehicle Rear Camera Installation Demonstration Honda Specific ...

Page 21: ...ReverseWithConfidence 21 Note The installation method may be different for various vehicle models and camera shapes CAMERA INSTALLATION ...

Page 22: ...lateafterdrillingiscomplete 3 Distribute rear extending cable from the license plate lamp along the original wire distribution tube to the glove box 4 Connect rear camera extending cable to 12V anode of the reversing lamp to create a reversing signal 5 After testing the video from the connected camera place the trunk panel back in the vehicle Rear Camera Installation Demonstration Universal Rear C...

Page 23: ...rseWithConfidence 23 Place the locating plate on the vehicle then drill a wiring hole Remove locating plate after drilling is complete Lastly fix the camera to the car with a screwdriver CAMERA INSTALLATION ...

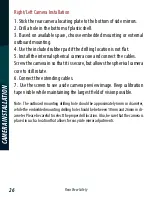
Page 24: ... bit based on the size of your camera Choose a flat area near the edge of the side mirror plastic shell that gives the camera the widest field of view FOV possible Place the camera in a location allowing easy adjustment of the side mirrors Drilling Location Diagram ...

Page 25: ...ReverseWithConfidence 25 Installation Diagram Of Universal Camera CAMERA INSTALLATION ...

Page 26: ...merainsothatitissecure butallowsthesphericalcamera core to still rotate 6 Connect the extending cables 7 Use the screen to see a side camera preview image Keep calibration tape visible while maintaining the largest field of vision possible Note The outboard mounting drilling hole should be approximately 6mm in diameter while the embedded mounting drilling hole should be between 18mm and 26mm in di...

Page 27: ...le 3 55mm in diameter screw the unit to the bottom panel and connect the cables 3 Connect the anode of the left right turning signal from the fuse box to control box wire harness 4 Connect the power cable to battery supply line and connect the wire harness to the control box 5 Fix the control box in the glove box or the space behind the central control panel Note DO NOT cover the heat dissipation ...

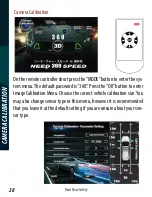
Page 28: ... menu The default password is 360 Press the OK button to enter Image Calibration Menu Choose the correct vehicle calibration size You may also change sensor type in this menu however it is recommended that you leave it at the default setting if you are unsure about your sen sor type Camera Calibration ...

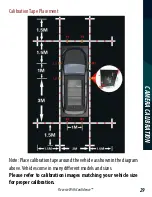
Page 29: ...ecalibrationtapearoundthevehicleasshowninthediagram above Vehicles come in many different models and sizes Please refer to calibration images matching your vehicle size for proper calibration CalibrationTape Placement CAMERA CALIBRATION ...

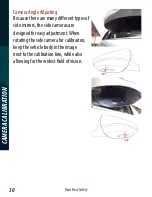
Page 30: ...fferent types of side mirrors the side cameras are designed for easy adjustment When rotating the side camera for calibraiton keep the vehicle body in the image next to the calibration line while also allowing for the widest field of vision Camera Angle Adjusting ...

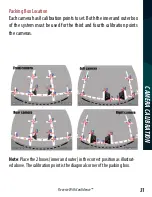
Page 31: ...uterbox of the system must be used for the third and fourth calibration points the cameras Packing Box Location CAMERA CALIBRATION Note Place the 2 boxes inner and outer in the correct position as illustrat ed above The calibration point is the diagonal corner of the packing box ...

Page 32: ...r to corresponding points on the calibration tape with theUP DOWN LEFT RIGHTbuttonsandpressthe OK buttontoconfirm thecalibrationpoint Afterselectingapointthesystemwillguideyouto the next calibration point in numerical order Camera Calibration Press the red MODE button to toggle to previous calibration point as needed ...

Page 33: ...t between the front rear cameras and side cameras The more accurate your calibration marks are the more accurate your image stitch will be Once you have calibrated all of your cameras press OK to start merging The system will reboot automatically Image Calculation CAMERA CALIBRATION ...

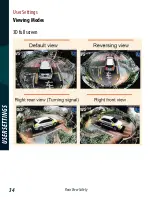
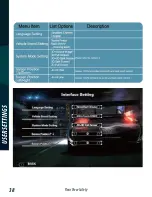
Page 34: ...RearViewSafety 34 USER SETTINGS User Settings Viewing Modes 3D full screen ...

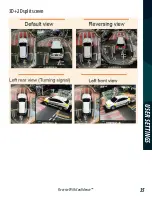
Page 35: ...ReverseWithConfidence 35 USER SETTINGS 3D 2D split screen ...

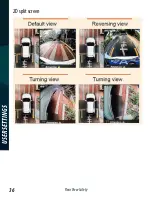
Page 36: ...RearViewSafety 36 USER SETTINGS 2D split screen ...

Page 37: ...em is in standby mode this option allows it to be activated by using a turn signal When the SVM system is in standby mode this option allows it to be activated with the emergency blinker The emergency blinker can also be used to put the SVM system back in standby mode Similar to the ActivateTurn Signal function except the high beams are used to toggle views Turn the recording function on off ...

Page 38: ...RearViewSafety 38 USER SETTINGS ...

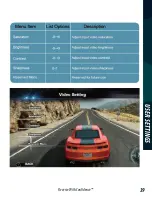
Page 39: ...ReverseWithConfidence 39 USER SETTINGS ...

Page 40: ...wSafety 40 USER SETTINGS The User Preference option restores user video settings window configurations and other options Use this option to upgrade firmware or change the car model to better suit your vehicle ...

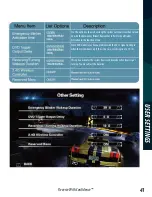
Page 41: ...Emergency Blinker Remember to first turn on Blinker Activation in the function menu Some DVD models may have a problem with the AV In signal coming in when the system boots up If this is the case set this option to 10 15s This option activates the system from standby mode when reversing or turning You may adjust the duration ...

Page 42: ...switch to recording system menu 2 Press OK button to stop current recording 3 Use the UP DOWN buttons to navigate between recorded files 4 Press CONFIRM buttontoselectafiletoplayback Pressthe LEFT or RIGHT buttons to view the individual cameras in full screen ...

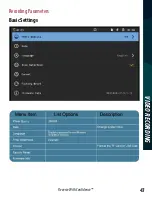
Page 43: ...ReverseWithConfidence 43 VIDEO RECORDING Recording Parameters Basic Settings ...

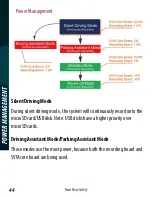
Page 44: ...sistant Mode Parking Assistant Mode During silent driving mode the system will continuously record onto the microSD card USB disk Note USB disks have a higher priority over microSD cards These modes use the most power because both the recording board and SVM core board are being used ...

Page 45: ...m will power up the external Cameras LEDs immediately and start recording In this mode the system is off except for the real time clock chip and G sensor The system will automatically boot up if vibration is detected In some special circumstances including when the battery is lower than 11V the system can only be powered up by starting the engine ...

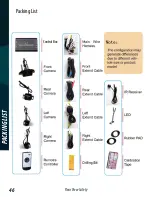
Page 46: ...RearViewSafety 46 PACKING LIST Packing List Control Box ...

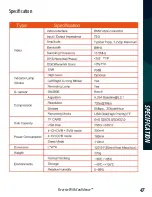
Page 47: ...ReverseWithConfidence 47 SPECIFICATION Specification ...

Page 48: ...mayalsobecausedbyimpropercalibration Remember the more accurate your calibration the better your merged image Problem 2 Merged Image Is Partially Mirrored If you are using OEM cameras check if the the image is mirrored If mirrored change the setting Problem 3 Corner Picture Is Blank These problem may be caused by the camera position Make sure the camera has a wide field of vision Troubleshooting ...

Page 49: ...1 Be sure calibrate correctly based on your vehicle size Failure to do so will result in improper calibration 2 Do not mix up the camera positions when calibrating This will result in improper calibration Diagnostics Troubleshooting TROUBLESHOOTING ...

Page 50: ...RearViewSafety 50 If you have any questions about this product contact RearViewSafety Inc 1797AtlanticAvenue Brooklyn NY11233 800 764 1028 BetterCameras BetterService IT SOURGUARANTEE ...

Reviews: