background image

Blade-900_11

First steps with the 1-channel digital recorder

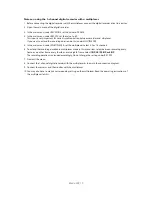
To start the 1-channel digital recorder:

1. Insert the hard disk as described and lock the HDD frame.

2. Connect the video signal sources (camera or multiplexer) with the video input on the rear of the

digital recorder.

3. Connect the video output of the digital recorder with the monitor input of your monitor (digital

recorder with camera or Quad) or with the recorder input of your multiplexer.

4. If necessary, set the switch on the monitor according to the terminal resistance.

5. Connect the cold device cable with the digital recorder and a 110-240V AC power socket.

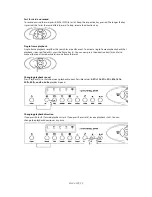
6. Switch on the digital recorder by briefly pressing the on/off switch (1).

The digital recorder now checks that the hard disk is correctly installed. The recorder during this time.

7. After about 5 seconds, confirm correct installation of the hard disk and the cameras by briefly

pressing Enter (9).
The digital recorder ends the test. 

The 1-channel digital recorder is now ready for programming.

IMPORTANT: 

If you want to use the digital recorder with a multiplexer, you have to connect the 

                             recorder direct to a monitor for the initial installation and set the monitor to 
                             multiplexer mode. Once it has been programmed, you can make all further changes  
                             via the multiplexer structure.

Programming the 1-channel digital recorder

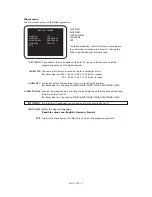
The programming menu of the digital recorder is divided into two parts – the main menu and an alarm
menu.
To open the programming menu, the recorder must be in standby mode :

1. Press Stop (c) to end any functions that may be active.

If the keys are locked, unlock them.

2. Press the menu button (5) and keep it pressed until the monitor display asks you to enter your

password.
The red menu LED lights up.
Enter your password using the direction keys (a,b,d,e). The left (a) and right (d) keys change the
cursor position, and the down (b) and up (e) keys change the value of the selected position.

You are now in the alarm menu. Use the direction keys to navigate through the programming menu. To
select a menu option, press Enter (9). To exit a selected menu option, press Stop (c).

IMPORTANT: 

The factory-set password is 0000. You can change the password at any time. If you do   

                             not want to change the password, confirm the password query twice with the Enter 
                             button (9).

Summary of Contents for Blade-900

Page 1: ...Blade 900_1 http www rec dvr com English PAL NTSC System Installation Instructions...

Page 2: ...Blade 900_2...

Page 3: ...described purpose may lead to damage of the product Other hazards such as short circuiting fire electric shock etc are also possible The recorder is designed for operation with mains electricity at 10...

Page 4: ...ing the 1 channel digital recorder with a multiplexer 15 OPERATING THE 1 CHANNEL DIGITAL RECORDER 16 Manual data recording 16 Locking the operating controls 17 Scheduled recording 18 Event controlled...

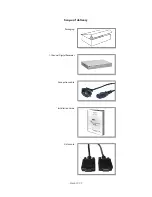
Page 5: ...Blade 900_5 Scope of delivery Packaging 1 Channel Digital Recorder Connection cable Installation Guide Data cable...

Page 6: ...corder is the ideal substitute for an existing video recording system consisting of an analogue video long play recorder and quad multiplexer The user friendly operation and simple programming enable...

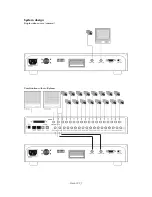
Page 7: ...VIDEO IN VIDEO OUT RS 232C NTSC PAL Blade 900_7 System design Single video source camera Combination with multiplexer VIDEO IN VIDEO OUT RS 232C NTSC PAL...

Page 8: ...Connections for alarm input and output 4 VIDEO IN BNC video connection composite video signal 5 VIDEO OUT BNC video output composite video signal 6 COM RS 232C serial connection For connecting a PC 7...

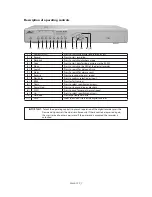
Page 9: ...rewind at normal speed 9 Play Enter Press to confirm selection or input a REW Press for fast rewind b Down Press to select specific menu items c Pause Stop Press to stop recording or playback d FWD P...

Page 10: ...ock of the HDD frame cover down and push the upper cover of the HDD frame back 4 Change the hard disk jumper so that the hard disk works as MASTER 5 Connect the hard disk supplied to the HDD frame usi...

Page 11: ...o use the digital recorder with a multiplexer you have to connect the recorder direct to a monitor for the initial installation and set the monitor to multiplexer mode Once it has been programmed you...

Page 12: ...per second used for recording an alarm Possible values are NTSC 60 30 15 8 4 2 1 0 5P fields second PAL 50 25 12 6 3 2 1 0 5P fields second ALARM REC The length of time the recording is to run in the...

Page 13: ...REC FPS Specifies how many frames per second are to be used for manual and scheduled recording Possible values are 50B 25B 12B 6B 3B 2B 1B 0 5B REC QUALITY Specifies how much the picture data is to be...

Page 14: ...ta is deleted until the next switch on Select ON and press Enter 9 2 All data is deleted Select ON and press Enter 9 After exiting the on screen menu press Record 2 for 3 seconds EXIT Confirm the menu...

Page 15: ...der MULTIPLEXER 5 In the main menu under MULTIPLEXER set the multiplexer Select 4 9 or 16 channels 6 To extend the recording duration in multiplexer mode in this menu item select between recording eve...

Page 16: ...briefly press Record 2 The red recording LED lights up The monitor displays the following The percentage refers to how much of the hard disk has already been used REC A under the percentage shows that...

Page 17: ...sly again 2 When prompted enter the password using the direction keys 3 Confirm your input with Play Enter 9 The word LOCK is no longer displayed The operating controls function again IMPORTANT The fa...

Page 18: ...gital recorder go to the SCHEDULE option 2 Using the direction keys change the setting to DAILY 3 Exit the programming menu of the digital recorder The digital recorder continues the scheduled recordi...

Page 19: ...ack LED lights up 2 Briefly press Enter 9 Playback ends after a few seconds 3 Press Enter 9 again Playback starts with the oldest recorded data The monitor displays the following The arrow next to PLA...

Page 20: ...ngle frame playback check that playback is paused To do this press the Pause key c You can now press the direction keys b and e to move either one frame backwards or one frame forwards Changing playba...

Page 21: ...t event 1A always the latest To jump to the next event press Alarm 7 again To play back this event 1 Press Stop c 2 Press Play 9 The event is played back IMPORTANT If no alarm event has been recorded...

Page 22: ...splays the following HOUR means that the digital recorder is searching the hard disk hour by hour To jump to the next hour press FWD d to jump to the previous hour press REW a To start playback 1 Pres...

Page 23: ...Start playback on the digital recorder 3 Select a picture you want to transfer and press Pause c Make in FIELD mode 4 Now press the Copy button 5 on the digital recorder 5 Place the mouse pointer on...

Page 24: ...e monitor for about 5 seconds Recommended hard disks IMPORTANT The figure shown is only approximate The actual recording time can vary according to prevailing environmental conditions Manufacturer Abb...

Page 25: ...fields second Recording Quality 3 various recording qualities 1 Basic 2 normal 3 High Image Size Average framed size 48 32 16KB Recording Mode Continuous Alarm and Scheduled recording Video Search Tu...

Page 26: ...in and switched on Is the monitor output BNC of the digital recorder connected to the video input BNC of the monitor Are brightness and contrast correctly set on the monitor HDD FAILURE appears on the...

Page 27: ...compatible Not compatible AND MP D4DX 4 Not compatible Not compatible Everfocus Hsintek Not compatible Not compatible Not compatible Not compatible AV Tech AVC 707ND 16 Compatible Compatible Compatib...

Page 28: ...Blade 900_28...

Reviews: