background image

11

10

Forward-Facing:

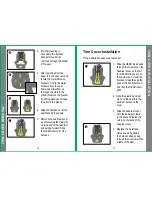
A child 

CAN

 use this child restraint in the 

Forward-Facing

 position 

ONLY

 if:

•  The child is at least 12 months of age 

and,

• The child’s weight is between 

23 

and 

65 

pounds (10.4 kg 

and

 29.5 kg) 

and,

• The child’s standing height* is 

LESS


than 

49 inches (125 cm)

 and, 

• When the child is sitting and the 

head of the restraint is in the highest 

position, the top of the child’s ears 

muse be 

BELOW

 the top of the 

headrest.

• If 

ANY

 portion of the child’s head exceeds the top edge of the 

child restraint, there must be a vehicle headrest support.

*NOTE

: A child’s standing height measures the distance from the top 

of their head to the bottom of their feet, when they are standing. 

Safety Stripe System

TM 

Your child restraint is equipped with the easy-to-use RECARO 

Safety Stripe SystemTM. You will notice that your harness has 

a white stripe on the outside edges. This added safety feature 

will allow you to ensure that your harness is not twisted. The 

white stripe should always remain at the outside edge of the 

harness above the lower buckle. If it is not, please loosen your 

harness system and remove any twist prior to use.

GETTING T

O KNOW 

YOUR CHILD RESTRAINT


2

Genius

TM

 Adjustment Technology

By pulling on the Genius

TM

 Adjust Harness Tightening Strap, 

the Genius Adjustment Technology properly places the harness 

at shoulder height while correctly positioning the head rest. 

This eliminates the need for manual adjustment of the head 

rest and harness slots as your child grows, whether using the 

Performance Crossover rear-facing or forward-facing. 
When using the Genius Adjustment Technology you MUST use it 

as a complete system. You MUST connect the chest clip, fasten 

the crotch buckle latch plates and pull the Genius Adjust Harness 

Tightening Strap to position the harness straps and head rest.

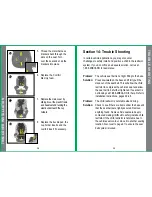
1.  Loosen the harness system 

by pressing the Genius 

Adjust lever and allowing 

the headrest and shoulder 

straps to raise to the highest 

position.

2.  Pull on the Genius Adjust 

Harness Tightening Strap 

to lower the head rest and 

shoulder straps until the 

harness is tight according 

to the pinch test (reference 

page 16)

3.  Pull shoulder straps to ensure 

the system is secure.

1

ADJUSTING THE HARNESS SYSTEM T

O FIT 

YOUR CHILD

Summary of Contents for Performance Crossover

Page 1: ...3 Only suitable for use in vehicles with 2 point lap 3 point lap shoulder seat belts and LATCH anchorages El manual de instructiones Performance Crossover esta disponible en espa ol en www recaro com...

Page 2: ...our vehicle before you lock it and walk away Keep a stuffed animal or other memento in your child s car seat when it s empty and move it to the front seat as a visual reminder when your child is in th...

Page 3: ...ection 7 Installing the Base in Your Vehicle p 22 28 Section 8 Installing the Performance Crossover Rear Facing p 29 30 Section 9 Installing the Performance Crossover Forward Facing p 31 32 Section 10...

Page 4: ...damaged during shipping Failure to follow these instructions and the labels on the seat can result in serious injury or even death The RECARO child seat you have purchased is a high quality product I...

Page 5: ...he child restraint has been in a crash or vehicle accident it must be replaced do NOT use the child restraint again A crash can cause unseen damage and using the child restraint again can cause seriou...

Page 6: ...he child restraint before placing a child in it When it is COLD RECARO recommends the following tips to reduce possible injury or discomfort to your child Remove the child s bulky clothing before rest...

Page 7: ...can Academy of Pediatrics and NHTSA recommend keeping children rear facing up to age 2 RECARO advocates using a convertible child restraint up to maximum rear facing weight and height Child Fit Inform...

Page 8: ...e harness above the lower buckle If it is not please loosen your harness system and remove any twist prior to use GETTING TO KNOW YOUR CHILD RESTRAINT 2 GeniusTM Adjustment Technology By pulling on th...

Page 9: ...with the features of your child restraint system These diagrams help you identify key features Side Impact Protection GeniusTM Adjust Harness Tightening Strap Buckle HERO Insert Chest Clip AutoOpen Ha...

Page 10: ...the child in the child restraint with his her bottom fully back into the seat Position the harness straps around the child and fasten both latch plates into the buckle 1 2 3 4 Child Restraint Features...

Page 11: ...VER install in the rear seat of small extended cab pickup NEVER install on a side facing vehicle seat If the vehicle backrest angle is adjustable adjust vehicle s backrest into the upright position Be...

Page 12: ...restraint system may injure other occupants or store it somewhere outside the passenger cabin so that it cannot injure anyone while the vehicle is in motion RECARO recommends storing the child restrai...

Page 13: ...LE SAFETY SYSTEMS WARNING DEATH or SERIOUS INJURY can occur LEARNING ABOUT YOUR VEHICLE SAFETY SYSTEMS Types of Seat Belt Systems Seat Belt System Description Installation Instructions LATCH LATCH str...

Page 14: ...adjuster release button and pulling the webbing to full length WARNING DEATH or SERIOUS INJURY can occur Base Installation LATCH 3 Position the base on the forward facing vehicle seat with the belt pa...

Page 15: ...nnot be moved more than 1 inch 2 5 cm in any direction at the belt path WARNING DEATH or SERIOUS INJURY can occur 1 2 4 Lap Belt Only Installation Cannot use this method of installation with an emerge...

Page 16: ...ere may be a label located on the door side of the seat belt with instructions for use with a child restraint The Performance Crossover is equipped with belt lock offs that MUST be used with these typ...

Page 17: ...al connection to the base the seat will be at its upmost position Recline the seat by pulling on the recline lever so that the level to ground line on the side of the seat is parallel with the ground...

Page 18: ...on top of the base 2 Face the seat toward the front of the vehicle and place the seat into the base Pull up on the seat to verify that all four attachment rods are secured to the seat 3 Adjust the rec...

Page 19: ...the Lap Belt Only instructions on pages 25 26 Rear Facing Installation Secure rear facing as shown on pages 29 30 Installing the Performance Crossover Rear Facing Forward Facing Installation Secure fo...

Page 20: ...the child restraint s plastic structure follow these tips Clean by hand with a sponge or soft cloth using warm water and mild soap Dry the structure off thoroughly with a soft towel NOTE Heavily soile...

Page 21: ...est and pulling forward Slide the HERO insert off of the harness 6 1 4 1 Slide the HERO insert pads through the two slots on the headrest cover so that all 3 RECARO logos are on the same side Thread t...

Page 22: ...cle seat belt is not tight fitting to the base Solution Press downward on the base and firmly pull the slack out of the seat belt This will allow the child restraint to compress the vehicle s seat and...

Page 23: ...the safety of the child restraint Problem Buckle sticks or will not latch Solution Check inside the buckle slots for foreign objects The buckle may be rinsed with cool water to remove spilled food an...

Page 24: ...ion or alteration of the Product c Failure to comply with RECARO s instructions for service and maintenance d Accident unauthorized repairs or unauthorized use e Any attachment or replacement part tha...

Page 25: ...to as a lap belt 3 Point Seat Belt A seat belt with both a lap and a shoulder portion having three contact points one shoulder two hips Airbag A passive idle restraint system that automatically deploy...

Page 26: ...raint systems to vehicles independent of the vehicle seat belts LATCH Anchors Two small metal bars that can be found in the space where the rear seat back meets the seat cushion GLOSSARY LATCH Connect...

Page 27: ...ecaro com E mail info usa recaro cs com In the interest of product development RECARO reserves all rights to make changes to the construction and design of its products without prior notification RECA...

Reviews: