background image


17 

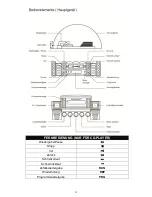
UTILISATION DE LA RADIO 

1. Tournez la molette SELECTEUR DE MODE jusqu‟au point désiré. 
2. Ajustez le son avec la molette VOLUME. 
3. Effectuez le réglage de la station de radio désirée avec la molette REGLAGE RADIO. 
4. Pour éteindre la radio, appuyez sur l‟interrupteur d‟ALIMENTATION. 


UTILISATION DE LA LUMIERE


1. Appuyer sur le bouton LUMIERE pour allumer toutes les lumières. 
2. Pour éteindre les lumières, appuyez sur le bouton LUMIERE une nouvelle fois. 


REMARQUES:   
1. 

(POUR LA VERSION “LUMIERES NEON” SEULEMENT) 

Veuillez notez que les lumière néon ne fonctionneront pas en mode radio PO/GO. Cela est dû à 
l‟interférence dûe à la lumière néon, ce qui est normal. 


2. 

MODE LUMIERE (AVEC LA VERSION “LUMIERES BULBE” SEULEMENT) 

Appuyez sur le SELECTEUR DE MODE derrière l‟appareil pour changer le mode lumières. 
 

3. MODE LUMIERE (

AVEC LA VERSION “LUMIERES LED” A L’ARRIERE SEULEMENT) 

Les couleurs des lumières changent au fur et à mesure ; passez en position HOLD (MAINTENIR) pour 
rester à vos couleurs favorites. Passez en position PLAY pour reprendre. 
 

* NOTE IMPORTANTE: (VERSION LUMIERES LED SEULEMENT) 
Le changement des séquences de couleurs est contrôlé par circuits intégrés ; les lumières 
peuvent s’éteindre quand le mode lumière est en position HOLD normal. 
 
CONNECTION A DES ENCEINTES EXTERNES SI EQUIPE)


Branchez chaque enceinte au terminal enceinte derrière l‟appareil ; mettez l‟interrupteur enceintes en 
position “externe”.


CONNECTION AUXILIAIRE 

“AUX IN” (SI EQUIPE)


1. Branchez votre source externe (par exemple lecteur mp3 ou iPod) sur 

la “connection AUX IN” 

(située au dos de votre appareil) 

avec un branchement stéréo et un rack détachable (fourni 

séparément)


2. 

Mettez l‟interrupteur ON/OFF à côté du jack en position “ON”. 

3. Faites passer le sélecteur de mode en 

“CD-AUX”. 

4. Ajustez le son avec la molette de VOLUME ou le contrôle volume de votre source externe. 
5. Quand vous passez à un autre mode, la source externe continuera à lire sans son jusqu‟à ce que 
l‟interrupteur ON/OFF soit mis en position “OFF” et que la source externe soit éteinte. 


NOTE IMPORTANTE:


1. Mettez l‟interrupteur ON/OFF en position “OFF” quand vous ne l‟utilisez pas. 
2. La fonction CD sera opérationnelle de façon normale après que l‟interrupteur ON/OFF ait été mis 
en position “OFF”. 


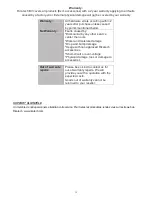
Summary of Contents for RR950 RETRO JUKEBOX

Page 1: ...RR950 RETRO JUKEBOX POWER LIGHT Yesterday s feeling Today s technology ...

Page 2: ...unction normally Let the unit stand for 1 to 2 hours before turning the power on or gradually heat the room up and dry the unit before use ATTENTION SHOULD BE DRAWN TO THE EVIRONMENTAL ASPECTS OF BATTERY DISPOSAL The Lighting flash with an arrowhead symbol within the equilateral triangle is intended to alert the user to the presence of uninsulated dangerous voltage within the product s enclosure t...

Page 3: ...3 USER MANUAL REMOTE CONTROL FUNCTION FOR CD PLAYER ONLY PLAY PAUSE STOP SKIP FORWARD SKIP BACKWARD FAST FORWARD FAST REWIND RANDOM RAN REPEAT REP PROGRAM PRG ...

Page 4: ...ed PROGRAMMED DISC PLAY It is not possible to enter programs during disc play Press the STOP button first then enter a program 1 Press the STOP button 2 Press the PROGRAM button Select a track number using SKIP FORWARD or SKIP BACKWARD button press PROGRAM button again 3 Repeat step 2 until all the desired tracks are programmed in memory NOTE To modify the program press the STOP button and restart...

Page 5: ... IMPORTANT NOTE LED LIGHTS VERSION ONLY The changing colors sequences of lights are controlled by IC the lights maybe turned off when the light mode in HOLD position is normal EXTERNAL SPEAKER CONNECTION IF EQUIPPED Connect each speaker wire to the speaker terminal at the back cover switch the speaker switch to extenal AUXILIARY CONNECTION AUX IN IF EQUIPPED 1 Connect your own device i e MP3 playe...

Page 6: ...ordance with the colors 2 Adjust ON OFF switch next to the jack to the ON position The built in amplifier of Jukebox will cut off immediately 3 Adjust the sound with the VOLUME TREBLE BASS knob of Jukebox and or the volume control of your own amplifier NOTE No sound could be heard when the LINE OUT switch in ON position if without connecting to your own amplifier make sure the ON OFF switch to OFF...

Page 7: ...urs Water and moisture damage Drop and bump damage Usage with non approved Ricatech accessories Short circuit or over voltage Physical damage loss or damage to accessories Out of warranty repairs Please be so kind to contact us for out of warranty repairs We will provide you with a quotation with the expected costs Goods out of warranty cannot be returned to your reseller CUSTOMER SUPPORT You can ...

Page 8: ...tie begint te vormen Als er condensatie in het apparaat ontstaat bestaat er een kans dat deze niet naar behoren functioneert Laat het apparaat 1 tot 2 uur rusten voordat u het gebruikt verwarmd en droog het apparaat geleidelijk voordat u hem weer aanzet AANDACHT VOOR HET EFFECT VAN BATTERIJ VERWERKING OP HET MILIEU WAARSCHUWING OM DE KANS OP EEN ELEKTRISCHE SCHOK TE VERKLEINEN VERWIJDER NIET DE HO...

Page 9: ...ON FOR CD PLAYER ONLY PLAY PAUSE AFSPELEN PAUZE STOP STOP SKIP FORWARD VOORUIT SPOELEN SKIP BACKWARD TERUG SPOELEN FAST FORWARD SNEL VOORUIT SPOELEN FAST REWIND SNEL TERUG SPOELEN RANDOM WILLEKEURIG RAN REPEAT HERHAAL REP PROGRAM PROGRAMMEREN PRG ...

Page 10: ...komen uit het apparaat Gebruik van zulke CD s is afgeraden GEPROGRAMEERD AFSPELEN Het is niet mogelijk om een programma in te voeren tijdens het afspelen Druk eerst op de STOP knop en voer daarna het gewenste programma in 1 Druk op de STOP knop 2 Druk op de PROGRAM knop Selecteer een nummer door de knoppen SKIP FORWARD of SKIP BACKWARD te gebruiken druk nogmaals op de PROGRAM knop 3 Herhaal stap 2...

Page 11: ...ite kleur te behouden Schakel over naar PLAY om het afwisselen te hervatten BELANGRIJKE NOTITIE ALLEEN DE LED LIGHTS VERSIE Het veranderen van de kleur volgorde word geregeld door de IC de lichten kunnen uitgeschakled worden als de light mode in HOLD positie normaal is EXTERNE SPEAKER VERBINDING ALS DEZE GEINSTALLEERD IS Sluit elke speaker aan kabel aan met de speaker aansluiting op de achterkant ...

Page 12: ...uren 2 Schakel de ON OFF schakelaar naast de aansluiting op ON De ingebouwde versterker van Jukebox wordt onmiddellijk uitgeschakeld 3 Stel het geluid af met de VOLUME TREBLE BASS knop van de Jukebox en of de volumeknop van je eigen versterker OPMERKING Er is geen geluid te horen wanneer de LINE OUT schakelaar in de ON stand staat zodra deze niet in verbinding staat met je eigen versterker zorg er...

Page 13: ...r en vloeistof schade Val en stoot schade Gebruik van andere accessories die niet zijn goedgekeurd door Ricatech Kortsluiting of overspanning Fysieke schade verlies of schade aan de accessories Buiten garantie vallende reparaties Voor buiten garantie vallende reparaties kan u altijd contact met ons openemen We zillen u een factuur geven van de verwachte kosten Producten die buiten de garantie vall...

Page 14: ...tels que journaux serviettes rideaux etc Ne mettez pas des flammes à nu comme des bougies sur l appareil Respectez les consignes environnementales liées à l utilisation des piles Utilisez cet appareil dans des climats modérés non tropicaux N exposez pas l appareil à l eau ou aux éclaboussures Ne mettez pas des objets remplis d eau comme des vases sur l appareil MODE D EMPLOI La flèche en forme d é...

Page 15: ...15 FONCTIONS DE LA TELECOMMANDE SEULEMENT POUR LE LECTEUR CD LECTURE PAUSE STOP PISTE SUIVANTE PISTE PRECEDENTE AVANCE RAPIDE RETOUR RAPIDE LECTURE ALEATOIRE RAN REPETITION REP PROGRAMME PRG ...

Page 16: ...ogrammes pendant la lecture de disques Appuyez sur le bouton STOP d abord puis réglez un programme 1 Appuyez sur le bouton STOP 2 Appuyez sur le bouton PROGRAMME Choisissez un numéro de piste à l aide des boutons PISTE SUIVANTE et PISTE PRECEDENTE appuyez sur le bouton PROGRAMME de nouveau 3 Répétez l étape 2 jusqu à ce que toutes les pistes désirées soient programmées dans la mémoire NOTE Pour mo...

Page 17: ...LAY pour reprendre NOTE IMPORTANTE VERSION LUMIERES LED SEULEMENT Le changement des séquences de couleurs est contrôlé par circuits intégrés les lumières peuvent s éteindre quand le mode lumière est en position HOLD normal CONNECTION A DES ENCEINTES EXTERNES SI EQUIPE Branchez chaque enceinte au terminal enceinte derrière l appareil mettez l interrupteur enceintes en position externe CONNECTION AU...

Page 18: ...c les couleurs 2 Régler interrupteur ON OFF côté de la prise de la position ON L amplificateur intégré de Jukebox sera coupée immédiatement 3 Réglez le son à l VOLUME TREBLE BASS bouton de juke box et ou le volume de votre propre amplificateur NOTE Pas de son peut être entendu lorsque le commutateur LINE OUT en position ON si sans vous connecter à votre propre amplificateur assurez vous que le com...

Page 19: ...r service center then ours Water and moisture damage Drop and bump damage Usage with non approved Ricatech accessories Short circuit or over voltage Physical damage loss or damage to accessories Out of warranty repairs Please be so kind to contact us for out of warranty repairs We will provide you with a quotation with the expected costs Goods out of warranty cannot be returned to your reseller SU...

Page 20: ...ngen Tischtücher Vorhänge o ä abgedeckt ist Gegenstände mit offenen Flammen wie z B Kerzen sollten niemals auf das Gerät gestellt werden Achten Sie immer auf eine umweltgerechte Entsorgung leerer Batterien Benutzen Sie das Gerät nur in moderaten Klimazonen nicht für tropisches Klima geeignet Setzen Sie das Gerät niemals Wassertropen oder spritzern aus Gegenstände die mit Flüssigkeiten gefüllt sind...

Page 21: ...21 FERNBEDIENUNG NUR FÜR CD PLAYER Wiedergabe Pause Stopp Vor Zurück Schnellvorlauf Schnellrücklauf Zufallswiedergabe RAN Wiederholung REP Programmwiedergabe PRG ...

Page 22: ...AMMWIEDERGABE Während der Wiedergabe ist es nicht möglich ein Programm zu erstellen Betätigen Sie daher bitte zuerst die STOPP Taste 1 Betätigen Sie die STOPP Taste 2 Betätigen Sie die PRG Taste Wählen Sie eine Titelnummer mithilfe von oder und betätigen Sie die PRG Taste erneut 3 Wiederholen Sie Schritt 2 bis alle gewünschten Titel programmiert sind HINWEIS Zum Verändern des Programms betätigen S...

Page 23: ... Fortfahren der Wiedergabe WICHTIGER HINWEIS BEI VERWENDUNG DER LED LIGHTS VERSION Die Lichteffekte werden durch einen integrierten Schaltkreis geregelt Zum Ausschalten der Lichteffekte stellen Sie den Lochtmodusschalter bitte in die Normalposition ANSCHLUSS EXTERNER LAUTSPRECHER OPTIONAL Verbinden Sie sämtliche Lautsprecherkabel mit den Lautsprecheranschlüssen auf der Geräterückseite Schalten Sie...

Page 24: ...Farben verbunden werden 2 Stellen Sie ON OFF neben der Buchse an der Position ON Schalter Die eingebauten Verstärker der Jukebox wird abgeschnitten sofort 3 Den Klang mit den VOLUME TREBLE BASS Regler der Jukebox und oder die Lautstärke der eigenen Verstärker Hinweis Kein Ton war zu hören wenn die LINE OUT Schalter in Stellung ON wenn ohne die Verbindung zu Ihrem eigenen Verstärker stellen Sie sic...

Page 25: ...center then ours Water and moisture damage Drop and bump damage Usage with non approved Ricatech accessories Short circuit or over voltage Physical damage loss or damage to accessories Out of warranty repairs Please be so kind to contact us for out of warranty repairs We will provide you with a quotation with the expected costs Goods out of warranty cannot be returned to your reseller KUNDENDIENST...

Reviews: