TonerRefillKits.com
RechargX™ RX201X v1
Mon - Fri 8am - 5pm ET © 1995-2011 ReChargX™, EmptyX, TonerRefillKits and TonerRefillKits.com, the TonerRefillKits logo, the
2012.01.10
800.527.3712 or 352.343.7533 ReChargX™ and EmptyX logos are trademarks owned by TonerRefillkits, LLC. All rights reserved.
Page 3 of 9
Step 6: Empty the Toner Hopper
You must remove any toner that is still in the
toner hopper before refilling.
NOTE:
This step does not need to be repeated
the next time you refill.
NOTE:
This toner cannot be used again, the new
toner being added cannot mix with the residual
OEM toner. Failing to remove the toner before
refilling will result in significant hazing on some
or all of the printed page that will not go away
with further printing.
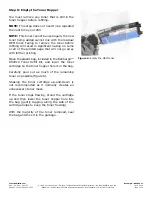
Open the plastic bag, included in the ReChargX™
RX201X Toner Refill Kit, and lower the toner
cartridge so the toner hopper hole is in the bag.
Carefully pour out as much of the remaining
toner as possible (figure 6).
Shaking the toner cartridge up-and-down is
not recommended as it normally creates an
unnecessary toner mess.
If the toner stops flowing, stand the cartridge
up and then lower the toner hopper hole into
the bag (gently tapping along the side of the
cartridge helps to keep the toner flowing).
With the majority of the toner removed, seal
the bag and toss it in the garbage.
Figure 6:
Empty the OEM toner


