


TonerRefillKits.com
RechargX™ RX230X v1
Mon - Fri 8am - 5pm ET
© 1995-2011 ReChargX™, EmptyX, TonerRefillKits and TonerRefillKits.com, the TonerRefillKits logo, the
2011.11.09
800.527.3712 or 352.343.7533 ReChargX™ and EmptyX logos are trademarks owned by TonerRefillkits, LLC. All rights reserved.
Page 10 of 10
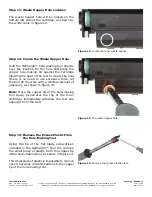
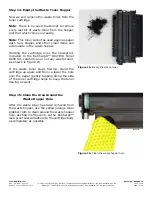
Figure 21
: Install the new ReChargX™ reset chip
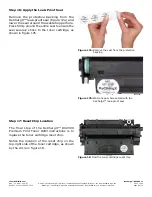
Figure 22
: Cartridge reset chip in place with tape
Step 20: Replacing the Reset Chip
After removing the old chip, slide the new
RX230RC-X reset chip into the slot (in this
orientation make certain the notches are
facing inward, as shown in figure 21).
Step 21: Secure the Reset Chip
If the chip sits very loosely in the slot, a tiny bit
of tape, that is included in your refill kit, can be
used on the top of the chip to hold it in place,
as shown in figure 22 -
DO NOT COVER THE
BRASS CONTACTS!
Congratulations – You’re Finished!
Congratulations! You have successfully refilled
your Canon 119II toner cartridge, emptied the
waste hopper and replaced the cartridge reset
chip.
Enjoy your savings. You’ve just saved $158.04
by refilling your toner cartridge!
-End of ReChargX™ RX230X Instructions-
Customer Service / Technical Support
To further help your ReChargX™ RX230X Toner
Refill procedure, we are always ready, willing
and happy to answer any of your questions or
comments via technical support.
Please contact us at 352.343.7533 or
800.527.3712 M - F 8am - 5pm ET.
Additionally, you may also chat with us using
Live Help on our website (M - F 8am - 5pm ET)
or submit a technical support ticket at:
www.TonerRefillKits.com/Tech_Support.php


