background image

TonerRefillKits.com 


RechargX™ RX230X v1

Mon - Fri  8am - 5pm ET                     

© 1995-2011 ReChargX™, EmptyX, TonerRefillKits and TonerRefillKits.com, the TonerRefillKits logo, the  

2011.11.09

800.527.3712 or 352.343.7533                 ReChargX™ and EmptyX logos are trademarks owned by TonerRefillkits, LLC. All rights reserved. 

Page 6 of 10

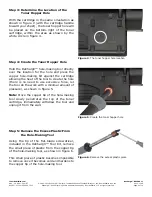
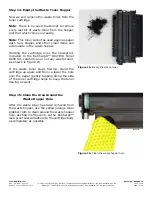
Step 11: Waste Hopper Hole Location

T

he  waste  hopper  hole  will  be  placed  on  the 

bottom left side of the cartridge, as shown by 

the white circle in figure 12.

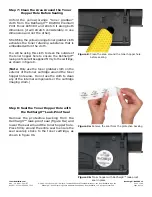
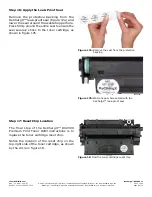
Step 12: Create the Waste Hopper Hole

Hold the ReChargX™ hole-making tool directly 

over  the  location  for  the  hole  and  press  the 

copper  hole-making  bit  against  the  cartridge 

allowing the heat of the tool to create the hole 

(there  is  no  need  to  use  excessive  force,  let 

the tool do the work with a minimal amount of 

pressure), as shown in figure 13.
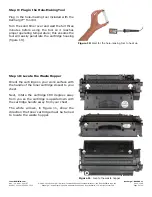
Note:

 Once the copper tip of the hole-making 

tool  slowly  penetrates  the  top  of  the  toner 

cartridge,  immediately  withdraw  the  tool  and 

unplug it from the wall.

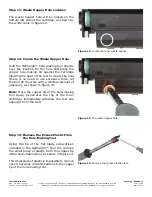
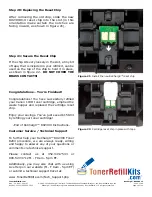
Step 13: Remove the Excess Plastic From 

the Hole-Making Tool

Using  the  tip  of  the  flat-blade  screwdriver, 

included in the ReChargX™ Tool Kit, remove 

the small piece of plastic from the copper tip 

of the hole-making tool, as shown in figure 14.

This small piece of plastic is impossible to remove 

once it becomes cold and hardens to the copper 

tip of the hole-making tool.


Figure 12

: Locate the toner waste hopper

Figure 13

: The waste hopper hole

Figure 14

: Remove the excess plastic piece

Summary of Contents for RX230X

Page 1: ... Toner Refill Kit Within these ReChargX RX230X Premium Print Toner Refill Kit instructions we will be adding new toner removing the waste toner and replacing the reset chip Step 1 Orient the Toner Cartridge Orient the cartridge on your work surface with the cartridge chip facing away from you In this orientation the handle of the toner cartridge will be closest to your chest as shown in figure 2 S...

Page 2: ...ation for the hole and press the copper hole making bit against the cartridge allowing the heat of the tool to create the hole there is no need to use excessive force let the tool do the work with a minimal amount of pressure as shown in figure 5 Note Once the copper tip of the hole making tool slowly penetrates the top of the toner cartridge immediately withdraw the tool and unplug it from the wa...

Page 3: ... dispenser spout from the ReChargX RX230X Toner Refill Kit To make the adding of the toner to the toner hopper as easy and dust free as possible tilt the end of the cartridge with the hole in it up at a 45 degree angle and slowly angle the dispenser spout on the bottle of toner to meet up with the hole as shown in figure 7 Tilting the bottle up a little more will start the toner flowing into the t...

Page 4: ... the cloth You will be using this cloth to clean the outside of the toner hopper hole to ensure the ReChargX leak proof seal will be applied firmly to the cartridge as shown in figure 8 Note Only use the toner grabber cloth on the exterior of the toner cartridge around the toner hopper hole area Do not use the cloth to clean any of the internal components or the cartridge imaging drum Step 8 Seal ...

Page 5: ...t the full three minutes before using the tool so it reaches proper operating temperature this ensures the tool will easily penetrate the cartridge housing figure 10 Step 10 Locate the Waste Hopper Orient the cartridge on your work surface with the handle of the toner cartridge closest to your chest Next rotate the cartridge 180 degrees away from you so the cartridge is upside down with the cartri...

Page 6: ...cartridge allowing the heat of the tool to create the hole there is no need to use excessive force let the tool do the work with a minimal amount of pressure as shown in figure 13 Note Once the copper tip of the hole making tool slowly penetrates the top of the toner cartridge immediately withdraw the tool and unplug it from the wall Step 13 Remove the Excess Plastic From the Hole Making Tool Usin...

Page 7: ...s and other small items can accumulate in the waste hopper Holding the cartridge over the newsprint included in the ReChargX RX230X Toner Refill Kit carefully pour out any waste toner as shown in figure 15 If the waste toner stops flowing stand the cartridge up again and then re lower the hole over the paper gently tapping along the side of the toner cartridge helps to keep the toner flowing as we...

Page 8: ... and lower the seal around the waste hopper hole Press firmly around the entire seal to ensure the seal securely sticks to the toner cartridge as shown in figure 17b Step 17 Reset Chip Location The final step of the ReChargX RX230X Premium Print Toner Refill instructions is to replace the toner cartridge reset chip Notice the location of the reset chip on the top right side of the toner cartridge ...

Page 9: ...ve the Plastic Tabs The toner cartridge reset chip is held in place by two small plastic tabs These tabs must be removed before the cartridge reset chip can be removed as shown in figure 19 Gently pry up on each of the cartridge reset chip tabs to snap them off so the chip can be removed from the cartridge Step 19 Removing the Reset Chip After the two tabs have been removed push the chip out of th...

Page 10: ... of tape that is included in your refill kit can be used on the top of the chip to hold it in place as shown in figure 22 DO NOT COVER THE BRASS CONTACTS Congratulations You re Finished Congratulations You have successfully refilled your Canon 119II toner cartridge emptied the waste hopper and replaced the cartridge reset chip Enjoy your savings You ve just saved 158 04 by refilling your toner car...

Reviews: