23
17. Assembly of the Optional BDS250-W Pedal Wheel Kit
1
Pedal
1
2
Flat washer
2
3
Hex nut
2
4
Spring washer
7
5
Washer
4
6
Axle
2
7
Split pin
4
8
Rotating casters
2
9
Hex bolt
5
10
Casters
2
11
Release catch
1
12
Hex nut
5
13
Flat washer
5
14
Operating frame
1
15
Brace support bar
2
i
Kg
Fig.17.1
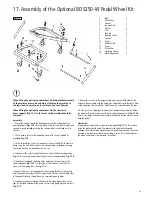
When fitting the optional pedal wheel kit during initial assembly
of the machine, please do so before attaching the machine to
the leg stand to ensure greater safety and ease of fitment.
When fitting the optional pedal wheel kit, the short mid
brace support (Fig. 17.1) at the front of the machine should be
removed.
Assembly
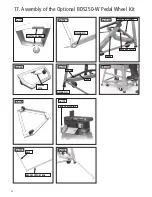
1. Mount the two casters to the flattened areas on the underside of the
operating frame,
Fig. 17.2
. Secure in place using the nuts bolts, washers and
spring washers provided, ensuring the spring washers are placed next to
the nuts.
2. Fit the release catch to the operating frame with the nuts and bolts
provided,
Fig. 17.3
.
3. Fit the two rotating casters to the pedal as shown in
Fig. 17.4
. Secure in
place using the nuts bolts, washers and spring washers provided, ensuring
the spring washers are placed next to the nuts.
4. Feed one of the axles through the hole on one of the brace support bars,
Fig. 17.5
, and secure using one of the pins and washers provided,
Fig. 17.6
.
5. Feed the axle through the fixing holes on both of the rear legs of the
stand and pedal,
Fig. 17.7
. The rear side of the machine is that which is
closest to the sanding disc, see
Fig. 17.8
.
6. Repeat this process at the opposite side ensuring that both sides of the
axle have been secured with the fixing pins and washers and that both sides
of the pedal are fixed. It should now be secure between the legs.
7. Feed the second axle through the holes in the brace support bars, front
legs of the stand and operating frame. Secure using fixing pins and washers,
Fig. 17.9
.
8. Repeat this process at the opposite side ensuring that both sides of the
axle have been secured with the fixing pins and washers and that both sides
of the operating frame are fixed. It should now be secure between the legs.
9. At this point it is important to ensure that the operating frame sits below
the pedal and that the release catch hooks under the pedal as in
Fig. 17.10
.
If necessary, adjust the operating frame to enable the release catch to hook
onto the pedal.
Operation
To operate the wheel kit press down on the pedal,
Fig. 17.11
. This motion
raises the machine and stand. The release catch hooks onto the pedal
allowing the machine to be wheeled freely around the workshop. To set the
machine in position, press down on the release catch. This motion releases
the wheels and lowers the leg stand to the floor.


