background image

5.4 Tensioning the blade

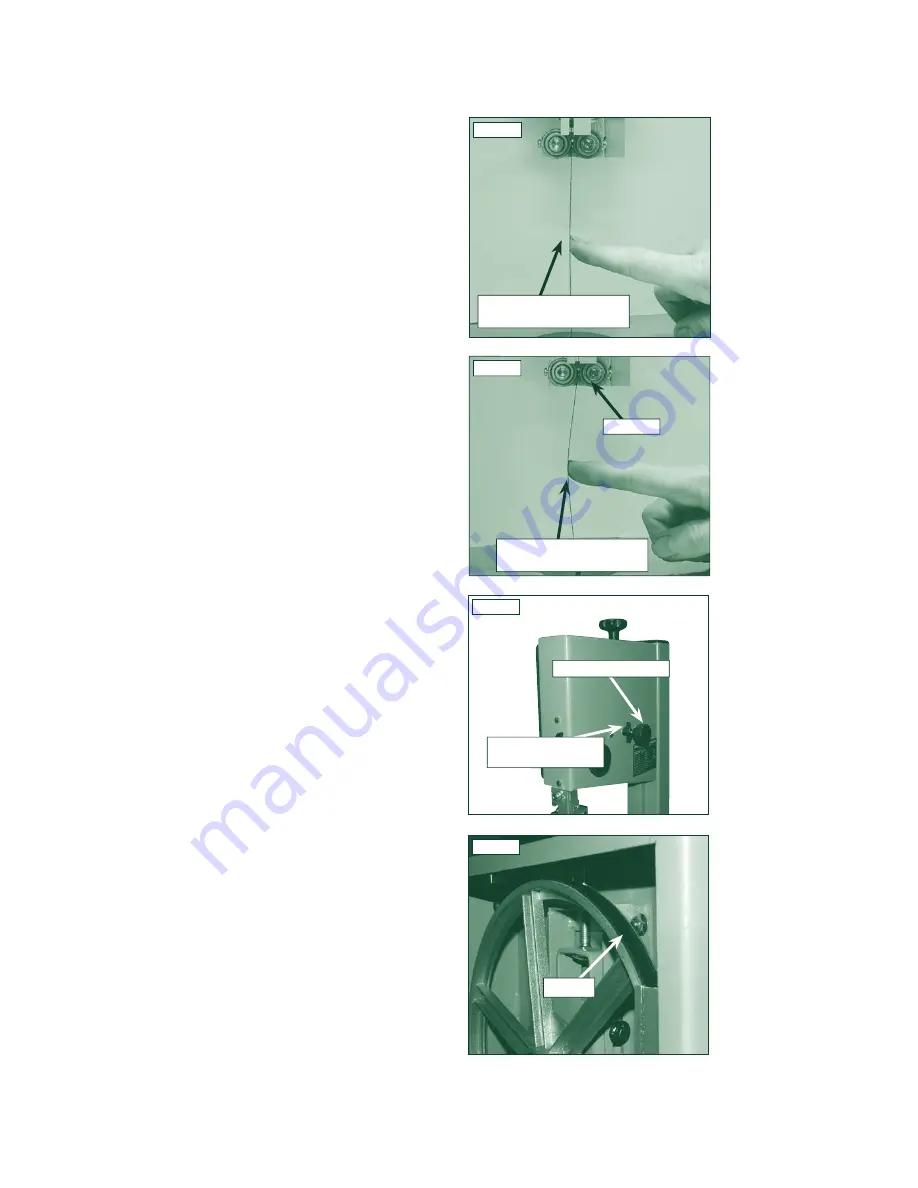
The blade tensioning knob should be used to increase or 
decrease tension. The only accurate way to check a blade is 
with a tension meter. These are very expensive so most users 
may need another method. We suggest testing the tension by 
the amount the blade will deflect sideways. First set the guides 
to the maximum height above the table, making sure the saw is 
turned off. Push the blade sideways with a reasonable amount 
of pressure using the index finger. When pushing with the index 
finger a correctly tensioned blade should not move more than a 
1/4" sideways 

Fig.5.4

. An incorrectly tensioned blade will easily 

move more than 1/4" sideways 

Fig.5.5

.

However, perhaps the most tried and tested way of blade 
tensioning is simply: If the bandsaw is cutting accurately then 
the blade is tensioned correctly, if the blade tends to wander 
and an accurate cut cannot be achieved then the blade tension 
needs adjusting. If adjusting the tension does not solve the 
problem the blade may need replacing.

If the machine is to stand idle for a period it is good practice to 
slacken tension and re-tension when next using. 

5.5 Tracking the Bandsaw blade

Isolate the machine from the supply by unplugging the mains 
plug. Set the tracking of the blade before setting the blade
guides. Once the blade is tensioned, track the blade by turning 
the upper bandwheel by hand and adjusting the tracking knob 

Fig.5.6

. By turning the tracking knob clockwise the blade 

will move towards the back of the bandwheel, by turning the 
tracking knob anti-clockwise the blade will move to the front of 
the bandwheel. The blade should run as close to the centre of 
the bandwheel as possible, as shown 

Fig.5.7.

 On narrow blades 

(eg 1/4" and 3/8") it may be necessary to run the blade to the 
rear of the bandwheel. After the blade is tracked in the desired 
position on the bandwheel, rotate the wheel several more times 
by hand without any further adjustment ensuring that the blade 
remains in the same position. Once this has been achieved lock 
the tracking knob with the winged nut.

NB: It takes a few revolutions of the bandwheel for the effecting 
adjustment on the tracking knob to become apparent. To avoid 
over-adjusting, make small gradual adjustments on the tracking 
knob and revolve the bandwheel on a few times to check the 
effect before making further adjustments.

5.   

Machine Setting 

- cont.

CAUTION!

Before carrying out any adjustments or maintenance ensure 
that the machine is isolated and disconnected from the 
electricity supply.

Fig.5.6

Fig.5.7

Fig.5.4

CORRECT TENSION ON 
THE BLADE

Fig.5.5

INCORRECT TENSION 
ON THE BLADE

GUIDES

TRACKING KNOB

TRACKING KNOB 
LOCK

BLADE

Summary of Contents for BS250

Page 1: ...Instruction Manual IMPORTANT For your safety read instructions carefully before assembling or using this product Save this manual for future reference Compact Bandsaw BS250 ...

Page 2: ......

Page 3: ...aintenance page 24 11 Parts Diagram page 28 12 Parts List page 30 Consumable Spare Parts Quick Find See page 28 for parts diagrams 3 Part Description Part Number Blades 1 4 x 6TPI Bandsaw Blade BB701406 3 8 x 6TPI Bandsaw Blade BB703806 1 2 x 4TPI Bandsaw Blade BB701204 1 2 x 6TPI Bandsaw Blade BB701206 Pack of 3 Blades 1 4 3 8 1 2 BB70 3PACK Table Insert 127 Bandwheels Drive belt 93 Bandwheel tyr...

Page 4: ...odically and if damaged have them repaired by an authorized service facility or qualified electrician Inspect extension cords if used periodically and replace if damaged Always use properly rated extension cord 16 Disconnect Machine When not in use before servicing changing blades etc disconnect the machine from the power supply 17 Never leave machine running unattended Turn power off do not leave...

Page 5: ...he blade guard is not closed 14 Adjust the guard as close as possible to the workpiece being cut 15 Ensure the selection of the saw blade and speed are suitable for the material to be cut For most wood cutting applications the fastest of the two speeds should be used See section 8 16 If the mains lead is damaged it must only be replaced by a qualified electrician 17 Never use a long extension cabl...

Page 6: ...ns misuse or alteration or repair of the product without our approval 2 2 5 This product has been purchased by you and not used for hire purposes 2 2 6 This Guarantee extends to the cost of carriage incurred by you returning the product to Record Power as long as it is demonstrated that the defect falls within the terms of this Guarantee and you follow the claims procedure as outlined below 3 CLAI...

Page 7: ...ng Plate N Table Tilting Handle O 100mm Dust Extraction Port P Motor 6 7 A B C F I D E H J K P N G L BS350 SPECIFICATION Blade length 1785mm 701 4 Blade width 6mm 13mm 1 4 1 2 Max depth of cut 120mm Throat depth 240mm Table size 315 x 350mm Max width blade to rip fence 140mm Table height from floor 370mm Extraction port 100mm Motor power output 1 3hp Weight 30kg Footprint 340 x 240mm Dimensions 860...

Page 8: ...x Long top brace supports 2 2 x Short top brace support 3 2 x Long mid brace supports 4 2 x Short mid brace supports 5 4 x Legs Wheel Kit 6 1 x Operating frame 7 1 x Operating frame pedal 8 2 x Brace support bars 9 2 x Axles 10 4 x Rubber feet 11 3 x Phillips head bolts 12 8 x Fixing pins 13 8 x Washers 14 24 x Short fixing bolts 15 4 x Long fixing bolts 16 2 x Short stem wheels 17 2 x Long stem w...

Page 9: ... 3 5 5 Locating holes a third of the way down each leg are for securing the mid brace supports Fix the long mid brace supports to the frame using the nuts bolts and washers Fig 3 6 6 Finally fit the short mid brace support to one of the shorter sides Fig 3 7 Note The side with the short mid brace support fitted will be referred to as the back of the stand This leaves the front area free for wheel ...

Page 10: ... leg Once the axle is through the opposing leg hook the remaining brace support bar on the axle and secure with a washer and pin as previous Fig 3 13 5 Now pass the remaining axle through the rear of the stand and hook the brace support bar with washer and pin as previous Fig 3 14 6 The operating frame can now be fitted to the axle and secured to the opposing rear leg with the other brace support ...

Page 11: ... LONG FIXING BOLTS 10 11 Note Before fully tightening all of the fixtures on the stand ensure that the long fixing bolts and nuts are fitted through each top corner of the stand Once this is complete the rest of the stand can be fully tightened and the bandsaw can be fitted 1 Feed the long fixing bolts up through the stand and secure the four corners using the washers and bolts provided Fig 3 17 2...

Page 12: ...npacking the machine the following components are included for the initial assembly Fig 4 1 1 1 x Table 2 1 x Fence 3 1 x Trunnion 4 1 x Fence rail 5 1 x Extraction port 6 1 x Mitre fence 7 1 x Push stick 8 4 x Bolts 9 4 x Serrated washers 10 4 x Star knobs 11 4 x Washers 12 1 x Tension knob 13 2 x Allen keys 1 2 3 5 6 7 8 9 11 12 10 13 4 Fig 4 1 ...

Page 13: ...ighten Slide the fence rail into the gap left between the table and the star knobs then tighten the star knobs to secure the fence rail Fig 4 5 4 3 Fitting the rip fence Slide the rip fence assembly onto the fence rail and along the back of the table Fig 4 6 Pull down the locking lever to secure the position if the locking lever does not lock the fence it can be adjusted by rotating it clockwise t...

Page 14: ...ed Fig 4 10B Tip When an accurate cut is crucial it is good practice to check all settings before machining the workpiece and make a test cut with some scrap material 4 6 Fitting the tension knob To fit the tension knob simply place into the slot on the top of the machine Fig 4 11 4 7 Fitting the extraction port If the machine is to be used with a 100mm dust extractor it is necessary to fit the ad...

Page 15: ...0º to the blade lock off the lock handle on the table tilt mechanism to secure the table position See Fig 5 1 Now set the table stop screw See Fig 5 3 the table stop screw should be adjusted to meet the registration point on the underside of the table now set at 90º to ensure that the table always returns to square after tilting The table stop screw is located above the bandwheel on the lower band...

Page 16: ...ug Set the tracking of the blade before setting the blade guides Once the blade is tensioned track the blade by turning the upper bandwheel by hand and adjusting the tracking knob Fig 5 6 By turning the tracking knob clockwise the blade will move towards the back of the bandwheel by turning the tracking knob anti clockwise the blade will move to the front of the bandwheel The blade should run as c...

Page 17: ...lets of the blade Fig 6 6 Next set the roller guides as near as possible to the blade without actually touching Fig 6 9 This is done by releasing the Allen bolts See Fig 6 8 on each side of the blade Finally adjust the thrust bearing to be just clear of the back of the blade Fig 6 7 6 3 Adjusting the cutting height When the machine is in operation the cutting height must be adjusted so there is ma...

Page 18: ...ral Brown Live As the colours of the wires in the mains lead may not correspond with the coloured markings identifying the terminals on your plug proceed as follows The wire coloured green and yellow must be connected to the terminal marked E or by the earth symbol or coloured green or green and yellow The wire coloured blue must be connected to the terminal marked N coloured black The wire colour...

Page 19: ...t of the cut Care is necessary to minimise damage to the work and blade When removing large pieces of material it is advisable to make the shorter cut last to avoid having to reverse out of the longer cut When reversing out of a cut it is advisable to leave the blade running but take extreme care not to pull the blade off the band wheel 8 4 Blade stall In circumstances such as cutting deep or wet ...

Page 20: ...tting radius the blade will twist and possibly jam or break The smaller the radius the narrower the blade has to be Fig 8 2 provides guidance on the minimum radius to be cut with the most commonly used blade widths Fig 8 2 To scale 8 6 Blade selection summary To see how TPI and width of the blade come together see Fig 8 3 Regularly examine the blade for excessive damage or cracking as a result of ...

Page 21: ...ade that can last up to ten times longer than other blades on the market The following range of blades are available for the BS250 To order any of these blades please contact our Customer Services Department on 0870 770 1777 who will advise you of your nearest retailer or alternatively a mail order supplier BB701406 1 4 x 6 TPI Bandsaw Blade BB703804 3 8 x 4 TPI Bandsaw Blade BB703806 1 2 x 4 TPI ...

Page 22: ...d supports used on a bandsaw Fig 8 5 Always support round pieces with a wedge Fig 8 6 Use a side pressure pad for accurate cutting of taller material Fig 8 4 Supporting large workpieces with roller stands or take off tables Fig 8 7 Chamfered pieces can be cut squarely using an additional support jig on the opposite side of the work piece to the fence Fig 8 8 Jig for accurate repetitive wedges Fig ...

Page 23: ... litre capacity single 1kw motor suitable for intermittent use i e must be switched off for 20 minutes per hour RSDE2 High Filtration Dust Extractor Drum type extractor 50 litre capacity single 1kw motor suitable for intermittent use i e must be switched off for 20 minutes per hour RSDE3 High Filtration Dust Extractor Bag type extractor 80 litre capacity single 1kw motor suitable for intermittent ...

Page 24: ...necessary Fig 10 2 6 Fit the new blade around the bandwheels ensuring the blade teeth are pointing downwards and towards you at the position where the blade passes through the table Ensuring that the blade is fully in place on the bandwheel re apply tension using the tensioning knob adjust the blade tension until you are happy with the blade tension see section 5 4 for tensioning guidelines 7 Chec...

Page 25: ...l usage it is advisable to carefully apply silicone spray to the blade guides to ensure free movement of the rollers do not use oil or grease for lubrication as this will attract dust and cause the rollers to jam The blade guide system is a consumable item and depending on usage will wear and need replacing CAUTION It is advisable that the blade has been removed from the machine before replacing t...

Page 26: ... Take a brass drift or similar and tap one of the bearings out the second bearing should now be able to be pushed out When fitting the new bearings position by hand in the wheel hub and tap in until the bearing seats against the ridge in the casting Fig 10 11 10 7 Cleaning the table The table is ground from cast iron and if cared for properly will provide smooth accurate performance Obviously when...

Page 27: ...er Blades 1 4 x 6TPI Bandsaw Blade BB701406 3 8 x 6TPI Bandsaw Blade BB703806 1 2 x 4TPI Bandsaw Blade BB701204 1 2 x 6TPI Bandsaw Blade BB701206 1 4 x 6TPI Bandsaw Blade BB70 3PACK 3 8 x 6TPI Bandsaw Blade 5 8 x 6TPI Bandsaw Blade Table Insert 127 Bandwheels Drive belt 93 Bandwheel tyre 26 Wheel bearing 18 Brush 58 Upper Blade Guides Hex bolt M6 1 0x15 149 Upper guide support block 153 Lower Blad...

Page 28: ...mm 6 Axle 7 Fixing pins 8 Short stem wheels 9 Pan Hd screw M4x30 10 Long stem wheels 11 Release pedal 12 Legs 13 Self nut M4 14 Operating frame 15 Brace support bar 16 Short top brace support 17 Short mid brace support 18 Long mid brace support 19 Hex screw M8x16 20 Nut M8 1 2 3 4 5 6 7 9 8 10 11 12 13 14 15 16 17 18 19 20 7 ...

Page 29: ...11 Parts Diagrams cont 28 29 ...

Page 30: ...80026 50 Washer Ø 5mm 51 Adjusting shaft 52 Mount shaft 53 Tension angle 54 Bolt guide 55 Lower guide shaft 56 Star washer M5 57 Hexagonal nut with flange M8 58 Carriage bolt M6 x 16mm 59 Hexagonal nut with flange M6 60 Washer 61 Hexagonal socket head cap screw M8 x 30mm 62 J belt 63 Lower bearing bolt 64 Motor 65 Motor pulley 66 Lower table trunion 67 Wheel pulley 68 Lower guide mount 69 Pin guid...

Page 31: ... EEC LOW VOLTAGE DIRECTIVE 73 23 EEC and its subsequent amendment 93 68 EEC ELECTROMAGNETIC 89 336EEC COMPATIBILITY DIRECTIVE 92 31EEC and its subsequent amendments 93 68EEC and conforms to the machinery example for which the EC Type Examination Certificate No BM2010044 01 E9931773E 01 AN 9933942 01 E9931773E 01 CC9859786 P9832796Z 02 has been issued by TUV Rheinland Product Safety GmbH at Am Grau...

Page 32: ...ower Limited Unit B Adelphi Way Ireland Industrial Est Staveley S43 3LS Woodworking Machines Accessories Telephone 0870 770 1777 Facsimile 0870 770 1888 Email sales recordpower co uk http www recordpower co uk ...

Reviews: