background image

5

Powering off the WC50: 

1.Press the power button on the remote control. The RED light will blink 3 times to confirm that the  

    WC50 has powered down. 

NOTE:

The steps to powering off the WC50 are the same for both methods of powering on the WC50.

The WC50 can record while plugged into a power source or using the internal rechargeable battery.

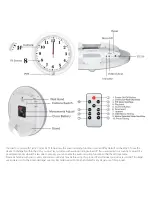
D. Adjust Camera View Angle:

You can adjust the view angle of your camera by using the camera adjustment wheel located on the 

back of your WC50. (see diagram; labeled as “camera switch”) Scroll the wheel up to tilt the camera 

angle down and vice versa. 

E. Loop Recording: 

If Loop Recording is turned on, your WC50 will record over the oldest files when the memory 

capacity is reached so that you never have to change the memory card. If Loop Recording is turned 

off, your WC50 will stop recording when the memory capacity is reached. (see section 5-B-3)

F. Video format and Recording Time:

There are 4 video resolution options: 480p, 720P30, 720P60 or 1080P and 3 options for the video 

time which include 1 min, 3 min, and 5 min.

(see section 5-B-4 for more detail)

G. Remote Control

You will use the remote control for many functions on the WC50 such as start/stop recording, 

switching modes, taking photos, and navigating the menu system (using the included video output 

cable). We recommend pointing the remote directly towards the front of the clock at a 2ft-10ft 

range. Please refer to the remote control diagram. 

Summary of Contents for WC50

Page 1: ...USER MANUAL www recordergear com RecorderGear and respective logos are trademarks of Teton Webstores LLC 2016 ALL RIGHTS RESERVED ...

Page 2: ... you are located in a country or a part of a government entity where this law does not apply you can enable the audio recording function within the settings menu Please be familiar with your country and state surveillance laws before using this product RecorderGear products are sold NOT for illegal use and are sold for their intended legal use only RecorderGear will not be held liable for any ille...

Page 3: ...s A Standby Mode B Motion Activated Recording C Continuous Recording D PIR Passive Infrared Sensor Motion Activated Recording 3 Photo Taking A Take Photos 4 Play Back Files A Memory Card to PC B WC50 to TV via AV Cable 5 WC50 Setting A Main Menu B Menu Description 6 Miscellaneous Setting A Clock Time 7 Trouble Shooting A Reset B System Reset 8 Specs 4 6 8 9 10 12 12 13 Table of Contents ...

Page 4: ...he power button on the remote control A GREEN light followed by 3 blinking RED lights will indicate it is powered on and recording When the WC50 is powered on it automatically starts recording video in motion detection mode see diagram for indicator light Powering on with Power Cable 1 Insert a micro SD card into the WC50 2 Insert power cord to the DC 5V charging port see diagram of the WC50 and i...

Page 5: ...ording is turned on your WC50 will record over the oldest files when the memory capacity is reached so that you never have to change the memory card If Loop Recording is turned off your WC50 will stop recording when the memory capacity is reached see section 5 B 3 F Video format and Recording Time There are 4 video resolution options 480p 720P30 720P60 or 1080P and 3 options for the video time whi...

Page 6: ...by 3 blinking RED lights will indicate recording has started and then turn of during recording 3 It will record in one minute intervals saving each recording to the SD card NOTE The RED indicator light will blink 3 times anytime motion is detected Stop Motion Detection Mode 1 To stop recording press the motion detection button on the remote 2 The recording will stop your WC50 will switch to the st...

Page 7: ... mode and file will be saved MODE BATTERY LIFE Up to 22 hrs D PIR Passive Infrared Sensor Motion Activated Recording For motion activated recording we recommend this mode to all users since it is the most accurate and precise mode of the WC50 A passive infrared sensor PIR sensor is an electronic sensor that measures infrared IR light radiating from objects in its field of view Wikipedia This mode ...

Page 8: ...hoto was taken and then return to GREEN standby mode Repeat as needed NOTE You can start taking photos from any other recording mode by first stopping that recording mode and then pressing the photo taking button NOTE You can activate PIR motion detection mode from any other recording mode by first stopping that mode and then pressing the PIR button Stop PRI Motion Detection mode 1 To stop recordi...

Page 9: ...ing in motion detection mode 3 Press the playback button on the remote 4 Use the up and down arrow on the remote to navigate the files 5 Press the Ok button to select or play desired file or press the menu button to access more options which include delete volume and setup see section 5 B 8 6 Press the Ok button to stop selected or playing video 7 Press any recording mode button to exit play back ...

Page 10: ...p motion detection recording and it will enter standby mode indicated by a solid GREEN light 4 While in standby mode press the menu button on the remote to enter the main menu 5 To exit the main menu at any time press the menu button on the remote B Menu Description While in the main menu you can navigate using the UP or Down arrow Press the OK button on the remote to confirm selection or access m...

Page 11: ... exposure values available ranging from 2 0 to 2 0 7 Motion Detection There are 3 sensitivity options available which include High Medium and Low This will not effect the PIR mode 8 Setup Here you ll find more settings available to help you further personalize your WC50 a Format Here you can format the micro SD card inserted in your WC50 To format the SD card select execute If you do not want to f...

Page 12: ...orks on a separate AA battery To set the time on clock use the setting wheel above the battery see diagram labeled as Movements Adjust A Reset 1 Press the reset button on the back of clock with a thin pointed object ex paper clip tooth pick etc B System Reset See step 5 B 8 h ...

Page 13: ...ng Modes Motion Detection PIR Continuous Recording PIR Standby 6 months Motion Detection Range Up to 26ft PIR Detection Range Up to 32ft Min Illumination 1 0lux Memory SD Card Up to 128GB RC Battery 8000mAh Operation temperature 10 to 50 C 14 to 122 F Operating Systems Windows XP Vista32 Win7 MAC Power DC 5V 1 5A ...

Page 14: ...1 Year Warranty included with all RecorderGear brand products See our website at www recordergear com for more details ...

Reviews: