background image

  Page 5

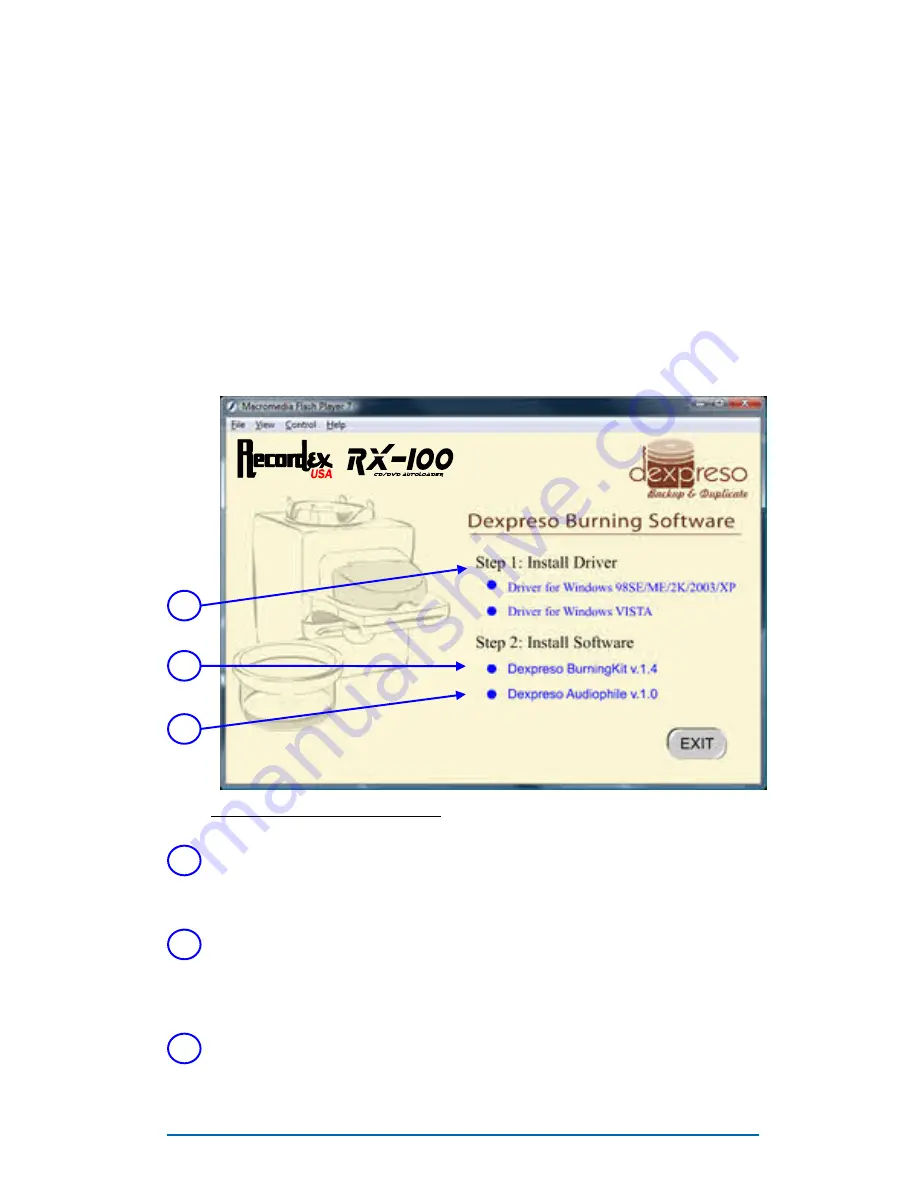
STEP 4: Install Device Driver & Software

CAUTION:  Do not connect the USB cable until after you have
installed the device driver or your unit may not work properly.

Insert the RX-100PC installation disc into your computer’s disc
drive.  Auto-run should launch the installation menu.

Note: If AutoRun is disabled on your computer then you will
need to run the setup program manually.  To do this open the
disc  contents  using  Windows  Explorer  and  open  the  file
named autorun.exe.

Figure 4.1 Installation Menu

1

3

2

1

2

3

Next, install the Dexpreso BurningKit Software. Note, you will be asked
to restart your computer after installing the BurningKit software, but we
recommend that you wait to restart until after you’ve installed the

AudioPhile Kit (step 3).  Both software kits must be installed for the

RX-100PC to function properly.

Install the device driver for your RX-100PC™.  This device driver works
for both XP and Vista versions of Windows.

Finally, install the Dexpreso AudioPhile software.  This time please re-
start your computer after completing installation.

Summary of Contents for RX-100PC

Page 1: ...DVD CD AutoLoader Duplicator QUICKSTART GUIDE Recordex RX 100PC...

Page 2: ...original box foam When calling for service we will need to know the serial number of your RX 100 the date of purchase and the name of the company that sold you your AutoLoader Your serial number is l...

Page 3: ...and packaging material for return shipment should your printer require service STEP 1 Unbox and Verify Contents Figure 1 1 Package Contents Base Unit 50 Disc Collection Tub 100 Disc Collection Tub Se...

Page 4: ...ub the tub will hang over the table edge Figure 3 1 Plug In AutoLoader Plug end A into the rear of the base unit Plug end B into a grounded 110V electrical outlet 1 Connect the power cord to the power...

Page 5: ...s Explorer and open the file named autorun exe Figure 4 1 Installation Menu 1 3 2 1 2 3 Next install the Dexpreso BurningKit Software Note you will be asked to restart your computer after installing t...

Page 6: ...f the RX 100PC and connect the other end to an open USB port on your computer To Computer To RX 100 Figure 5 1 Connecting USB Cable After you connect the USB cable you can power on your RX 100 and Win...

Page 7: ...nput tank This will give you a solid base to place the remainder of the blank or re writable disc stack The input tank can hold 50 or 100 discs depending on which input tank guide rods are installed T...

Page 8: ...s with Data and Video Discs only The software will not make disc to disc copies of audio CDs to copy a CD you must rip to the computer first Rip Audio and then use the Burn Audio CD function Rip Au di...

Page 9: ...3 4 5 1 2 3 4 5 Click on a task to launch the Task Wizard List of recently saved burn image projects Log of previously processed discs Click to set configuration options Send commands to the RX 100PC...

Page 10: ...Burner Specs 20X DVDRW Burner Media Type Standard 12cm DVD CD Media Formats Supported CD R CD RW DVD R DVD RW DVD R DVD RW Single Layer DVD R DL DVD R DL Dual Layer DVD RAM Operation System Microsoft...

Page 11: ...n one step Included with your RX 100 is a handy little tool for removing discs from the output tub Insert the disc removal tool into the stack of completed discs and then turn the output tub over Your...

Page 12: ...ader develops a covered defect within the first year Recordex will at its op tion either repair or replace the autoloader at no charge provided that the autoload er is returned during the warranty per...

Reviews: