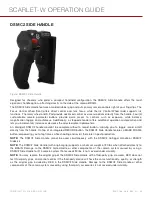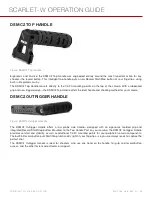
DSMC2 EXPANDER: INSTALL/REMOVE
INSTALL A DSMC2 EXPANDER
This section applies to the following items:
DSMC2 Base Expander
DSMC2 V-Lock I/O Expander
DSMC2 REDVOLT Expander
DSMC2 Jetpack Expander
DSMC2 Jetpack-SDI Expander
WARNING:
Before installing or removing this item, you MUST turn off the camera.
WARNING:
When installing and removing a DSMC2 REDVOLT Expander, ensure that a REDVOLT battery is NOT
installed in the expander. Damage to the REDVOLT or camera system caused by failing to remove the REDVOLT
during installation/removal is not covered under warranty.
REQUIRED TOOLS:
T20 TORX driver
1. Turn off the camera.
2. Position the expander on the rear of the camera, aligning the connector on the front of the expander with the
connector on the rear of the camera.
3. Apply pressure and tighten the four (4) captive screws in a cross pattern (“X” pattern) approximately two (2) turns
each using a T20 TORX driver. DO NOT FULLY TIGHTEN.
4. Fully tighten the four (4) screws in a cross pattern (“X” pattern) using a T20 TORX driver.
WARNING:
DO NOT OVERTIGHTEN.
REMOVE A DSMC2 EXPANDER
This section applies to the following items:
DSMC2 Base Expander
DSMC2 V-Lock I/O Expander
DSMC2 REDVOLT Expander
DSMC2 Jetpack Expander
DSMC2 Jetpack-SDI Expander
WARNING:
Before installing or removing this item, you MUST turn off the camera.
WARNING:
When installing and removing a DSMC2 REDVOLT Expander, ensure that a REDVOLT battery is NOT
installed in the expander. Damage to the REDVOLT or camera system caused by failing to remove the REDVOLT
during installation/removal is not covered under warranty.
REQUIRED TOOLS:
T20 TORX driver
1. Turn off the camera.
2. Loosen the four (4) captive screws in a cross pattern (“X” pattern) using a T20 TORX driver.
3. Remove the expander from the camera.
C O PYR I G HT © 2 0 1 6 R ED.C O M , I NC
9 5 5 - 0 1 3 3 _V 6 .3 , R EV - H
|
4 3
SCARLET-W OPERATION GUIDE


