background image

Red Sea MAX

®

 E-Series

24

15   Warranty

Red Sea Aquarium Products Limited Warranty.

The limited warranty sets forth all Red Sea Aquatics (HK) Ltd (Red Sea) 
responsibilities regarding this product. There are no other express or 
implied warranties from Red Sea.

Red Sea warrants your product against defects in materials and 
workmanship for a period of 12 months, valid from the date of original 
purchase and will repair this product free of charge (not including 
shipping costs) with new/rebuilt parts. Damage to the aquarium glass 
is not included. The precondition for the warranty is that the stipulated 
set-up routine is observed. In the event that a problem develops with this 
product during or after the warranty period, contact your local dealer or 
Red Sea (at the company address indicated) for details of your nearest 
authorized service center.

The warranty is extended only to the original purchaser. Proof of date of 
purchase will be required before warranty performance is rendered. This 
warranty only covers failures due to defects in materials or workmanship 
which occur during normal use. It does not cover damage which occurs 
in shipment or failures which result from misuse, abuse, neglect, 
improper installation, operation, mishandling, misapplication, alteration, 
modification or service by anyone other than an authorized Red Sea 
service center. Red Sea shall not be liable for incidental or consequential 
damages resulting from the use of this product, or arising out of any 
breach of this warranty. All express and implied warranties, including the 
warranties of saleability and fitness for particular purpose, are limited to 
the applicable warranty period set forth above.

These statements do not affect the statutory rights of the consumer.

USA

Some states do not allow the exclusion or limitation of incidental or 
consequential damages, or limitations on how long an implied warranty 
lasts, so the above exclusion or limitations may not apply.

To benefit from product update information and exclusive special 
offers to registered MAX

®

 owners, please register your MAX

®

 on-line at 

redseafish.com

Summary of Contents for MAX E Series

Page 1: ...Plug Play Aquarium Red Sea MAX E Series Complete Plug Play Open Top Reef Systems Installation and Operation Manual ENG DE FR JP CHN...

Page 2: ......

Page 3: ...ENG DE FR JP CHN 2 24 28 51 54 77 80 102 106 126...

Page 4: ......

Page 5: ...Red Sea MAX E Series Installation and Operation Manual Complete Plug Play Open Top Reef Systems ENG...

Page 6: ...Components 7 Assembly 8 Installation of Rear Sump Components 10 Installation of optional Chiller 15 Installation of LED Modules 16 Operation of Power Center 17 LED Set up and programming 18 Initial F...

Page 7: ...ical conditions prevail such as sufficient light adequate current stable temperature and water quality The Red Sea MAX system provides the conditions that enable you to keep a thriving healthy reef in...

Page 8: ...y do not contact moving parts d Always unplug an appliance from an outlet when not in use before putting on or taking off parts and before cleaning Never pull the cord itself to remove the plug from t...

Page 9: ...that you keep the ambient room temperature a comfortable and stable 22 C 72 F Avoid placing the tank in front of an air conditioner heating vents or direct sunlight A well ventilated room with moderat...

Page 10: ...N The aquarium has a bare glass bottom Before removing the aquarium from the box prepare a smooth soft clean flat surface that can hold its weight NOTE Every precaution has been taken to ensure the sa...

Page 11: ...assembly Self assembly Power Center Cabinet Unit Cabinet Unit ReefLED 90 light units 1 x 90W 2 x 90W MSK 900 Rear Sump Protein Skimmer MSK900 MSK900 Circulation pumps 1 x 2150lph 2 x 2150lph Media Ra...

Page 12: ...ft anticlockwise half a turn Repeat this adjustment until pressing the door causes the PTO to operate After assembly place the cabinet in the desired location 5 2 Cabinet mounted Power Center Remove t...

Page 13: ...rium onto the cabinet will require at least 2 people The top of the cabinet is approximately 86cm 34 from the floor Ensure that anyone lifting the aquarium is physically suitable for such an operation...

Page 14: ...Detachable Surface Skimmer 2 Protein Skimmer 3 Media Rack 4 Carbon 5 Circulation Pump 6 Pump Outlet Nozzle 7 Filter Sponge 8 Multiport Bulkhead 9 Flow Grill Plug 10 Accessory kit 11 Return pump outle...

Page 15: ...11 ENG E 260 rear sump component assembly diagram shows position of optional heater chiller pump and piping 10 11 1 9 9 6 6 8 2 3 4 4 7 7 5 5 12 13...

Page 16: ...d at approximately 3cm 1 25 below the rim The water level in the rear should be maintained just below the lowest position of the adjustable skimmer outlet which is approximately 9cm 3 below the rim Th...

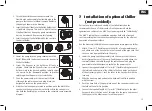
Page 17: ...immer pump to the outlet of the silencer 3 Connect the small air pipe on the inlet of the silencer 4 An optional air valve is provided for use with the skimmer Initially do not attach the air valve it...

Page 18: ...net sump For the surface skimmer to operate effectively in the standard rear sump configuration the flow grills are closed These will be replaced with open grills when the upgrade is performed 6 6 Sum...

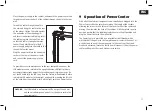
Page 19: ...and vitality of reef inhabitants Red Sea recommends the use of chillers with all reef aquariums Both the aquarium and cabinet of the MAX E systems are provided Chiller Ready The MAX E cabinet has air...

Page 20: ...e M3 screws provided attach the swivel connector as shown in the diagram Put the swivel connector pins and fixing screw within easy reach of the aquarium Locate the LED Module in front of the mounting...

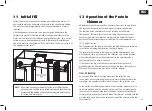
Page 21: ...time the fixture is illuminated Before raising the LED modules to the upright position either unplug the DC jack of the cord from the module or turn off the light switch on Power Center 9 Operation o...

Page 22: ...is recommended to allow a period of 8 weeks for new set ups During the acclimation period look for signs of photo stress and photo inhibition such as Whitening Bleaching of the upper section of the ti...

Page 23: ...ein skimmers is controlled by raising and lowering the Skim Adjuster The foam will be formed in the upper part of the skimmer body and will build and climb up the neck of the collection cup Set the po...

Page 24: ...skimmer performance If you wash the cup with detergent make sure to rinse it thoroughly before returning it to the skimmer 13 General Aquarium Maintenance The long term success and health of the inhab...

Page 25: ...a soft cloth or brush To remove calcium carbonate deposits soak the parts in a weak acidic solution vinegar citric acid until deposits have dissolved Rinse all parts thoroughly reassemble the pump en...

Page 26: ...es that need to be removed by the skimmer Lower the position of the Skim Adjuster as necessary to reduce the water level in the skimmer neck and if necessary reduce the air flow by adding the air valv...

Page 27: ...water leaves the skimmer it relaxes and releases the extra gas in the form of micro bubbles In the MAX E Series the pumps are located near the bottom of the rear sump and are pre filtered by a sponge...

Page 28: ...warranty performance is rendered This warranty only covers failures due to defects in materials or workmanship which occur during normal use It does not cover damage which occurs in shipment or failu...

Page 29: ...25 ENG...

Page 30: ......

Page 31: ...27 ENG DE Red Sea MAX E Serie Installations Bedienungsanleitung Plug Play Open Top Korallenriffkomplettsysteme...

Page 32: ...age 34 Installation der Bauteile im hinteren Filterbereich 36 Installation eines optionalen K hlger tes 42 Installation der LED Module 43 Betrieb der Stromzentrale 44 LED Aufbau und Programmierung 44...

Page 33: ...Ozean gedeihen Korallenriffe nur dort wo spezielle physikalische Bedingungen herrschen dazu geh ren ausreichendes Licht eine geeignete Str mung sowie eine stabile Wassertemperatur und qualit t Das Re...

Page 34: ...ich in Bewegung befinden d Ziehen Sie immer den Netzstecker eines Ger tes wenn dieses nicht in Gebrauch ist bevor Sie Teile anbringen oder entfernen und vor dem Reinigen Ziehen Sie nie am Netzkabel um...

Page 35: ...mperatur von 22 C Vermeiden Sie es das Becken vor Klimaanlagen und Heizl fter oder in direktes Sonnenlicht zu stellen Ein gut bel fteter m ig heller Raum ist der beste Standort f r ein Aquarium Zugang...

Page 36: ...das Aquarium aus dem Karton nehmen eine glatte weiche saubere und ebene Unterlage zum Abstellen vor die das Gewicht halten kann HINWEIS Es wurden alle Vorsichtsma nahmen getroffen damit das MAX E Aqu...

Page 37: ...elbstmontage Power Center Stromzentrale Unterschrank Einheit Unterschrank Einheit ReefLED Beleuchtungseinheiten 1 x 90W 2 x 90W MSK 900 Eiwei absch umer MSK900 MSK900 Str mungspumpen 1 x 2150lph 2 x 2...

Page 38: ...ffnen derselben bewirkt Stellen Sie den Unterschrank nach dem Zusammenbau an die vorgesehene Stelle 5 2 Am Unterschrank montierte Stromzentrale Entfernen Sie die Spritzschutzabdeckung von der Stromzen...

Page 39: ...chrank zu heben werden mindestens 2 Personen ben tigt Die Oberkante des Unterschranks ist etwa 86 cm vom Boden entfernt Vergewissern Sie sich dass die Personen die das Aquarium anheben k rperlich f r...

Page 40: ...ohle 5 Str mungspumpe 6 Pumpen Auslassd se 7 Filterschwamm 8 Multiporttrennwand 9 Zulaufgitter Zulaufverschl sse 10 Anschluss Set f r externes Zubeh r 11 F rderpumpen Anschluss vorbereitet f r Upgrade...

Page 41: ...ENG DE Die Montageskizze der r ckseitigen Filterbereich Bauteile f r das E 260 zeigt auch die Positionen der optionalen Bauteile wie Heizer F rderpumpe und rohre 10 11 1 9 9 6 6 8 2 3 4 4 7 7 5 5 12...

Page 42: ...wird Die Leistung des Filtersystems steht in direktem Zusammenhang mit dem Wasserstand in Aquarium und Filterbereich bei der MAX E Baureihe sind aber der Filterbereich und der Oberfl chenablauf so kon...

Page 43: ...ordnungsgem mit dem Bajonett Ring gesichert ist berpr fen Sie vorher ob Pumpe und Stromkabel unbesch digt sind Diagramm Legende a Durchflussregler b Venturi Einlass c Luftschlauch d kleiner Luftschlau...

Page 44: ...triebs nach oben treiben kann und Mikroluftblasen aus ihren Poren entweichen Geben Sie die gewaschene Kohle in die daf r vorgesehenen F cher des Filterkorbs Vergewissern Sie sich dass der Beutel nicht...

Page 45: ...Sie die komplette Einheit in die Pumpenkammer sodass der Gewindestutzen durch das daf r vorgesehene Loch in der Glaswand geht 4 Schrauben Sie den Auslass an den Gewindestutzen und ziehen Sie ihn fest...

Page 46: ...en f r ihn vorgesehenen Steckplatz der Stromzentrale 3 Bringen Sie einen Schlauch mit 17 mm Durchmesser von erforderlicher L nge an um den Ein und Auslass des K hlers mit den Schlauchstutzen an der R...

Page 47: ...nd bringen Sie das Kabel an der Befestigung nach hinten Legen Sie das Kabel flach an der Unterseite des Montagearms entlang und setzen Sie erst den unteren und dann den oberen Verschlussstopfen ein so...

Page 48: ...ieder rein 10 Die LED einrichten und programmieren Befolgen Sie zum Einrichten und Programmieren der ReefLED 90 die dem LED Modul beigef gten Anweisungen Programmierrichtlinien Lichtperiode Tag Mondli...

Page 49: ...das Becken zu geben bevor Sie das Wasser hinzuf gen da die Einrichtung sich erheblich auf das ben tigte Wasservolumen auswirkt F llenSiedasMeerwasserindasHauptbecken denr ckseitigenFilterbereich und...

Page 50: ...rch den oben am Schaumbecher befindlichen berlauf Schlitz zur ck in den Filterbereich Um das Problem der berabsch umung zu beheben vergewissern Sie sich dass der Durchflussregler auf seiner niedrigste...

Page 51: ...werden Sie es als hilfreich empfinden eine systematische Checkliste der Pflegeaktivit ten anzulegen und ein Tagebuch zu f hren in das Sie die erledigten Aufgaben eintragen Ihr Tagebuch braucht nicht...

Page 52: ...sicher dass alle Rohrleitungen sicher verbunden sind Setzen Sie die Pumpe zur ck in das Aquarium bevor Sie das Stromkabel wieder an der Stromversorgung anschlie en Kontrolle der Wassertemperatur Um op...

Page 53: ...asserstand im Absch umerhals zu senken Wenn n tig setzen Sie das Luftventil oben auf den Lufteinlass Schlauch und reduzieren Sie die Luftzufuhr bis eine stabile Schaumproduktion erreicht ist Es kann e...

Page 54: ...ereich und erfahren eine Vorfilterung durch einen Schwamm der verhindern sollte dass Luftblasen in den Pumpeneinlass gelangen Es kann sein dass sich die aufgefangene Luft im Schwamm ansammelt Entferne...

Page 55: ...enanschrift um Angaben zum am n chsten zu Ihrem Wohnort gelegenen Kundendienst zu erhalten Diese Garantie gilt nur f r den Originalk ufer Der Nachweis des Kaufdatums ist erforderlich bevor Garantielei...

Page 56: ......

Page 57: ...53 ENG DE FR Red Sea MAX E Series Manuel d installation et d utilisation Syst mes r cifaux complets ouverts Plug Play...

Page 58: ...59 Assemblage 60 Installation des l ments de la d cantation arri re 62 Installation du groupe froid facultatif 68 Installation des modules LED 69 Fonctionnement du Power Center 70 Installation et pro...

Page 59: ...comme une lumi re suffisante des courants favorables une temp rature stable et une bonne qualit de l eau Le syst me Red Sea MAX fournit les conditions optimales permettant de maintenir la vitalit et...

Page 60: ...n mouvement d D branchez toujours l appareil de son alimentation quand il n est pas utilis avant d ins rer ou de retirer certains de ses l ments ou avant de le nettoyer Ne tirez jamais directement le...

Page 61: ...ante stable de 22 C dans la pi ce vitez de placer l aquarium face une sortie d air climatis ou de chauffage soufflant ou en plein soleil L emplacement id al pour votre aquarium est une pi ce bien vent...

Page 62: ...e l aquarium en verre n est pas prot g Avant de sortir l aquarium pr parez une surface plane douce et propre apte supporter son poids NOTE Bien que toutes les pr cautions aient t prises pour assurer l...

Page 63: ...limentation Power Center Meuble Meuble Modules d clairage ReefLED 90 1 x 90 W 2 x 90 W cumeur de d cantation arri re MSK 900 MSK900 MSK900 Pompes de circulation 1 pompe de 2150 L h 2 pompes de 2150 L...

Page 64: ...i tour dans le sens antihoraire R p tez jusqu ce que le module PTO fonctionne et que la porte s ouvre quand vous appuyez dessus Une fois le meuble mont placez le son emplacement d finitif 5 2 Power Ce...

Page 65: ...oins deux personnes pour soulever l aquarium et le poser sur son meuble Le sommet du meuble se trouve environ 86 cm du sol Assurez vous que les personnes soulevant l aquarium ont la capacit physique n...

Page 66: ...de masses filtrantes 4 Charbon 5 Pompe de circulation 6 Buse de sortie de pompe 7 Mousse de filtration 8 Passe cloison multivoies 9 Grille de d bit bouchon 10 Kit d accessoires 11 Sortie de la pompe d...

Page 67: ...63 ENG DE FR E 260 Montage des l ments de la d cantation arri re diagramme montrant la position des l ments en option chauffage pompe du groupe froid et tubes 10 11 1 9 9 6 6 8 2 3 4 4 7 7 5 5 12 13...

Page 68: ...t li e directement au niveau d eau l int rieur de l aquarium et de la d cantation arri re mais la d cantation et l cumeur du syst me MAX E Series sont con us pour autoriser les fluctuations de la haut...

Page 69: ...z que la pompe et son c ble d alimentation ne sont pas endommag s L gende du diagramme a Ajusteur d cume b Prise Venturi c Tube air d Petit tube air Assemblez l cumeur comme illustr dans le diagramme...

Page 70: ...s jours Placez le charbon lav sur l tag re pr vue du panier de masses filtrantes Assurez vous que le sac ne d passe pas du cadre du panier 6 5 Cr pines Les compartiments des pompes de circulation sont...

Page 71: ...elle ne soit expuls e lors de l entretien de la pompe mais on peut ventuellement l enlever pour le nettoyage 4 Ins rez la sortie de rotule puis le joint dans le support de sortie 5 Abaissez la pompe d...

Page 72: ...us la cloison arri re faites le glisser travers le guide c ble et branchez le au Power Center sur sa prise d di e 3 Connectez une longueur ad quate de tuyau souple 17 mm afin de relier l entr e et la...

Page 73: ...cteur du module LED Renfoncez le c ble dans la face inf rieure du bras de montage et ins rez le connecteur inf rieur du c ble Ins rez le connecteur au sommet du bras pour que le c ble soit orient vers...

Page 74: ...LED Pour r gler et installer les ReefLED 90 suivez les instructions fournies avec le module LED Conseils de programmation Photop riode Jour Moonlight La photop riode en journ e devrait se situer entre...

Page 75: ...l eau de mer artificielle Il est plus pratique de placer le substrat ou les roches vivantes dans le bac avant d ajouter l eau puisque cela influe directement sur le volume global d eau sal e apporter...

Page 76: ...mage v rifiez que l Ajusteur d cume est r gl dans sa position la plus basse ajoutez le robinet d air au sommet du tube d entr e d air et r duisez l arriv e d air jusqu ce que l cume se stabilise Conti...

Page 77: ...pparence g n rale de l aquarium et de ses occupants Les changements d quipement date d installation du groupe froid ou d un r acteur par exemple Le remplacement du charbon ou autre moyen de filtration...

Page 78: ...ncher le cordon sur l alimentation Contr le de la temp rature d eau Pour obtenir des conditions optimales un aquarium r cifal devrait tre maintenu une temp rature comprise entre 24 C et 28 C une temp...

Page 79: ...mine tous ces produits chimiques Q Mon installation n est pas r cente mais l cumeur ne produit pas d cume ou elle est trop s che et se colle sur le col du godet R Sur une nouvelle installation la char...

Page 80: ...tteindre l entr e de la pompe Il peut cependant y avoir de l air pi g dans la mousse Si c est le cas retirez la mousse rincez la et replacez la dans la d cantation Il peut y avoir aussi des micro bull...

Page 81: ...uvre ou de mat riel se produisant dans le cadre d une utilisation normale du produit Elle ne couvre pas les dommages se produisant en cours de transport ou les d fauts r sultant d une utilisation impr...

Page 82: ......

Page 83: ...79 ENG DE FR JP 79...

Page 84: ...Red Sea MAX E Series 80 80 Red Sea MAX E Series 2 82 83 84 85 86 88 93 94 95 96 97 97 98 100 102...

Page 85: ...81 ENG DE FR JP 81 3 ENG...

Page 86: ...Red Sea MAX E Series 82 82...

Page 87: ...83 ENG DE FR JP 83 5 ENG...

Page 88: ...Red Sea MAX E Series 84 84 Red Sea MAX E Series 6 E 170 25 55 E 260 40 90...

Page 89: ...85 ENG DE FR JP 85...

Page 90: ...Red Sea MAX E Series 86 86 Red Sea MAX E Series 8...

Page 91: ...87 ENG DE FR JP 87 9 ENG 1 2...

Page 92: ...Red Sea MAX E Series 88 88 12 Red Sea MAX E Series 10 E 2 1 2 3 4 5 6 7 8 9 10 11 12 13 E 170 6...

Page 93: ...89 ENG DE FR JP 89 11 ENG 10 11 1 9 9 6 6 8 2 3 4 4 7 7 5 5 12 13...

Page 94: ...Red Sea MAX E Series 90 90 Red Sea MAX E Series 12...

Page 95: ...91 ENG DE FR JP 91...

Page 96: ...Red Sea MAX E Series 92 92 Red Sea MAX E Series 14...

Page 97: ...93 ENG DE FR JP 93...

Page 98: ...Red Sea MAX E Series 94 94 Red Sea MAX E Series 16...

Page 99: ...95 ENG DE FR JP 95 17...

Page 100: ...Red Sea MAX E Series 96 96 Red Sea MAX E Series 18...

Page 101: ...97 ENG DE FR JP 97...

Page 102: ...Red Sea MAX E Series 98 98 Red Sea MAX E Series 20...

Page 103: ...99 ENG DE FR JP 99...

Page 104: ...Red Sea MAX E Series 100 100 Red Sea MAX E Series 22...

Page 105: ...101 ENG DE FR JP 101 23 ENG...

Page 106: ...Red Sea MAX E Series 102 102 Red Sea MAX E Series 24...

Page 107: ...103 ENG DE FR JP 103...

Page 108: ......

Page 109: ...105 ENG CHN MAX E...

Page 110: ...Red Sea MAX E Series 106 MAX E 108 109 MAX E 110 111 112 114 119 LED 119 120 LED 121 121 122 123 124 126...

Page 111: ...107 ENG CHN MAX E MAX MAX MAX E MAX MAX redseafish cn...

Page 112: ...Red Sea MAX E Series 108 1 1 1...

Page 113: ...109 ENG CHN 2 MAX E MAX E E 170 160W E 260 290W RCD RCCB GFI GFCI 30kg cm2 425 lbs 22 C 72 F MAX 10cm 4 60cm 24...

Page 114: ...Red Sea MAX E Series 110 3 MAX E 1 2 3 MAX E 2 5cm 1 15 kg lb E 170 25 55 E 260 40 90...

Page 115: ...111 ENG CHN 4 MAX E E 170 E 260 MAX E 170L 260L MAX E ReefLED 90 1 x 90W 2 x 90W MSK 900 MSK900 MSK900 1 x 2150lph 2 x 2150lph 4 4 1 2 0 4 1 2 E 170 E 260 E E...

Page 116: ...Red Sea MAX E Series 112 5 5 1 MAX E PTO PTO 1 5mm 1 16 5cm 2 PTO PTO PTO PTO PTO 5 2 M4 1 M4 off...

Page 117: ...113 ENG CHN 5 3 LED 5 4 LED LED LED 5 5 2 86cm 34 1 2...

Page 118: ...Red Sea MAX E Series 114 6 MAX E 1 2 3 4 5 6 7 8 9 10 11 12 13 E 170 10 11 13 9 7 2 5 6 3 1 8 4 12...

Page 119: ...115 ENG CHN E 260 10 11 1 9 9 6 6 8 2 3 4 4 7 7 5 5 12 13...

Page 120: ...Red Sea MAX E Series 116 MAX E MAX E MAX E REEF SPEC 12 16 SPS 3 MAX E 3cm 1 25 9cm 3 MAX E 225 RO 6 1 MSK 900 a b off MSK 900 b a...

Page 121: ...117 ENG CHN c d 1 2 3 4 12 122 5 6 6 2 6 3 6 4 24 72 6 5 6 6 MSK 900 c d...

Page 122: ...Red Sea MAX E Series 118 6 7 1 2 3 4 5 6 7 8...

Page 123: ...119 ENG CHN 7 MAX E MAX E 1 17mm 30cm 4 2 3 17mm 4 5 6 17mm 7 8 pH 8 LED M3 LED LED 5...

Page 124: ...Red Sea MAX E Series 120 LED LED LED LED DC 9 LED...

Page 125: ...121 ENG CHN 10 LED ReefLED 90 8 12 9 4 LED 8 20 4 5 11...

Page 126: ...Red Sea MAX E Series 122 12 MSK 30...

Page 127: ...123 ENG CHN 13 MAX pH...

Page 128: ...Red Sea MAX E Series 124 24 28 C 76 82 F 2 C 7 F 14 Q A Q A Q A MAX Q A 12 122...

Page 129: ...125 ENG CHN Q A Q A Q A MAX E 24...

Page 130: ...Red Sea MAX E Series 126 15 Red Sea Aquatics GZ Ltd Red Sea Aquatics GZ Ltd Red Sea Aquatics GZ Ltd 12 Red Sea Red Sea MAX redseafish cn...

Page 131: ......
Page 132: ...x 1237 Cheddar BS279AG uk info redseafish com North America Red Sea U S A Canada 4687 World Houston Parkway 150 Houston TX 77032 U S A Tel 1 888 RED SEA9 support usa redseafish com Asia Pacific Red Se...

Reviews: