background image

1

MODEL: 58813TS

Read this grill guide before attempting to assemble or operate your grill.

Follow all safety instructions.

Check for your leaks according to directions in this grill guide before operating
your grill, even if you purchased this grill assembled.

Keep this grill guide for future reference.

Always read and follow all
notices in this grill guide. Failure to follow these notices may result in
property damage, bodily injury,or death.

1. Grill installation must conform with local codes, or in their absence, with either the

National Fuel Gas Code, ANSI Z223.1/NFPA 54, Natural Gas and Propane
Installation Code, CSA B149.1, or Propane Storage and Handling Code, B149.2.

Before

Before

Before

Before returning

returning

returning

returning to

to

to

to your

your

your

your retailer,

retailer,

retailer,

retailer, call

call

call

call our

our

our

our customer

customer

customer

customer service

service

service

service department

department

department

department at

at

at

at

1-877-292-9888

1-877-292-9888

1-877-292-9888

1-877-292-9888 with

with

with

with hours

hours

hours

hours of

of

of

of operation

operation

operation

operation 9:00am

9:00am

9:00am

9:00am

5:00pm

5:00pm

5:00pm

5:00pm EST,

EST,

EST,

EST, Monday

Monday

Monday

Monday

Friday.

Friday.

Friday.

Friday.

Summary of Contents for 58813TS

Page 1: ...the National Fuel Gas Code ANSI Z223 1 NFPA 54 Natural Gas and Propane Installation Code CSA B149 1 or Propane Storage and Handling Code B149 2 Before Before Before Before returning returning returnin...

Page 2: ...e regulator with a type 1 connector that is supplied with this gas grill 7 Before each use check the gas hose for excessive abrasion cracking fraying wear or cuts Replace a hose assembly showing those...

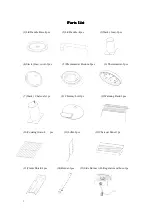
Page 3: ...s 3 Stack Gas 2pcs 4 Stack Gas cover 2pcs 5 Thermometer Bottom 2pcs 6 Thermometer 2pcs 7 Stack Charcoal 1pc 8 Chimney Lid 1pc 9 Warming Rack 2pcs 10 Cooking Grate 4 pcs 11 Lifter 2pcs 12 Charcoal Pane...

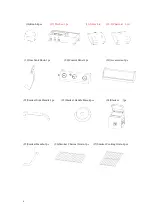
Page 4: ...Gas Lid 18 2 Charcoal Lid 19 Gas Tank Hook 1pc 20 Control Panel 1pc 21 Accessories 1pc 22 Smoker Side Handle 1pc 23 Smoker Handle Base 4pcs 24 Smoker 1pc 25 Smoker Handle 1pc 26 Smoker Charcoal Grate...

Page 5: ...n 1pc 29 Drip Pan 1pc 30 Grease tray 1pc 31 Ash Pan 1pc 32 Stabilizing Plate Left 1pcs 33Stabilizing Plate 2pcs 34 Stabilizing Plate Right 1pc 35 Gas Tank 1pc 36 Legs 4pcs 37 Caster 4pcs 38 Bottom She...

Page 6: ...ardware List List List List H Battery AA Qty 1pc A M8 Nut Qty 1pc B Spring Qty 1pc I Hinge Pins Qty 4pcs C M5 8bolt Qty 9pcs J Cotter Pins Qty 4pcs D M6 12bolt Qty 68pcs E M6 25bolt Qty 8pcs F M6 Nut...

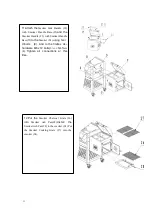
Page 7: ...tighten with a Phillips screwdriver 3 Use hardware M6 x 12 bolts D to attach the bottom shelf 28 to legs Also assemble the gas tank hook and gas tank holder 19 35 as shown using hardware M6 x 12 bolts...

Page 8: ...grill assembly upright and attach the Stabilizing Plate Left 32 Stabilizing Plate 33 Stabilizing Plate Right 34 to the legs Use hardware M6 x 12 bolts D and M6 Nuts F 6 Install the ash pan 31 and Ins...

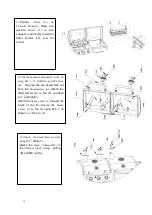
Page 9: ...al section using hardware M6 x 12 bolts D See illustration below 8 Assemble the control panel 20 to the gas section by using hardware M6 x 12 bolts D Install the knobs 16 to the panel Tighten all conn...

Page 10: ...e M5 8bolt C See the illustration as below 10 Install the knobs 16 to the side burner with regulator and hose 15 Assemble the side burner to the body Use hardware M6 x 12 bolts D and M6 Nuts F Insert...

Page 11: ...ndle Base 23 to the Smoker 24 using M6 25bolts E And to the firebox Use hardware M6 x 12 bolts D and M6 Nuts F Tighten all connections at this time 12 Put the Smoker Charcoal Grate 26 into Smoker Ash...

Page 12: ...g M6 35 bolts G and M6 Nuts F Unscrew the pre assembled nut from the Thermometer 6 Attach the thermometer 6 to the lid re attach nut and tighten Insert the Stacks Gas 3 through the inside of the lid S...

Page 13: ...13 16 Insert warming racks 9 tab into hole of each grill lid and bottom end 17 Place the cooking grates 10 into each grill body Two pieces of each section...

Page 14: ...ues issues issues issues related related related related to to to to neglect neglect neglect neglect abuse abuse abuse abuse or or or or modifications modifications modifications modifications to to t...

Page 15: ...L GRILL as well as all of the butterfly dampers Remove the cooking grates Add charcoal Do not put more than 6 pounds of charcoal briquettes or 3 pounds of lump charcoal into the pan Lower the adjustab...

Page 16: ...er closing the remaining damper will create a convection effect inside the grill when hood is closed This will allow for extended cooking times when barbecuing The adjustable charcoal grate can also b...

Page 17: ...s and longer cooking times this method works best for cuts of meat that need time to tenderize such as ribs brisket pork shoulder wild game etc Barbecuing uses temperatures from 225 F to 325 F Try to...

Page 18: ...ed Green wood still contains all the sap and moisture needed to keep the tree alive and will impart a super strong tasting smoke that will turn your foods black Also when you try burning green wood it...

Page 19: ...e grill is used Make sure coals are completely extinguished and the grates are cooled down before cleaning inside of the unit To remove the stains on the lid and front panel caused by the fumigation w...

Reviews: