background image

23

OPERATION

OPERATION

OPERATION

OPERATION INSTRUCTIONS

INSTRUCTIONS

INSTRUCTIONS

INSTRUCTIONS

Cooking

Cooking

Cooking

Cooking Methods

Methods

Methods

Methods

You can use your GRILL to cook three different ways – depending on the type of food, and how

you want to prepare it.

GRILLING

Grilling is cooking directly over the fire, using direct heat. This method is the quickest and

works well for foods that are tender before you cook them – including steaks, beef or pork

tenderloin, burgers, hot dogs, sausages, chicken, seafood, etc. Vegetables are also wonderful

when grilled.

Grilling uses very high temperatures that are over 325

°

F. When cooking at these temperatures,

it is important to carefully watch your food to keep it from burning. Also, closing the lid to put

out any grease flare-up that may occur when flipping burgers or steaks.

BARBECUING

Barbecuing is cooking using indirect heat and smoke. This method takes a little longer, but can

be used for nearly any kind of food you want to cook (including those above). As barbecuing

uses lower temperatures and longer cooking times – this method works best for cuts of meat

that need time to tenderize – such as ribs, brisket, pork shoulder, wild game, etc.

Barbecuing uses temperatures from 225

°

F to 325

°

F. Try to maintain 275

°

F for optimal results.

Use your imagination when barbecuing, as the possibilities are endless!

SLOW SMOKING

Slow smoking uses much lower temperatures and much longer cooking times. Slow smoking

is actually a way to cure meats rather than cook them. Slow smoking is ideal for turkeys,

chickens, beef briskets, cheese and sausage.

Slow smoking uses temperatures that range from 140

°

F to 225

°

F. Most slow smoking recipes

call for the use of a saline brine that helps preserve the meat and avoid bacterial

contamination during the cooking process.

Using

Using

Using

Using Charcoal

Charcoal

Charcoal

Charcoal and

and

and

and Wood

Wood

Wood

Wood

CHARCOAL

Your CHARCOAL GRILL is made to burn either charcoal briquettes or natural wood lump

charcoal – both of which have different cooking attributes. Briquettes typically provide

longer burn times than lump charcoal – but lump charcoal burns hotter than briquettes.

Using the charcoal pan access door to add more charcoal makes both briquettes and

lump easy and convenient for extended cooking times.

Summary of Contents for 58828TS

Page 1: ...urning returning returning to to to to your your your your retailer retailer retailer retailer call call call call our our our our customer customer customer customer service service service service department department department department at at at at 1 877 292 9888 1 877 292 9888 1 877 292 9888 1 877 292 9888 with with with with hours hours hours hours of of of of operation operation operation...

Page 2: ...E TABLE TABLE TABLE OF OF OF OF CONTENTS CONTENTS CONTENTS CONTENTS Safety Information 3 Parts List 4 Hardware List 9 Assembly or Installation Instructions 10 Operation Instructions 20 Care and Maintenance 24 ...

Page 3: ... of reach of children and pets store out of reach of children when not in use When moving or lifting grill use caution to avoid back strains or injuries Do not try to move or reposition grill while it is in use Don t place goods over 10kgs 22lbs on each side shelf Do not use gasoline kerosene or alcohol to light charcoal Using any of these products or similar products could cause a flare up flash ...

Page 4: ...4 PARTS PARTS PARTS PARTS LIST LIST LIST LIST A B C D E F G H I J K M N O P Q R S T U V W X Y Z A1 A2 A4 A5 A3 A6 A7 A8 A9 A10 L ...

Page 5: ... Name Part Name Picture Picture Picture Picture Qty Qty Qty Qty Parts List Parts List Parts List Parts List A 1 pc B C D E F G H I 2 pcs 1 pc 1 pc 1 pc 1 pc 2 pcs 1 pc 2 pcs Hood handle Lid Handle Base Hood Thermometer Chimney Lid Chimney Warming Rack Upper Hinge Cooking Grid ...

Page 6: ...art Name Part Name Qty Qty Qty Qty J 2 pcs K L M N O P Q R 1 pc 1 pc 2 pcs 2 pcs 2 pcs 6 pcs 1 pc 1 pc Picture Picture Picture Picture Lower Hinge Firebox Back Panel Fire Box Front Panel Door Air Vent Firebox Side Panel Hooks 3pcs Side Shelf Charcoal Pan Transmission Shaft ...

Page 7: ...rt Name Part Name Qty Qty Qty Qty S 1 pc T U V W X Y Z A1 1 pc 1 pc 1 pc 1 pc 2 pcs 1 pc 2 pcs 1 pc Picture Picture Picture Picture Right Transmission Support Left Transmission Support Left Front Leg Ash Pan Handle Left Back Leg Wheel Axle Wheel Ash Pan Ash Pan Handle Base ...

Page 8: ...e Qty Qty Qty Qty A2 1 pc A3 A4 A5 A6 A7 A8 A9 A10 2 pcs 1 pc 1 pc 1 pc 1 pc 1 pc 1 pc 1 pc Picture Picture Picture Picture Leg End Cap Bottom Shelf Right Back Leg Right Front Leg Charcoal Pan Crank Charcoal Door Handle Handle Bar Grip Charcoal Door Locking Lever Charcoal Door Handle Base ...

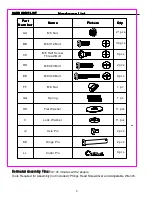
Page 9: ...wdriver and Adjustable Wrench Part Part Part Part Number Number Number Number Name Name Name Name Qty Qty Qty Qty AA 21 pcs Picture Picture Picture Picture Hardware List Hardware List Hardware List Hardware List M6 Nut BB CC DD EE FF GG HH II JJ KK LL M6X12 Bolt M6 Half Screw Thread Bolt M6X20 Bolt M6X40 Bolt M8 Nut Spring Flat Washer Lock Washer Hinge Pin Axle Pin Cotter Pin 34 pcs 8 pcs 2 pcs 8 ...

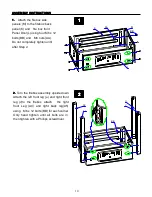
Page 10: ...nt Panel Door L using four M6 x 12 bolts BB and M6 nuts AA Do not completely tighten until after Step 2 2 2 2 2 Turn the firebox assembly upside down Attach the left front leg u and right front leg v to the firebox attach the right front Leg A4 and right back leg A5 using M6 x 12 bolts BB for each corner Only hand tighten until all bolts are in then tighten with a Phillips screwdriver 1 1 1 1 2 2 ...

Page 11: ... BB A2 A3 W X LL 3 3 3 3 Attach the bottom shelf A2 to all 4 legs using 4 M6 x 12 bolts BB and tighten 4 4 4 4 Slide the wheel axle W through the holes on the legs Attach the wheels X onto the ends of the wheel axle W using 2 cotter pins LL Put the leg end cap A3 on the legs 3 3 3 3 4 4 4 4 ...

Page 12: ...se A9 and charcoal door handle A8 to the charcoal door attached to the firebox front panel L using M6 nut AA flat washer HH and lock washer II Be sure that the handle and locking lever are in the correct positions handle pointing down level pointing up before fully tightening 6 6 6 6 Install the air vents N to both of the side firebox side panels M using M6 nuts AA M6 x 12 bolts BB flat washers HH...

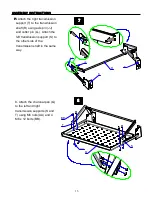
Page 13: ...the right transmission support T to the transmission shaft R using axle pin JJ and cotter pin LL Attach the left transmission support S to the other side of the transmission shaft in the same way 8 Attach the charcoal pan Q to the left and right transmission supports S and T using M6 nuts AA and 4 M6 x 12 bolts BB 7 7 7 7 8 8 8 8 ...

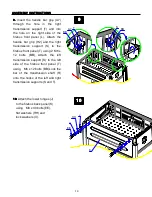
Page 14: ... A7 through the hole in the right transmission support T and into the hole on the right side of the firebox front panel L Attach the handle bar grip H2 and the right transmission support S to the firebox front panel T using 2 M6 x 12 bolts BB Attach the left transmission support S to the left side of the firebox front panel T using M6 x 12 bolts BB Lock the bar of the transmission shaft R onto the...

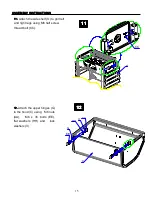
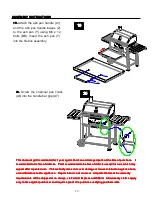
Page 15: ...TRUCTIONS O CC AA II HH EE C G 1 1 1 11 1 1 1 Attach the side shelf O to grill left and right legs using M6 half screw thread bolt CC 1 1 1 12 2 2 2 Attach the upper hinges G to the hood C using M6 nuts AA M6 x 35 bolts EE flat washers HH and lock washers II 11 11 11 11 12 12 12 12 ...

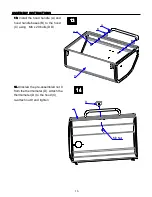
Page 16: ... INSTRUCTIONS 1 1 1 13 3 3 3 Install the hood handle A and hood handle bases B to the hood C using M6 x 20 bolts DD 1 1 1 14 4 4 4 Unscrew the pre assembled nut 9 from the thermometer D Attach the thermometer D to the hood C re attach nut 9 and tighten 13 13 13 13 14 14 14 14 D C M9 Nut ...

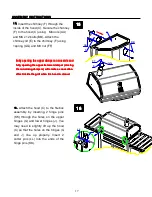
Page 17: ...of the hinge pins KK 15 15 15 15 16 16 16 16 KK LL Fully Fully Fully Fully opening opening opening opening the the the the upper upper upper upper damper damper damper damper on on on on one one one one side side side side and and and and fully fully fully fully opening opening opening opening the the the the opposite opposite opposite opposite lower lower lower lower damper damper damper damper c...

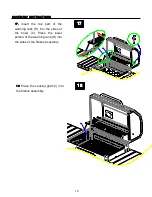
Page 18: ... INSTRUCTIONS H I 1 1 1 17 7 7 7 Insert the top part of the warming rack H into the sides of the hood C Place the lower portion of the warming rack H into the sides of the firebox assembly 17 17 17 17 1 1 1 18 8 8 8 Place the cooking grids I into the firebox assembly 18 18 18 18 ...

Page 19: ... repeated repeated use use use use This This This This warranty warranty warranty warranty does does does does not not not not cover cover cover cover damage damage damage damage or or or or issues issues issues issues related related related related to to to to neglect neglect neglect neglect abuse abuse abuse abuse or or or or modifications modifications modifications modifications to to to to t...

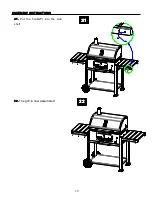
Page 20: ...0 ASSEMBLY ASSEMBLY ASSEMBLY ASSEMBLY INSTRUCTIONS INSTRUCTIONS INSTRUCTIONS INSTRUCTIONS 21 21 21 21 Put the hooks P into the side shelf 21 21 21 21 P 22 22 22 22 The grill is now assembled 22 22 22 22 ...

Page 21: ...L GRILL as well as all of the butterfly dampers Remove the cooking grates Add charcoal Do not put more than 6 pounds of charcoal briquettes or 3 pounds of lump charcoal into the pan Lower the adjustable charcoal pan to its lowest setting use charcoal lighter fluid to start the fire following directions supplied by the manufacturer of the lighter fluid Allow the charcoal enough time to completely a...

Page 22: ...per closing the remaining damper will create a convection effect inside the grill when hood is closed This will allow for extended cooking times when barbecuing The adjustable charcoal grate can also be used to control the temperature Raise it to its highest setting for quick searing and lower it to its lowest setting for slow cooking Adding Adding Adding Adding Additional Additional Additional Ad...

Page 23: ...es and longer cooking times this method works best for cuts of meat that need time to tenderize such as ribs brisket pork shoulder wild game etc Barbecuing uses temperatures from 225 F to 325 F Try to maintain 275 F for optimal results Use your imagination when barbecuing as the possibilities are endless SLOW SMOKING Slow smoking uses much lower temperatures and much longer cooking times Slow smok...

Page 24: ...red Green wood still contains all the sap and moisture needed to keep the tree alive and will impart a super strong tasting smoke that will turn your foods black Also when you try burning green wood it is hard to reach a good temperature because all the moisture inside the wood almost puts the fire out while it s burning Well cured wood lights easily maintains cooking temperature and produces a gr...

Page 25: ...he grill is used Make sure coals are completely extinguished and the grates are cooled down before cleaning inside of the unit To remove the stains on the lid and front panel caused by the fumigation while grilling use of a cleaning pad is recommended Wipe out the interior of unit with cloth or paper towel Clean the grates with warm water and pat dry The coating is fragile Do not knock hit or drop...

Reviews: