9
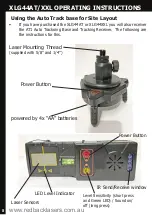
First insert batteries in both the motorised base and receiver. Next
determine which thread fits the laser you are using and screw it into the
base of the laser. The laser can now be mounted onto the motorised base
and the locking nut tightened.
The motorised base is powered up by pressing the power button on one of
its corners and the red LED should indicate it is powered up. Next power
up the required vertical laser lines on your laser as per the instructions for
your laser. Also put your laser into outdoor pulse mode.
Next power up the tracking receiver by pressing the red power button on
the receiver. The receiver will now operate like a standard line receiver
picking up both the horizontal line when up right and vertical lines when
the receiver is placed on its side. For vertical auto alignment whilst using
the rotating base the receiver needs to be on its side.
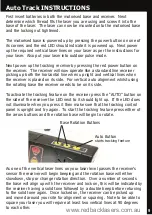
To activate the tracking feature on the receiver press the “AUTO” button on
the side of the receiver the LED next to it should light up. If the LED does
not illuminate when you press it then make sure that the tracking control
panel is upright and try again. To start the tracking feature press either of
the arrow buttons and the rotation base will begin to rotate.
Auto Track INSTRUCTIONS
Auto Button
starts tracking feature
Base Rotation Buttons
www.redbacklasers.com.au
IR Send/Receive window
As one of the vertical laser lines on your laser level passes the receiver’s
sensor the receiver will begin beeping and the rotation base will either
slowdown, stop or change rotation direction. Over a number of seconds
the base will align up with the receiver and lock on, this will be indicated by
the receiver having a solid tone followed by a double beep before returning
to the solid tone again. Once locked on, the receiver can be picked up
and moved around your site for alignment or squaring. Note to be able to
square your laser you will require at least two vertical lines at 90 degrees
to each other.
Summary of Contents for XLG44
Page 1: ......


