background image


11

with  a  vacuum  cleaner.  For  long  battery  life,  keep  the  UPS  at  an  ambient 
temperature of 25°C (77°F) 


1.3.2 Storing the UPS and Batteries 

When  the  UPS  is  intended  to  store  for  a  long  period,  recharge  the  battery 
every 6 months by connecting the UPS to utility power. The batteries charge to 
90% capacity in approximately 4 hours. However, it is recommended that the 
batteries charge for 48 hours after long-term storage. 

1.3.3 Time to Replace Batteries 

When the discharging time is less than 50% of specified after full charged, the 
battery  may  need  to  be  replaced.  Please  check  the  battery  connection  or 
contact your local dealer to order new battery. 


WARNING:


Turn off the UPS and disconnect the utility power cord from the wall outlet. 


Servicing  should  be  performed  by  qualified  service  personnel 
knowledgeable  of  batteries  and  required  precautions.  Keep  unauthorized 
personnel away from batteries   


Batteries  can present  a  risk  of  electrical  shock or  burn  from high  short 
circuit current. The following precautions should be observed: 

1. Remove watches, rings, or other metal objects. 
2. Use tools with insulated handles. 
3. Do not lay tools or metal parts on top of batteries. 
4. Wear rubber gloves and boots.   
5.  Disconnect  the  charging  source  prior  to  connecting  or  disconnecting 

battery terminal. 


When  replacing  batteries,  replace  with  the  same  type  and number  of 
batteries  or  battery  packs.  Contact  your  service  representative  to  order 
new batteries. 


Do not dispose of battery in a fire. Batteries may explode when exposed to 
flame. 


Proper  disposal  of  batteries  is  required.  Refer  to  your  local  codes  for 
disposal requirements. 


Do not open or mutilate the battery. Released toxic electrolyte is harmful to 
skin and eyes. 


www.redeal.pt

sales@redeal.pt

Summary of Contents for AP160N

Page 1: ...USER MANUAL On Line UPS Model AP160N 1000VA 2000VA 3000VA Uninterruptible Power Supply System ReDeal www redeal pt sales redeal pt...

Page 2: ...Connection 19 5 3 Battery charge 21 5 4 Turn on the UPS 21 5 5 Test function 21 5 6 Turn off the UPS 22 5 7 Audible alarm mute function 22 5 8 Operation procedure of external battery for long backup t...

Page 3: ...ent 33 10 3 Typical backup time Typical values at 25 C in minutes 33 10 4 Dimensions and weights 34 11 Communication Port 34 11 1 RS 232 and USB communication ports 34 11 2 RS 232 port 35 11 3 USB por...

Page 4: ...to close to the UPS With the installation of the equipment the sum of the leakage current of the UPS and the connected load does not exceed 1 5mA Do not block ventilation openings in the UPS s housing...

Page 5: ...the instruction for Tower Setup and Rack Mount Setup Tower setup This series of UPS can be placed horizontally and vertically As a tower configuration it is provided with the optional UPS stands to s...

Page 6: ...e rack rail and lock it in the rack enclosure 4 Tighten the screw and the load can then be connect 1 1 4 EBM Installation Optional Connecting the EBM in Tower form 1 Slide down the UPS and EBM vertica...

Page 7: ...6 on side of the front panel to allow the outlet wire of the EBM to pass through the gate and then reassemble front panel B A C B A www redeal pt sales redeal pt...

Page 8: ...the small gate C on side of the front panel to allow the outlet wire of the EBM to pass through the gate and then reassemble front panel 5 After installing the UPS into rack the load can then be conn...

Page 9: ...outlet wire of the EBM to pass through the gate and then reassemble front panel Connecting the Multiple EBMs in rack form 1 Connect Earth line between UPS and the first EBM and then connect Earth Line...

Page 10: ...and of all connected loads The UPS features its own internal current source batteries You may be electric shock when you touch the UPS output sockets or output terminal block even if the UPS is not c...

Page 11: ...ardous voltages may occur between the battery terminals and the ground Verify that no voltage is present before servicing Batteries have a high short circuit current and pose a risk of shock Take all...

Page 12: ...alified service personnel knowledgeable of batteries and required precautions Keep unauthorized personnel away from batteries Batteries can present a risk of electrical shock or burn from high short c...

Page 13: ...nd battery pack 4 Remove the right inner battery bracket 5 Pull the battery pack out onto flat area 6 Install new battery pack into UPS 7 Screw up the battery bracket and reconnect the battery cable A...

Page 14: ...attery pack and batteries into the trash bin Please follow your local laws and regulations you may contact your local recycling waste management center for further information to dispose properly of t...

Page 15: ...rent IEC EN 61000 3 2 Voltage Fluctuation and Flicker IEC EN 61000 3 3 EMS ESD IEC EN 61000 4 2 Level 3 RS IEC EN 61000 4 3 Level 3 EFT IEC EN 61000 4 4 Level 4 SURGE IEC EN 61000 4 5 Level 4 CS IEC E...

Page 16: ...scription of Commonly Used Symbols Some or all of the following symbols may be used in this manual It is advisable to familiarize yourself with them and understand their meaning www redeal pt sales re...

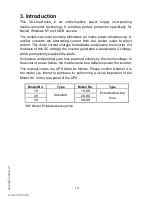
Page 17: ...he inverter On the basis of this DC voltage the inverter generates a sinusoidal AC voltage which permanently supplies the loads Computers and periphery are thus powered entirely by the mains voltage I...

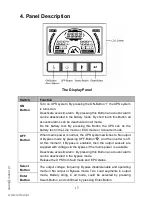
Page 18: ...al the UPS system switches to No output or Bypass mode by pressing OFF Button and the inverter is off At this moment if Bypass is enabled then the output sockets are supplied with voltage via the bypa...

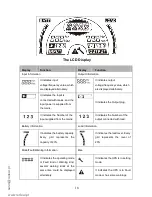
Page 19: ...e Number of the input supplied from the mains It indicates the Number of the output connected with load Battery Information Load Information It indicates the battery capacity Every grid represents the...

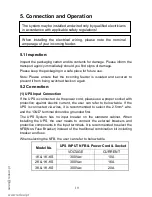
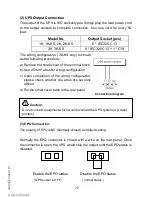
Page 20: ...select the 2 5mm 2 wire and the GND terminal should be grounded first The UPS System has no input breaker on the standard cabinet When installing the UPS the user needs to connect the external breake...

Page 21: ...ing configuration c Upon completion of the wiring configuration please check whether the wires are securely affixed d Put the small cover back to the rear panel 3 EPO Connection The polarity of EPO is...

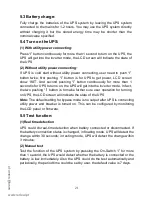
Page 22: ...into the inverter mode In fact the two pushing I button is to make further sure user operation for turning on UPS the LCD screen will indicate the state of the UPS Note The default setting for bypass...

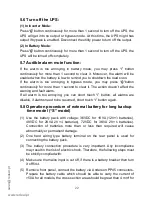
Page 23: ...annoying you can short touch I button all alarms are disable if alarms need to be resumed short touch I button again 5 8 Operation procedure of external battery for long backup time model S model 1 Us...

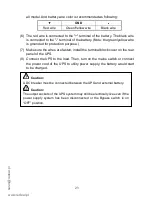
Page 24: ...are fasten install the terminal block cover on the rear panel of the UPS 8 Connect the UPS to the load Then turn on the mains switch or connect the power cord of the UPS to utility power supply the ba...

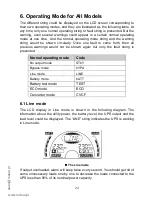
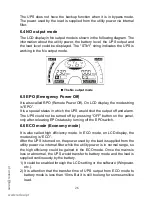
Page 25: ...ld not be shown again but only the fault string is presented Normal operating mode Code No output mode STbY Bypass mode bYPA Line mode LINE Battery mode bATT Battery test mode TEST ECO mode ECO Conver...

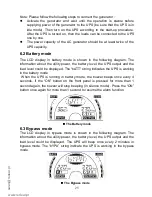
Page 26: ...vel the UPS output and the load level could be displayed The bATT string indicates the UPS is working in the battery mode When the UPS is running in battery mode the buzzer beeps once every 4 seconds...

Page 27: ...could not be turned off by pressing OFF button on the panel only after releasing EPO status by turning off the EPO switch 6 6 ECO mode Economy mode It is also called high efficiency mode In ECO mode o...

Page 28: ...the battery 1 It could be enabled through the LCD setting or the software Winpower etc 2 The load should be derating to 70 in converter mode 6 8 Abnormal mode In abnormal mode such as Bus fault etc t...

Page 29: ...press the Enter button for more than one second a flickering string 208 would be shown if the Enter button is pressed again the string 208 turn to flickerless the output volt is changed to 208V if th...

Page 30: ...means load segment 1 off 001 means load segment 1 on Load segment 2 is the same as Load segment 1 Here is a example for changing the Operating mode from normal mode to converter mode through the LCD...

Page 31: ...voltage Check building wiring socket outlet and input cable Display Mode string STbY in LCD even though the power supply is available Inverter not switched on Press On Switch I Display Mode string bAT...

Page 32: ...t start UPS internal fault Notify dealer Inverter fault Low high soft start UPS internal fault Notify dealer Over temperature fault Over temperature Check the ventilation of the UPS check the ambient...

Page 33: ...t recommends to shut off the UPS completely before the replacement If there is a battery breaker then turn it off first Disconnect the battery cable carefully and make sure no any exposed wires can be...

Page 34: ...7KW Voltage 208 220 230 240 1 1 VAC Frequency 50 60 0 2 Hz Battery mode Wave form sinusoidal BATTERIES Model No 1K 2K 3K Number and type 3 12V 7Ah 4 12V 9Ah 6 12V 9Ah 10 2 Operating Environment Ambien...

Page 35: ...a computer connect a computer to one of the UPS communication ports by using an applicable communication cable NOTE Only one of the communication ports can be active at one time The USB port has prior...

Page 36: ...l device In 4 Unused Not applicable 5 GND Signal common tied to chassis Not applicable 6 Unused Not applicable 7 Unused Not applicable 8 Unused Not applicable 9 Unused Not applicable 11 3 USB port The...

Page 37: ...bay 2 Remove the two screws that secure the communication bay cover to the UPS and save the screws 3 Insert the Serial Network Management Card into the slot on the UPS 4 Secure the Serial Network Mana...

Page 38: ...same LAN no matter how far from the UPSs Installation procedure 1 Go to the website http www ups software download com winpower htm 2 Choose the operation system you need and follow the instruction de...

Page 39: ...shown as below 1K 2K Standard 1K KS rear panel 2K KS rear panel No Function 1KVA 2KVA 3KVA 1 AC Output 2 EPO Dry input Communication Port 3 USB Port 4 AC Input 5 Dry out 6 SNMP slot 7 RS232 8 Modem Ne...

Page 40: ...del rear panel 3K KS model rear panel The EBM rear panel description table and picture are shown as below 36V 48V 72V EBM rear panel 614 03804 00 No Function 36V 48V 72V EBM 1 Earth Line Port www rede...

Reviews: