background image


11


3.0  THE POWER TAKE-OFF (PTO) 


The PTO is a very important component. It takes care of the drive of the tractor and of a safe 
use of the machine, provided it is installed and maintained in the correct manner. The PTO 
has its own CE certification. Read the PTO manual. This manual is located on the PTO.


Figure 7 

3.1 

LENGTH OF THE PTO 


The length of the PTO is very important. If it is too long, it can damage the drive of the tractor and/or 
the Extreme Clean II. If the overlapping length of the cylinders becomes less than 150 mm (6

) at 

any time, it can damage the PTO.


The length changes when the machine is lifted or when a different tractor is used! 

In order to set the PTO on the correct length, when a new one has been purchased or when a 
different tractor is used, follow these steps: 

(see Figure 7)


1.  Measure the distance between the PTO’s connection to the tractor and to the Extreme Clean II, 

from groove to groove, when the machine is connected to the tractor and positioned on the 
ground at the right angle. 

2.  Measure the distance B of the PTO in its shortest position from the locking pin to the locking bolt. 

3. 

Divide the PTO in two parts and remove the protection cap at both ends. 


4.  The ends of the cylinders and the ends of the protection caps must be made shorter: (B-A) + 75 

mm (3”). 

5.  Smooth off all components, use some grease, and then assemble all components. 
6.  Mount the PTO on the side of the Extreme Clean II. 
7.  Attach the other end of the PTO to the tractor. 
8.  Check the overlap of the cylinders. 

Never use the machine if it has a damaged PTO protection cap. First remove any 
damaged parts.


Summary of Contents for Extreme Clean II 1200

Page 1: ...ER TO USE THE MACHINE SAFELY AND TO OBTAIN THE BEST RESULTS 1507 English 942 120 002 Kwekerijweg 8 3709JA Zeist The Netherlands T 31 306933227 F 31 306933228 E verti drain redexim com www redexim com...

Page 2: ...his user manual lists many instructions that are numbered in sequence You should follow this sequence A is an indication of a safety instruction A means a tip and or note All information and technical...

Page 3: ...es 2 The Extreme Clean II is manufactured according to the latest technical understanding and is safe to use When unskilled people use maintain or repair the machine this could result in injuries to t...

Page 4: ...resent you should always make it pressure free before working on this installation NEVER use the Extreme Clean II in the absence of safety stickers NEVER crawl under the Extreme Clean II If necessary...

Page 5: ...e functions and control elements of the Extreme Clean II before starting any work activities Attach the Extreme Clean II to the towing vehicle according to the regulations Danger of injuries Check whe...

Page 6: ...e permitted lifting capacity of the towing vehicle Dress appropriately Wear sturdy shoes with steel toecaps long trousers and tie up long hair Do not wear loose clothing Figure 5 7 Location of the saf...

Page 7: ...under our own responsibility that the product OVERSEEDER WITH MACHINE NUMBER AS STATED ON THE MACHINE AND IN THIS MANUAL to which this statement relates is in accordance with the provisions of the Mac...

Page 8: ...H OF THE PTO 11 3 2 USE OF THE PTO 12 4 0 ATTACHING THE MACHINE TO THE TRACTOR 12 5 0 ADJUSTING THE FORCEFULNESS OF THE MACHINE 13 6 0 TRANSPORTING THE EXTREME CLEAN II 13 7 0 DRIVING SPEED 13 8 0 OPE...

Page 9: ...lifting balls 250 kg 441 lbs 350 kg 551 lbs Maximum capacity Theoretical at maximum speed of 12 km h 7 5mph 9906 m2 h 106627 ft2 h 14742 m2 h 158681 ft2 h Transport dimensions L x W x H 1200 x 1360 x...

Page 10: ...pter 1 0 Technical Data for the weight details 2 Attach a cable to the lifting eye 2 3 Lift the machine approx 10mm 0 25 and remove pins 3 and 4 4 Lift the machine including the pallet of approx 50 mm...

Page 11: ...n a new one has been purchased or when a different tractor is used follow these steps see Figure 7 1 Measure the distance between the PTO s connection to the tractor and to the Extreme Clean II from g...

Page 12: ...re tight Check whether all safety stickers are present on the machine and are not damaged NEVER use the machine without these items Figure 8 The Extreme Clean II can be attached to the tractor by mean...

Page 13: ...Clean II A higher speed can be dangerous for the driver and or the public and can even damage the machine When the machine is raised off the ground the front axle of the tractor has to support minimu...

Page 14: ...tractor is blocked well and cannot move on its own accord Switch off the tractor before descending 3 Allow the machine to sink until it is standing with the wheels on the ground 4 Adjust the forceful...

Page 15: ...h off the tractor before descending 2 Carefully lower the Extreme Clean II to the ground 3 Adjust the height so that the machine is standing only on its wheels and not on the brush hairs 4 Release the...

Page 16: ...chains tension is not correct Chains sprockets are worn out Adjust the chain tension Replace the chains sprockets 12 0 MAINTENANCE Time schedule Check Grease point Method Before every use Check for l...

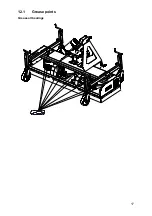
Page 17: ...17 12 1 Grease points Grease all bearings...

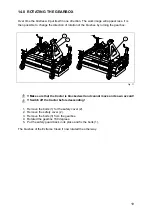
Page 18: ...ed out as follows Make sure that the Turf Stripper is blocked well and cannot move on its own accord Make sure that the PTO is detached from the Turf Stripper 1 Remove the safety guard 1 2 Check the t...

Page 19: ...e gearbox Fig 11 Make sure that the tractor is blocked well and cannot move on its own accord Switch off the tractor before descending 1 Remove the bolts 1 for the safety cover 2 2 Remove the safety c...

Reviews: