background image

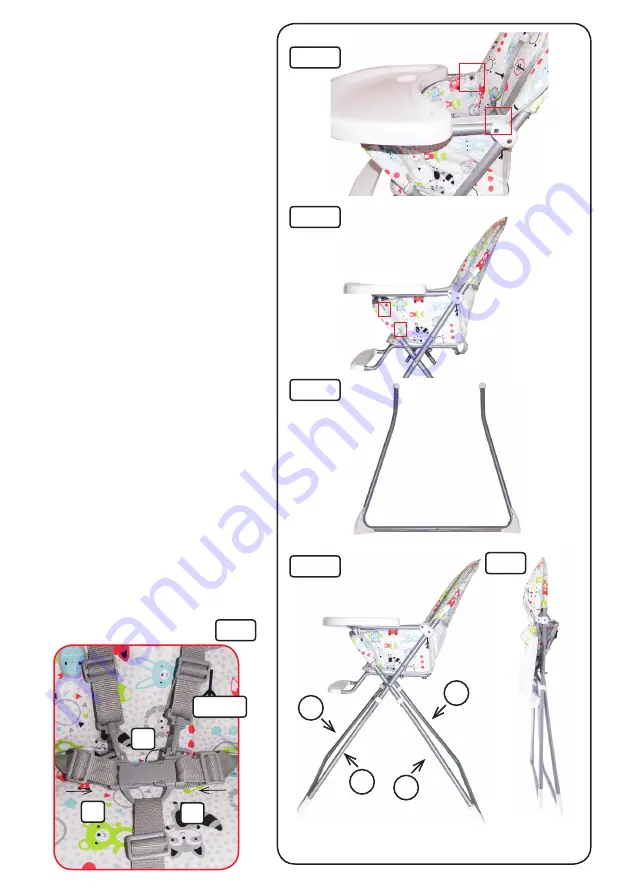
With the cover pulled all the way on to the 
frame, secure in place with the press studs.  
There are two inside the frame Fig 3a and four 
on the outside of the frame. 
Fig 3b

Match up the corresponding letters on the 
legs, slot both sets of legs together Fig 4a and     
connect them to the main frame.
Fig4b

NOTE. The rear legs are longer in length and 
narrower at the top to the front legs. Please 
ensure the correct lengths are assembled     
together.  The front legs have ‘A’ printed on 
them and the rear legs have ‘B’ printed.      

To fold the highchair, undo the strap under the 

tray and firmly lift the tray up and slide the legs 

together.  Please ensure the correct lengths 
are assembled together. 
Fig 5

To secure and adjust the harness
To secure your child in the harness, push the 
buckle prongs (A) + (B) into the buckle  housing 
(C) until they snap into position.  Adjust sliders to 

ensure a snug fit for your child.  Repeat for the 

other side and also for the shoulder straps. 
Fig 6

IMPORTANT! Always use the restriant 
system.

Fig 3a

Fig 3b

Fig 4a

Fig 4b

Fig 5

Fig 6

c

slider

a

b

A

B

B

A

Summary of Contents for Feed Me Compact

Page 1: ... Your child s safety may be affected if you do not follow these instructions Instruction Leaflet Feed Me Compact This product is intended for children able to sit up unaided and up to 3 years or a maximum weight of 15 kg Complies with BS EN 14988 2017 A1 2020 Customer Care Line 01454 326 568 Other colours available ...

Page 2: ...ap around the bar and secure with the press stud Fig 1c Slot the seat support bar on to the back of the frame Ensure the spring clips have come all the way through the holes Fig 2 Parts list 1 Main frame including tray seat cover and seat support bar 2 Front legs x 2 3 Rear legs x 2 Fig 1b Fig 2 3 2 1 Push down Clamp Clamp Strap Fig 1c Fig 1a ...

Page 3: ...ed together The front legs have A printed on them and the rear legs have B printed To fold the highchair undo the strap under the tray and firmly lift the tray up and slide the legs together Please ensure the correct lengths are assembled together Fig 5 To secure and adjust the harness To secure your child in the harness push the buckle prongs A B into the buckle housing C until they snap into pos...

Page 4: ...ed and adjusted WARNING Be aware of the risk of open fire and other sources of strong heat such as electric bar fires gas fires etc in the vicinity of the highchair Never place the highchair near these items Falling hazard Prevent your child from climbing on the product Be aware of the risk of tilting when your child can push its feet against a table or any other structure Keep children away when ...

Reviews: