background image

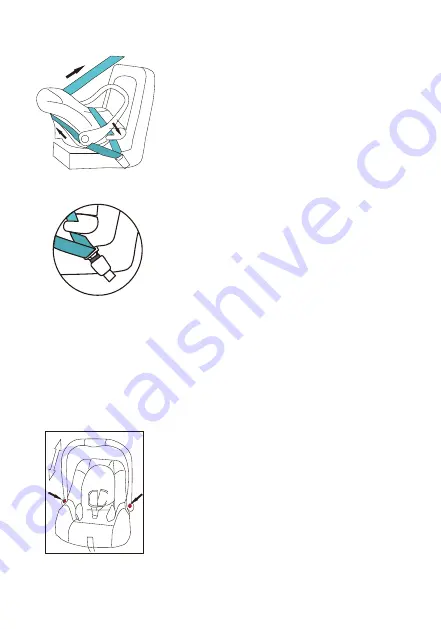
Fig.5

Fig.4

Step 4. 
Tighten the vehicle's own 
3-point seat belt by pulling hard
on the positions show

n.  Fig 4.

Step 5. 

Ensure all straps and buckles are 

located and adjusted correctly. Fig 5.

You 

can contact

 the child car seat manufacturer 

if in doubt  about this point.

Make sure all the belts position is right and they have not become 
twisted. Also check that the cover is not impeding the movement 
or 

t of the belt webbing in any way.

To release your baby car seat following the above instructions in 
reverse order.

Handle adjustment

The handle for the baby car seat can be 
snapped into 4 positions. To adjust the 
handle, press the red buttons of the 
handle on both side

at the same time


and adjust to required position.

Summary of Contents for Savanna

Page 1: ...04 Universal Customer Care Line 01454 326 568 IMPORTANT Read these instructions carefully before use and keep them for future reference Your child s safety may be affected if you do not follow these...

Page 2: ...ty seat in the case of accidents Do not use installation methods different from those indicated This would result in the risk of detachment from the seat Car safety seat group 0 Universal approved und...

Page 3: ...in the safety seat It is advisable to seek medical advice before leaving the hospital Do not use accessories not approved by the manufacturer or by the competent authorities To avoid the risk of falli...

Page 4: ...urning the child 11 In the event of an emergency it is important that the child can be released quickly This means that the buckle is not fully tamperproof and therefore your child should be persuaded...

Page 5: ...on in the car This car seat is not suitable for a car that that has only a lap belt handle adjuster cover shoulder straps adjuster Handle headrest pad buckle buckle pad Strap comfort pad shoulder pad...

Page 6: ...Step 2 Pull out the buckle tongues from the chest pad and the slots on the cover and the shell then thread them into the corresponding belt slots Ensure that both ofthe shoulder belts go through slots...

Page 7: ...the buckle connectors together Fig 2 Slot the two buckle connectors into the slot in the top of the buckle until they click into place Check the harness is correctly locked by pulling the shoulder st...

Page 8: ...point vehicle belt The baby car seat must be installed rearward facing Fig 1 Step 1 Adjust the handle to the forward position Handle must be rmly against the backrest of car s seat Step 2 Slide the l...

Page 9: ...point Make sure all the belts position is right and they have not become twisted Also check that the cover is not impeding the movement or t of the belt webbing in any way To release your baby car se...

Page 10: ...ight up for carrying Position three Handle clicked back to initiate the rocking feature Position four Down to support baby for feeding and play Ensure that the handle is locked in a position the harne...

Page 11: ...rts periodically with a damp cloth Do not use solvents or similar substances Brush the fabric parts to remove dust Do not clean the polystyrene shock absorbing device with solvents or other similar pr...

Page 12: ......

Reviews: