Motion
Meter
High Speed Video Camera
_____________________________________________________________________________
9400-0024 Rev. G
4-1
OPERATOR'S INSTRUCTIONS
4 RECORDING AND VIEWING IMAGES
4.1 Recording an Event Sequence
The camera should be in Live mode with the live image showing in the viewfinder and the
external monitor.
4.1.1
Camera Defaults
When you turn the camera on for the first time, the menus show these default values:
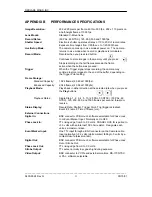
Record Rate: 60 fps. Shutter: 1X. Trigger Point: 100%. Event No: 0000.
If you change these values, the camera retains the new values when it is turned off. To return to
the default values, press the + and – buttons together.
4.2 Setting up the Camera to Record
4.2.1
Set the Record Values.
Use the Menu button to select the Live mode screen. Press the SELect button to step to the next
menu item. Press the + or - button to select the record value from the range shown.
4.2.1.1
Event.
This button displays the current event number. The event counter automatically increments by
one each time you record an event. Change the values with the + or – buttons, or reset the
counter to 0000 by pressing the + and - buttons simultaneously. (This also resets other values;
refer to paragraph 4.1.1 above.)
4.2.1.2
Record Rate.
Select the Live mode menu. The menu shows the current rate set, and gives the range of values
available to your camera model. Press the + or – buttons to set a new record rate. Refer to
Appendix A for record times.
4.2.1.3
Shutter.
The Live menu shows the current shutter speed. Select the menu and press the + or – buttons to
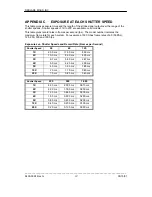
set a new shutter speed. The menu shows the shutter speeds available. Refer to Appendix C for
details of shutter speeds.
4.2.1.4
Trigger.
The button shows the current Trigger setting.
1. To see the images before the event, set the Trigger to 100%. To see images before and
after the event, set the Trigger to 10% to 90%, depending on the number of before and after
pictures you want. 10% means that you will see 10% of the sequence before the event and
90% after the event. Select 0% to see only the frames after the event. Refer to 1.6.2.
2. Select a rising or falling Trigger Signal, depending on the type of signal to be received. Step
to the next record rate range, up or down, to reverse the up or down triangle.
4.2.1.5
Event Marker Input.
Call up the Settings menu and, in the Digital In space, select Event Marker. This selects and
enables the Event Marker function.
4.3 Recording an Event Sequence
When the parameters have been set, you are now ready to record. The camera should be in Live
mode with the live image showing in the viewfinder and monitor.


