16
6. Set up
(EX-PS only)
(1)
(2)
(3)
(4)
(5)
EX-PS
SE1
EX-PS
SE2
EX-PS
SE3
■
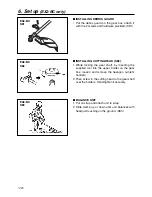
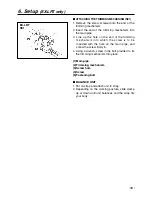
ATTACHING THE PRUNING MECHANISM (SE1)
1. Remove the cap on the end of the main pipe.
2. Remove the screw screwed into the end of the
gear case.
3. Insert the end of the gear case into the main
pipe.
4. Line up the hole on the end of the gear case into
which the screw is to be inserted with the hole
on the main pipe, and screw the screw firmly in.
5. Using a wrench, screw in the bolt provided to fix
the mechanism into place.
(1) Main pipe
(2) Gear case
(3) Screw hole
(4) Fastening bolt
(5) Bolt
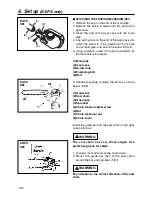
A standard package contains the items as shown
below. (SE2)
(1) Guide bar
(2) Saw chain
(3) Gase case
(4) Sprocket
(5) Chain tension adjust screw
(6) Nut
(7) Chain tensioner nut
(8) Chain cover
Install the guide bar and the saw chain on the gear
case as follows.
The saw chain has very sharp edges. Use
protective gloves for safety.
1. Loosen a nut and remove the chain cover.
2. Mount the guide bar then fit the saw chain
around the bar and sprocket. (SE3)
Pay attention to the correct direction of the saw
chain
WARNING
WARNING
Summary of Contents for EXtreme EX-HE
Page 46: ...12 Parts list 46 Fig 1 EXZ PU S N 60300000 and up...
Page 48: ...12 Parts list 48 Fig 2 EX2 BC S N 50200000 and up...
Page 50: ...Fig 3 ENGINE UNIT 60100000 and up 50 12 Parts list...
Page 52: ...12 Parts list 52 Fig 4 EX LRT S N 000531 and up...
Page 54: ...12 Parts list 54 Fig 5 EX PS S N 000000 and up...
Page 56: ...12 Parts list 56 Fig 6 EX HE S N 000101 and up...

